New Guy from Idaho, future camper build

fisher205

Explorer
Nice work on your camper. It's been fun to watch your ideas evolve on line. I have to say you caught on to Google sketch way faster than I did. Nice work.
-BRad
 

63tlf8

Observer
The lightest wall I've come up that is affordable is a 0.04" FRP sheet with a 3lbs per cu ft structural foam. That is $15/sq ft for a 1.75" thick foam wall with a weight of about 1.04 lbs/sq ft plus glue. I found a carbon fiber skinned foam board that is much lighter, but at $1000 for 8 sq ft it is unaffordable.

This is my design as it looks now. The box in the pictures is not quite as wide as I'm currently planning. It is also drawn with 1" thick walls versus 1.75" thick ones.

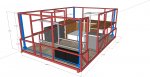
Corner construction detail:
Corner-detail.jpg

The red sliders will be thinner or absent. Orange is foam, but 1" rather than the 1.75" I'm leaning towards using now. The aluminum corner pieces will be bonded to the panels with auto body adhesives or VHB tape. The outer frames will be welded together at the corners. The inner angle pieces will just be fitted and glued in place. The angles are architectural profile 2"x2"x1/8" aluminum. The curved outer piece is formed by bending 1/8" aluminum plate. The lighter foam at the corner is low expansion window sealing foam from those cans. I'll need to use a longer straw, but that is doable. It will be done after the inner angle is glued and setup. Some conduits will be in there for wiring for side marker lights. At 80" wide it just trips truck marking regulations for USA and Canada.

Even with all this lightening work I'm still looking at 475 to 500 lbs for the box. The interior is 6'9" long and 6' wide. When the top is up it is 6'2" high inside. I'm feeling a bit frustrated as the window I want to use has a frame about 2" thick so I had to go to 1.75" thick walls for it. I was originally looking at 1" thick walls.

Hi Bogo,

Interesting how many come up with almost identical concepts completely independently. I'm half way through my construction and it bears quite a resemblance to yours, although it is going on a 404 UNIMOG. Looks like you are going through the same iterations as I did with windows and so on.

I have plenty of spare weight capacity so I went for steel framed lower and GRP over honeycomb for the upper section. The box is 3 Mtr x 2 Mtr. Walls are 30mm lower and 20mm upper. The weight will be some 500 Kg all up with all interior storage, tanks, batteries etc plus actual water, food and clothes. About twice your weight but with a 1500 Kg payload there is plenty in reserve. I'm using GRP bonding angles and epoxy adhesive for joining the corners of the the upper section.

Good luck with your build.

Tony
 

Attachments

  • Camper as_built12.jpg
    Camper as_built12.jpg
    592.7 KB · Views: 271
  • sliding roof.jpg
    sliding roof.jpg
    90.9 KB · Views: 241

IdaSHO

IDACAMPER
Thanks for all the responses guys. It really helps to keep the gears turning :ylsmoke:

As for this build...

Im getting there. And with the help of Sketchup, proper planning shouldnt be problem!

This is the right side wall framing. Using lightweight sheetmetal steel studs, 1.5"x5.5" I can get them for cheap at work. They are basically a C-channel steel, in various gauges.

Joints will more than likely be welded and/or pop riveted.

This is shown utilizing a 16" OC rivet frequency for attaching the skin. :chef:

CamperSketch08.jpg
 
Last edited:

IdaSHO

IDACAMPER
And the last bit done before heading to bed.

The skeleton is done.

Complete with framed in outside access points, main entry door.

Exact window locations are yet to be determined. And since I have moved the sleeping area to above the cab, we now have the option of using the pass-thru rear window on the pickup to gain entry to the camper. :coffeedrink:

I realize that this may be a bit heavy for a true exp-camper, but this truck has a very good payload capacity, and I would much rather this camper be very strong and a bit heavy, than brittle.

Im shooting for a wet weight of 1500 lbs at this point.

CamperSketch09.jpg
 
Last edited:

Bogo

Adventurer
Hi Bogo,

Interesting how many come up with almost identical concepts completely independently. I'm half way through my construction and it bears quite a resemblance to yours, although it is going on a 404 UNIMOG. Looks like you are going through the same iterations as I did with windows and so on.

I have plenty of spare weight capacity so I went for steel framed lower and GRP over honeycomb for the upper section. The box is 3 Mtr x 2 Mtr. Walls are 30mm lower and 20mm upper. The weight will be some 500 Kg all up with all interior storage, tanks, batteries etc plus actual water, food and clothes. About twice your weight but with a 1500 Kg payload there is plenty in reserve. I'm using GRP bonding angles and epoxy adhesive for joining the corners of the the upper section.

Good luck with your build.

Tony

My design is somewhat off of Sönke's hard-side popup camper. I had originally rejected the idea due to weight before I saw his. After exploring a few other ideas I am now back to the design again, but this time I have a much lighter design.

I chose to use AL angles and plate at the corners because I wanted some impact strength for handling tree branches. I'm figuring allot of my use will be on fire roads.

Thanks for all the responses guys. It really helps to keep the gears turning :ylsmoke:

As for this build...

Im getting there. And with the help of Sketchup, proper planning shouldnt be problem!

This is the right side wall framing. Using lightweight sheetmetal steel studs, 1.5"x5.5" I can get them for cheap at work. They are basically a C-channel steel, in various gauges.

Joints will more than likely be welded and/or pop riveted.

This is shown utilizing a 16" OC rivet frequency for attaching the aluminum skin. :chef:

campersketch08.jpg

I don't think a 16" OC rivet frequency will work for a vehicle. Take a look at what they use on semi trailer boxes. They are much closer than 16". Nowadays they don't bother with rivets because gluing with VHB tape is much faster and stronger than riveting. It also leaves a smooth leak free skin. It takes some surface prep time, but that is much less than the drilling and riveting time. Auto body glues can also be used. They are better when the pieces are not as well fitted. That is why I am thinking of using them over the VHB tapes.

Z channels, hat channels, and square tube all provide gluing surfaces for both sides of the wall. They can all be formed to custom by a metal fabricator. Square tubing can be found with very thin walls.
 

IdaSHO

IDACAMPER
I don't think a 16" OC rivet frequency will work for a vehicle. Take a look at what they use on semi trailer boxes. They are much closer than 16". Nowadays they don't bother with rivets because gluing with VHB tape is much faster and stronger than riveting. It also leaves a smooth leak free skin. It takes some surface prep time, but that is much less than the drilling and riveting time. Auto body glues can also be used. They are better when the pieces are not as well fitted. That is why I am thinking of using them over the VHB tapes.

Z channels, hat channels, and square tube all provide gluing surfaces for both sides of the wall. They can all be formed to custom by a metal fabricator. Square tubing can be found with very thin walls.

Thanks for the concern.

What gauge is typical siding?

The stuff Im looking at is 26 gauge coated STEEL (not aluminum as I previously thought). And typically spans 24"+
 
Last edited:

Bogo

Adventurer
Thanks for the concern.

What gauge is typical siding?

The stuff Im looking at is 26 gauge coated STEEL (not aluminum as I previously thought). And typically spans 24"+

OK, I see. You are referring to 16"OC as the span between studs. I was thinking 16" between rivets. The RV industry uses whatever they need for attaching to, but then they use continuous one piece skins.

Somewhere on the web I ran across an RV repair place where you could order 8' and 9' wide AL skins for repairing RVs. They were available up to 45' long.

Old semi trailer skins, I don't know the thicknesses or materials and I know it varied. Trust me that they were as thin as they thought they could get away with.

Typical semi trailer siding now is a composite. Often only on the order of 1/4" thick. The skin will have surfaces that are either AL or FRP and the core will be a stiff thermally stable plastic. They buy them in sheets large enough to skin the whole side of the trailer as one piece. Yeah, a little awkward for us.
 

IdaSHO

IDACAMPER
Thanks for the info. Yes, the 16OC is 16" on center between studs.

Interesting stuff, that VHB tape. If the budget allows, I will certainly be using it instead of fasteners. That stuff isnt cheap though!

I got some more work on the renderings.

Seeing that using 6" studs all the way around was very overkill, I downgraded to 4". This will shed some weight, as well as lessen the $$ needed for the skeleton.

I also framed in the two access doors on the drivers side. A rear one primarily for fuel door access, and a front one that will allow access to under the main cabinet, as well as allow a load of storage. I am going to build this with plumbing in mind, even if I dont go for it. I dom however, have immediate plans for propane heat. So I am creating storage space, accessible from the outside for not only a fresh water tank and pump, but also a propane tank and all associated hardware.

Red is the primary, heavy gauge sheetmetal frame.
The remaining skeleton will be done in a much lighter, thinner gauge stud.

CamperSketch10.jpg


And a quick rendering of the interior.

From left to right....

CamperSketch11.jpg


Rear storage, full width but narrow. I think this would be a great place for things like snow skis and snowboards :coffeedrink:

Primary bench, that will also fold out into a "twin" bed.

Secondary bench, creating fuel filler access from the outside, and a bit of storage.

Primary counter, with LOADS of storage under, and a large outside access panel that can double as an outside prep table.

Pass-thru window bench. Allows for easier access thru the pass-thru window, and connects storage areas from drivers side to passenger side.

Secondary counter, with storage access from outside, slated for propane tank housing, and possibly the heater too.

And finally, the primary sleeping area above the cab of the truck. A 48x72 area, just big enough for a "full" mattress.:wings:

 
Last edited:

Mickldo

Adventurer
On the ones we build at work we use 70 x 30 alloy box and a hat section that is 30mm high. We use the box section where there is a join in the sheets and we run two runs of 1" VHB tape down the box, one either side of the join. IMHO the 4" studs would still be massive overkill. If you are using steel 2" box would be fine or if you use alloy for the frame 3" would be plenty.
 

IdaSHO

IDACAMPER
Well, this project has been scrapped.

I came across a camper I couldnt pass up. it will serve as a great start to my build.

Look for a thread shortly :victory:
 

Forum statistics

Threads
188,593
Messages
2,907,567
Members
230,704
Latest member
Sfreeman
Top