OBS F250/F350 Flatbed camper build

Chorky

Observer
I was looking at a few options for the e4OD, John woods has great reviews, tons of dudes use his build for baja chase trucks, so i figured it could handle some abuse. His valve body work seems to be really good, but the deciding factor was he was local-ish. If I have warranty issues I can just drive the truck to him. Had a friend who recently paid a lot of money for a rebuild elsewhere, 3 months in it needs a warranty and now he has to pull the trans, crate it, and ship it. After that happened he said, just got local for that reason alone, made sense to me.

Good to know about the radiator. I'll keep an eye on that. I've heard great things about the banks intercooler. Living on a mountain and climbing 5000 ft every time i come and go from it, peace of mind running a it cooler was very important to me.

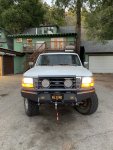
I went with the buckstop vintage series with grill guard.

Yeah same reason I went with the BD trans. Warranty and warranty able from anywhere, rather than even a well known tranny shop rebuild now being 10 hours away...

Wasn't able to get a pic of the radiator with where the truck is parked, but both things I'm thinking of are on the drivers side. Hopefully you wont' have that same issue, but just in case.

Lookin forward to hearing how it performs! I'm thinking an intercooler also, just so much stuff up front!
 

longroad2nowhere

Active member
Still waiting on parts, but while I had a little time to kill at my shop I fabbed up a little bracket to mount my ARB compressor.
IMG_6814 2.jpg
IMG_6815 2.jpg

Nothing too exciting, but always nice when you can tick a little something off in the middle of the day. New radiator shows up tmw, so may try and get in installed in the evening after work. We'll see. Oh, and I change my air filter today. Like I said, real exciting stuff.
 
Last edited:

PSD

Member
Good to know about the radiator. I'll keep an eye on that. I've heard great things about the banks intercooler. Living on a mountain and climbing 5000 ft every time i come and go from it, peace of mind running a it cooler was very important to me.

I put a Banks IC on my 350, and I couldn't be happier. Between that, and a .84 A/R turbo, my EGT's are excellent. No more staring at my pyrometer while climbing steep passes.
 

longroad2nowhere

Active member
I put a Banks IC on my 350, and I couldn't be happier. Between that, and a .84 A/R turbo, my EGT's are excellent. No more staring at my pyrometer while climbing steep passes.


Thats all I'm really hoping for. I do a lot of mountain pass driving, and not having to stare at the EGT gauge would make my drives much more chill. ha.
 

longroad2nowhere

Active member
Got some updates from the last few days. Getting things a bit closer to being back in action. IMG_6844.jpgIMG_6849.jpg

My mishimoto radiator showed up and I got that in. Went in quick and easy. I thought I had drained all the coolant out of the system, but the info I found said the truck should take 8 gallons and it started to overflow at about 5.5, so I had to drain a bit out again, which was annoying.

IMG_6874.jpgIMG_6875.jpg

I removed the ashtray since it no longer locked in place, and replaced it with this little aluminum panel to house some electronics gauges and control. I used the power from the cigarette lighter to power to usb ports. The swtiches are part of the trigger control system. Victron gauge to monitor my batteries (some relion lithiums on the way), and that little button looking things just lets me know my redarc system is working. I dont totally love how it looks. The placement on the gauges and switches feels a bit weird but it was only way they kinda fit inside the ashtray space, and it feels a bit large, but it's good enough for now.

IMG_6880.jpg

Finally my Buckstop Bumper showed up today. Super stoked on this.

IMG_6881.jpg

Gotta fab up some mounts for these Teralume lights

IMG_6887.jpg

And cute holes for these, which is gonna be super fun in this thick ass steel. Kinda regretting trying to reuse these and not just having some 3" round holes made and buying new lights. oh well. After I do that, I'll clean it up a bit and clear coat it. I kinda hate how black bumpers look on a lot of vintage trucks, and I think the raw will look good. Hopefully my spraying skills are up to par. Hopefully I can get that all wrapped up by the end of the weekend.
 

longroad2nowhere

Active member
IMG_6924.jpgIMG_6904.jpg

Fabbed up some brackets for the teralume lights. My lady is the welder of the family, and shes out of town, so today was the first time I fired up the welder myself in like 4 years, so I just threw down some tack welds so she can come fill them in tmw. I ended up mounting them a little too far to the side so ended up grinding them off and moving them in a couple inches. Didnt want to put them too close to center and block air flow, but all the way to the sides looked a little weird, so I moved them in a couple inches.

Also after chatting with a buddy who does paint for a living, he talked me out of just clear coating the bumper, so I'm gonna powder coat it, so trying to decide on color. I dont like how black bumpers look on these older trucks, so I'm probably gonna do a greyish color. IMG_6930.jpg
IMG_6931.jpg

I kinda like both of these. Gotta decide soon cause now that I'm taking it to powedercoat, its gonna take even longer to get it on the truck. I also got my trigger control bluetooth switches hooked up today, even tho I dont have any accessories hooked up to it.
 

longroad2nowhere

Active member
Have you tried STEEL-IT? It's a stainless steel paint that when applied to bare metal allows you to weld through it. It's super durable. It comes in grey, and black. I sprayed it over chrome and it's held up beautifully. https://www.steel-it.com/automotive-applications-of-steel-it-5

View attachment 628346
I actually looked into steel-it, but ******** aint cheap. Actually got it powdercoated for less than a gallon of the stuff costs. It does look cool tho!
 

longroad2nowhere

Active member
Was up in Mammoth all last week working on a project, and finally picked up the bumper from the powdercoat. Ended up going with a textured grey powdercoat. Got my lights and winch mounted, and waited till the nexy morning when the sun was out to install so I didnt freeze my fingers off.
IMG_7055.jpg

Got a little creative getting it lifted into place, and getting it as tight as possible up against the body.
IMG_7061.jpg

Then I had to hook up all the lights, was a bit of project cause I hooked them up to the trigger controller. Had to do some rewiring. The teralume lights had a plug that went into the headlights, so they turned on when you turned on the brights. The plug didnt work on my lights (assuming cause its an aussie brand) and they didnt seem to work without it hooked up, so I had to do some rewiring there too. Eventually got it all working.
IMG_7073.jpg

Super happy with how this buckstop bumper looks, and pleased with my color choice.
IMG_7078.jpg
IMG_7076.jpg

Then I finally got to take her out for the first spin since I installed the new radiator and intercooler. Def feels like she has a bit more power, and I live on a mountain so got a ton of steep roads, and pushing up them, EGT's seemed to be about 200-300 lower than before the intercooler, which i am super stoked up about.

IMG_7093.jpg

So stoked to have this thing road worthy again.
 

Attachments

  • IMG_7074.jpg
    IMG_7074.jpg
    401.6 KB · Views: 26

longroad2nowhere

Active member
So my lady and I really geeked out on sketchup last night, and I finally think I have a camper design I am happy with. Pretty minimalist. Lots of storage. Screen Shot 2020-12-05 at 10.26.58 PM.png
Screen Shot 2020-12-05 at 10.26.47 PM.png
Screen Shot 2020-12-05 at 10.30.11 PM.png

The idea is basically build my own extremely large version of an AT summit camper, and then set it on top of some custom built storage boxes that sit on the flatbed. This will give me a lot of storage space. Lots of room inside, and a pretty minimal/light camper set-up. After that I could build a fairly easily removable kitchen set-up so things can stay very versatile. After playing with tons of different set-ups, I think I finally came up with what I truly want, and it should be terribly difficult to build. Quite a bit of aluminum welding, but it will be worth it, and will be a completely custom set-up to our needs that wont cost an insane amount of money....I hope.
 

NorthernWoodsman

Adventurer/tinkerer
Did you create this from a stock image on SketchUp? If not, how did you create the truck image? Been wanting to do this myself but my last attempt on SketchUp was really frustrating.

So my lady and I really geeked out on sketchup last night, and I finally think I have a camper design I am happy with. Pretty minimalist. Lots of storage. View attachment 629472
View attachment 629473
View attachment 629474

The idea is basically build my own extremely large version of an AT summit camper, and then set it on top of some custom built storage boxes that sit on the flatbed. This will give me a lot of storage space. Lots of room inside, and a pretty minimal/light camper set-up. After that I could build a fairly easily removable kitchen set-up so things can stay very versatile. After playing with tons of different set-ups, I think I finally came up with what I truly want, and it should be terribly difficult to build. Quite a bit of aluminum welding, but it will be worth it, and will be a completely custom set-up to our needs that wont cost an insane amount of money....I hope.
 

longroad2nowhere

Active member
Did you create this from a stock image on SketchUp? If not, how did you create the truck image? Been wanting to do this myself but my last attempt on SketchUp was really frustrating.

We did find the truck already drawn up in the google warehouse. There are quite a few OBS ford models actually. We modded it a bit to match our truck, and then obviously drew up the flatbed and camper.
 

Forum statistics

Threads
187,906
Messages
2,899,794
Members
229,071
Latest member
fireofficer001
Top