Off Road Trailer Group Buy (M416 Style) ***Closed***

Status
Not open for further replies.

DannyLLama

Observer
@DannyLLama For brake controller I went with the Tekonsha 90160. I installed it to the right of the steering wheel (in the JK), around knee height, facing up. That controller does not need to be mounted horizontally to work. This placement is the only place I could find to put it, and it seems to work OK, but it is hard to read the display while driving.

Thanks for the info. Looks like it has raving reviews. 5 stars!

Do I have to install anything additional in the trailer in order to make it functional?
Or any other parts, electrical etc.. ? I'm mechanically challenged as you can see!

Side bar - what maintenance is required for these things long term? For example on the note of brakes, how often do pads need to be replaced?
 
Last edited:

mrjosh

Adventurer
For trailer brake controllers, I went with the reese towpower 8508700 mounted by my locker switches. I guess I'll find out later if I should've splurged for the redarc...

IMG_20201020_152235.jpg
 

norcalscott

Member
Thanks for the info. Looks like it has raving reviews. 5 stars!

Do I have to install anything additional in the trailer in order to make it functional?
Or any other parts, electrical etc.. ? I'm mechanically challenged as you can see!

Side bar - what maintenance is required for these things long term? For example on the note of brakes, how often do pads need to be replaced?
The trailer should be wired and ready to go. There is a brake control wire on one of the pins and that will connect to the brake controller’s brake wire. I ran power from under the hood through a 15 amp fuse, and ground to the brake controller, then there is a connection that needs to tap into the brake pedal (as mentioned in previous post, the wire tap posted by @Kmrtnsn would be ideal for this - wish I had used one of those :) ). You then need to run a wire from the controller to the trailer connector. Here is a great site for showing the different pin-outs for connectors:https://www.dieselhub.com/towing/trailer-wiring.html
Also search for your vehicle model for videos and pictures on getting to the brake connector - on my 2014 JK it was pretty easy - I removed that panel under the steering wheel and the connector can twist to unlock to let you get to the wires. Send me a message if you have any questions I can answer.

Regarding brake maintenance, these are drum brakes and should last for quite a while, probably at least 30k miles.
 

Kmrtnsn

Explorer
The trailer should be wired and ready to go. There is a brake control wire on one of the pins and that will connect to the brake controller’s brake wire. I ran power from under the hood through a 15 amp fuse, and ground to the brake controller, then there is a connection that needs to tap into the brake pedal (as mentioned in previous post, the wire tap posted by @Kmrtnsn would be ideal for this - wish I had used one of those :) ). You then need to run a wire from the controller to the trailer connector. Here is a great site for showing the different pin-outs for connectors:https://www.dieselhub.com/towing/trailer-wiring.html
Also search for your vehicle model for videos and pictures on getting to the brake connector - on my 2014 JK it was pretty easy - I removed that panel under the steering wheel and the connector can twist to unlock to let you get to the wires. Send me a message if you have any questions I can answer.

Regarding brake maintenance, these are drum brakes and should last for quite a while, probably at least 30k miles.

Scott,

I recommmend keeping a couple of packages of those Posi-Taps in your Jeep tool kit with several six-foot lengths of different sizes of wire. I had rodents eat through some of my injector wiring and had to patch around a connector on the side of a trail in Utah a couple of years ago. Not fun but was sure glad I had them tucked away. They aren't cheap but they're simple and easy to use. Amazon has them.
 

Kmrtnsn

Explorer
Thanks for the info. Looks like it has raving reviews. 5 stars!

Do I have to install anything additional in the trailer in order to make it functional?
Or any other parts, electrical etc.. ? I'm mechanically challenged as you can see!

Side bar - what maintenance is required for these things long term? For example on the note of brakes, how often do pads need to be replaced?


Danny, I hope your using the Mopar 7-Pin Harness. The only additional wiring is a short power lead from the battery, a ground lead, from your controller to the kick panel, the blue lead from the harness to the controller that you'll pull through the firewall at the same time as the power lead, and the brake signal wire, the pain in the butt one to tap into. There is no other cutting or spicing with the Mopar harness, the rest is plug and play.
 

norcalscott

Member
Scott,

I recommmend keeping a couple of packages of those Posi-Taps in your Jeep tool kit with several six-foot lengths of different sizes of wire. I had rodents eat through some of my injector wiring and had to patch around a connector on the side of a trail in Utah a couple of years ago. Not fun but was sure glad I had them tucked away. They aren't cheap but they're simple and easy to use. Amazon has them.
Great recommendation to keep a few of those in the electrical spare parts bin. I hadn't seen that type before, looks much better than the old blue ones that more often than not cut the wire you are tapping.
wiretap.jpg

In my case, I used a butt connector to bring in the controller wire. Was really hard to get the crimpers in there with the limited space - I prefer to solder things like this but no way to get a soldering iron in that tight space at all. Great advice about the Mopar wiring harness as well. I decided to not use that since I was doing some substantial re-wiring for the trailer and my lights, and I was going from 5 pin to 7 pin.
 
Last edited:

norcalscott

Member
I've had a few people ask me for additional pictures of my set-up. I recently took it to Utah / Moab, which was my second major trip out and involved about 2400 miles of travel (to/from Northern California) and that included about 200 miles of off road travel, some of it fairly severe and two river crossings. We spent about 12 nights total in the RTT - only payed for 2 of those in Forest Service campgrounds ($8 x 2) having boondocked in the wild throughout Utah for the most part.

Everything about the trailer exceeded my expectations and I am very happy. Also, I had done some modifications from my first trip, most importantly - I built a "kitchen counter with sink" attachment that can be attached to either side fender using a single C-Clamp, and I exchanged my big, noisy, 12 volt water pump and propane water heater for a simple USB charged water pump (for the sink) and a pressurized garden sprayer converted to a shower (water heated on my Coleman stove).

I had also purchased an ARB awning that I wanted to put on the side of the trailer that the RTT doesn't unfold to cover. Unfortunately, with COVID, ARB took 3 months to get it to me and, of course, it arrived after I left. I did install it before I returned the trailer to storage and I used, of all things, muffler clamps to attach it to the trailers load bars.

Many thanks to @FourLeafCloverFab / Simon for building a high quality trailer that will be my home base on many future trips!

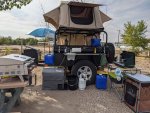
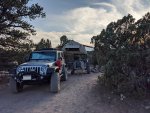
Here are a few pictures from the trip.
Moab1_sm.jpg
This is a boondocking spot in Moab. Turns out there is this "Trust" land everywhere and you can camp on most of it legally and without a permit.

Full setup1_sm.jpg
This is an example of everything set up. I generally won't be taking this much stuff, but wanted to see just how much I could set up. The ARB awning will be on this side.

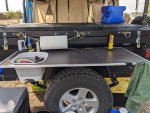
Kitchen1_sm.jpg
This is the kitchen counter. Made from plywood with an aluminum frame, just deep enough to fit standing on its side inside the trailer. Sink is collapsible sink with drain from Amazon. I built a magnetic pump attachment for the USB charged pump from Amazon and tubing goes from this to the water cans behind the tongue box. A single C Clamp hold this to the fender and it is really stable and can be used on either side. I may build another smaller one so two could be used at once if desired. Note that there are little LED lights mounted to the side of the trailer. I installed 3 of these on each side and they are controlled with a rocker switch on the tongue box. Search for "marine LED lights" on Amazon - they are perfect for this application and provide a lot of usable light on the kitchen counter.

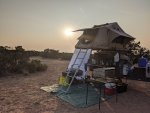
Mid setup2_sm.jpg
Mid setup1_sm.jpg
These are from the campsite at the "Little Grand Canyon" in Utah (wonderful place, highly recommended) camped right on the edge of the canyon. This is the typical setup for staying 2-3 days.

Cathedral Valley1_sm.jpg
This is the campsite in Cathedral Valley, Capital Reef National Park, at about 7,500 feet.

River Crossing 1.jpg
River Crossing 2.jpg
She handled the river crossings with no sweat!
 
Last edited:

DannyLLama

Observer
@Norcal10 Thanks for the pics and info! From the pictures, it looks like this is the water pump? Water pump if not, can you link the pump.
Couple more questions, can you link the handles, I like that Idea comes in handy for trash bags etc. Lastly, is the yellow bin the storage box you mentioned that you keep the floor jacks and all trailer tools etc?
 

norcalscott

Member
@Norcal10 Thanks for the pics and info! From the pictures, it looks like this is the water pump? Water pump if not, can you link the pump.
Couple more questions, can you link the handles, I like that Idea comes in handy for trash bags etc. Lastly, is the yellow bin the storage box you mentioned that you keep the floor jacks and all trailer tools etc?
@DannyLLama that is the pump I purchased - amazing value for what it does. I bought vinyl tubing from Home Depot to use for running to my water tanks. I also am working on building a mount to just put the pump on top of a water can with a short run of tubing that it comes with to reach down into the can. This is great for quick overnight stops where I don't want to deploy the kitchen. For handles, do you mean the tie downs along the sides? Those are E-Track mounts and I use E-Track O-ring Tie Downs in those. By the way, Harbor Freight sells the tie downs and they have smaller rings which may work even better. If you mean how the trash bag is hanging, I am just using a piece of Velcro for that. The yellow bin on top holds my firewood and extra oil/grease/gear oil. I do use these in the trailer to hold everything else. My actual tool box is a military rocket box that I restored and it lives inside the Jeep.

My biggest issue to date is trying to get everything to easily fit inside the trailer so that setup and teardown can be done in 30 minutes or less. I am getting there - I decided to divide the trailer compartment into two sections using a compression load bar. I built wood crates for my solar panel, little buddy heater and Coleman stoves. I have a piece of plywood for setting the stove/grill on. These all go on their side with the kitchen table and the load bar keeps them upright, with foam in between the pieces to keep it from scratching. On the other side, I am using 3 each 17 gallon containers (like the one on top with the firewood) and smaller containers on top of those. I am converting one of those containers into a kitchen box where I will use some thin plywood to compartmentalize it and line it with felt. Idea being, this could be pulled out, take out the water pump and sink and have all dishes, pans and other utensils easily accessed, and more importantly, easier to pack away. One downside of a trailer like this is that it is a big box, rather than slide out compartments, so organization is a bit more difficult. The advantage is that it holds a lot more stuff.
 

Kmrtnsn

Explorer
Regarding battery charging - I installed a 100Ah battery in the tongue box, and I have 3 ways to charge - I installed a Renogy 40 Amp DC-DC charger in the tongue box, and ran 6 gauge wire from the Jeep battery to back bumper, through an Anderson connector to feed the charger (60 Amp breaker at the Jeep battery connection). I have a switch box for all my lights and used one of those for turning the charger on and off.

Regarding your question of running this through the 7 pin - those wires are fairly small size so I don't recommend doing that unless you are using a low current charger.

I monitor the battery with a Victron Connect with Bluetooth so I can see state of charge, temperature, etc. from the cab while driving. The Renogy charger will charge the battery from ~50% to 100% while driving in about 90 minutes. The 40 Amp one is likely overkill for one battery - if I had to do over again I may have gotten the 20 Amp, but that fast recharging time is nice to have.

I also have a 220w portable solar system and mounted the solar charge controller inside the tongue box as well. This works better than I expected and can easily keep the battery topped off with about 6 hours of sunlight.

I also recently purchased a NOCO shore power charger since I was in a campground with AC power for a few days. This works really well with my battery - I decided to not mount this in the tongue box so I could use it with other vehicles if needed.

My use for battery power is mainly my Whynter refrigerator (I normally keep it in back of Jeep but did run wiring inside the trailer if I decide to put it in there), lights, and a heated blanket for colder temps in the RTT. I also installed a USB charging hub that I use to charge phones and other USB devices. I've got a small DC inverter for charging laptops. I installed boat LED lights on each side of the trailer (3 each side) and can control each side with a rocker switch. I also installed a spot light on the rear and another rocker switch can turn that on and off.

I attached my wiring diagram and a couple of pictures of the install (before I cleaned it up).

[Disclaimer - I take no responsibility for the safety of any wiring that anyone does on their trailer or vehicle. Be sure to have your work checked by a vehicle electrical specialist. :) ]

View attachment 619423View attachment 619424View attachment 619425


Scott, on your diagram can you further explain your ignition hot lead to the Renergy charger? If I do a long run to the Jeep starter battery with an Anderson connection on the rear bumper, that's a hot and a ground for a two prong connection, I get that but I am missing something where you did the ignition activation lead. I can swap a PT-6 TwinPac or a T-64 but electricity beyond the USMC Fundementals of Electricity MCI Course is lost on me.......

I was going to put something like this in a box on the outside of the tongue box to run a pump and some other things. If I use one switch to activate the charger? It'd be running off of the same battery?

 
Last edited:

norcalscott

Member
Scott, on your diagram can you further explain your ignition hot lead to the Renergy charger? If I do a long run to the Jeep starter battery with an Anderson connection on the rear bumper, that's a hot and a ground for a two prong connection, I get that but I am missing something where you did the ignition activation lead. I can swap a PT-6 TwinPac or a T-64 but electricity beyond the USMC Fundementals of Electricity MCI Course is lost on me.......

I was going to put something like this in a box on the outside of the tongue box to run a pump and some other things. If I use one switch to activate the charger? It'd be running off of the same battery?
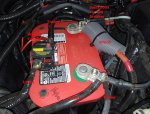
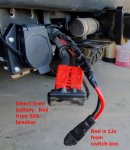
@Kmrtnsn I installed a switch box very much like the one you linked to (I bought from Amazon) in the cab of the jeep and it controls all my lights, but I also am using one of the switches to send 12 volts to an SAE connector at the back that gets connected to the trailer and the Renogy charger to turn it on. I like to turn this on and off as I need to, while monitoring the battery with the Victron BMV-712 so I can turn it off once it is fully charged, or not use it once the temp goes too high. I never thought about using another switch box on the trailer, that is a good idea, although it will add complexity to the circuits there. I just used waterproof toggle switches and mounted them through outside of tongue box. I attached a few more pictures to show the wiring. It is fairly simple, I ran two 6 gauge wires from battery (red via 60A breaker mounted to top of battery with industrial strength velcro) inside the frame rail to the rear, used heatproof tape where the muffler is close, and then to the Anderson connector. This all involves a lot of soldering - I used a torch to put all the connectors on these wires and a lot of heat shrink tubing.

For the switched 12 volt to turn the Renogy on and off, I ran that from the under-the-hood switch box, which is fused, back to an SAE connector (red). The black in that is a spare that I could use for something else, it just runs under the hood.
Battery1.jpg
With the winch and the trailer power, no more room to add anything else here on the battery.

Power Connections1.jpg
I added the mating wires to the trailer pigtail and wrapped the whole thing. It is a little unruly but works fine. I am using a gender changer to be the SAE dust cap. I have a sock that goes over these to keep them clean when not in use.

Switchbox1.jpg
I am really happy with this switch panel. I did have to cut the flat control wire and re-solder it back together to get it through the firewall.

Switchbox Hood1.jpg
Was about the only place I could find to mount the switch box under the hood, but it works fine.
 

Kmrtnsn

Explorer
@Kmrtnsn I installed a switch box very much like the one you linked to (I bought from Amazon) in the cab of the jeep and it controls all my lights, but I also am using one of the switches to send 12 volts to an SAE connector at the back that gets connected to the trailer and the Renogy charger to turn it on. I like to turn this on and off as I need to, while monitoring the battery with the Victron BMV-712 so I can turn it off once it is fully charged, or not use it once the temp goes too high. I never thought about using another switch box on the trailer, that is a good idea, although it will add complexity to the circuits there. I just used waterproof toggle switches and mounted them through outside of tongue box. I attached a few more pictures to show the wiring. It is fairly simple, I ran two 6 gauge wires from battery (red via 60A breaker mounted to top of battery with industrial strength velcro) inside the frame rail to the rear, used heatproof tape where the muffler is close, and then to the Anderson connector. This all involves a lot of soldering - I used a torch to put all the connectors on these wires and a lot of heat shrink tubing.

For the switched 12 volt to turn the Renogy on and off, I ran that from the under-the-hood switch box, which is fused, back to an SAE connector (red). The black in that is a spare that I could use for something else, it just runs under the hood.
View attachment 621622
With the winch and the trailer power, no more room to add anything else here on the battery.

View attachment 621623
I added the mating wires to the trailer pigtail and wrapped the whole thing. It is a little unruly but works fine. I am using a gender changer to be the SAE dust cap. I have a sock that goes over these to keep them clean when not in use.

View attachment 621624
I am really happy with this switch panel. I did have to cut the flat control wire and re-solder it back together to get it through the firewall.

View attachment 621625
Was about the only place I could find to mount the switch box under the hood, but it works fine.

Awesome! I have an sPod up by my mirror but all of the switches are in use. I was thinking of adding a second to the Jeep but thought why not just use it for the things I want to add to the trailer and install it in the nose box? I‘ll just run a small fuse tap from the TIPM fuse block to the rear bumper and find a simple plug/port and make a trailer connection for it. Appreciate the info and the pics! Can’t wait to get building on this, in the meantime I’ll start accumulating pieces. Thanks!
 

DannyLLama

Observer
For those of you who have taken the trailers out and left them behind for a short trip. What are some options for security? Adding a wheel lock or something to that effect so they dont walk away?
 

B^2

Observer
@DannyLLama that is the pump I purchased - amazing value for what it does. I bought vinyl tubing from Home Depot to use for running to my water tanks. I also am working on building a mount to just put the pump on top of a water can with a short run of tubing that it comes with to reach down into the can. This is great for quick overnight stops where I don't want to deploy the kitchen. For handles, do you mean the tie downs along the sides? Those are E-Track mounts and I use E-Track O-ring Tie Downs in those. By the way, Harbor Freight sells the tie downs and they have smaller rings which may work even better. If you mean how the trash bag is hanging, I am just using a piece of Velcro for that. The yellow bin on top holds my firewood and extra oil/grease/gear oil. I do use these in the trailer to hold everything else. My actual tool box is a military rocket box that I restored and it lives inside the Jeep.

My biggest issue to date is trying to get everything to easily fit inside the trailer so that setup and teardown can be done in 30 minutes or less. I am getting there - I decided to divide the trailer compartment into two sections using a compression load bar. I built wood crates for my solar panel, little buddy heater and Coleman stoves. I have a piece of plywood for setting the stove/grill on. These all go on their side with the kitchen table and the load bar keeps them upright, with foam in between the pieces to keep it from scratching. On the other side, I am using 3 each 17 gallon containers (like the one on top with the firewood) and smaller containers on top of those. I am converting one of those containers into a kitchen box where I will use some thin plywood to compartmentalize it and line it with felt. Idea being, this could be pulled out, take out the water pump and sink and have all dishes, pans and other utensils easily accessed, and more importantly, easier to pack away. One downside of a trailer like this is that it is a big box, rather than slide out compartments, so organization is a bit more difficult. The advantage is that it holds a lot more stuff.

If you get a chance to take a photo of the tub packed up, I'd love to visualize it. My trailer is being built and I'm in the process of acquiring a few more pieces of gear to get our setup dialed.
 
Status
Not open for further replies.

Forum statistics

Threads
188,399
Messages
2,906,848
Members
230,176
Latest member
Arcadia1415
Top