You are using an out of date browser. It may not display this or other websites correctly.
You should upgrade or use an alternative browser.
You should upgrade or use an alternative browser.
Outdooraholic's Montero Sport Adventure/Build thread
- Thread starter Outdooraholic
- Start date
Outdooraholic
Adventurer
Thanks so much! I know the Sport tends to hide in the shadow of the full size Montero but it's quite capable in its own right. Had I been purchasing a vehicle strictly for Overlanding, I probably would have gone with the full size Montero. However, being that I already had this Montero Sport, I just decided to go with it, and so far it's worked out great!Nice work on your build. Enjoying your thread. It's great to see a Sport get this attention.
Red Sands in El Paso, TX
This morning a buddy and I went out to a local dune area in El Paso called Red Sands, to test our trucks out in some loose sand. He had been out last week and had gotten stuck while running street tire pressure in his tires. Since I had my onboard air setup, we wanted to experiment with lower pressure in the loose stuff. He lowered down to 20 psi in his C rated K02's and I went down to 18 in my D rated ST's (although I think I may need to go lower because I wasn't seeing much droop in the sidewalls). We had a great time going over the dunes and following the sandy trails around the area and neither one of us had any issues getting stuck (although I wouldn't have minded getting stuck because he has a set of TRED recovery boards that I wanted to test out before purchasing a similar product). Near the end he picked up a knife blade in one of his tires but with my tire repair kit and compressor we were able to keep going. You truly couldn't have asked for better weather (Sunny, calm, and low 80's) and even though we didn't get to test our recovery gear, we did get to test out our tire repair gear instead.

Our route through Red Sands.
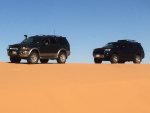
Our convoy for the day.
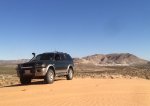
2000 Mitsubishi Montero Sport
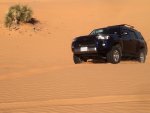
2016 Toyota 4Runner

This knife blade in the 4Runner's BFG K02 would have been a bad end to our day if not for my ARB tire repair kit and compressor. The blade was spinning around and also knocked his rear fender flair loose (luckily it just popped back in). We pulled off to the side, jacked up the rear a bit to take the pressure off the tire, patched it, aired it back up, and were leak free! It felt great to have all the equipment needed to fix something like this quickly and effectively.
Last edited:
Outdooraholic
Adventurer
We are less then two weeks out before we return to the New Mexico Backcountry Discovery Route to pick up where we left off last October. We are picking the trail back up in Truth or Consequences, NM and heading west through the Gila Mountains before turning north and paralleling the AZ border up to the town of Grants, NM. It will be sections 3-5 of the NMBDR.
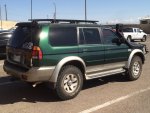
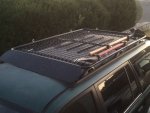
Traveling/camping with a family of 4 in a Montero Sport require you to maximize cargo space. We have made a few changes to our camping gear to help conserve space (Luci lights instead of Coleman lantern, compressible pillows instead of full size, smaller cooler, etc) but there is some gear that can't be sacrificed when going out into the wilderness for multiple days. To that end, I purchased a roof basket to attach to my factory cross bars. The one that I went with was the Apex 45"x64"x6" steel basket.
However, after mounting it on the roof it looked way to large for my truck. The rack looked way to high and really overpowered the truck. I left it on for one day and then had to do something about it. The first thing I was was remove the upper bars and deflector to convert it into a low profile platform rack. I really like the way it looks currently. I'm going to test it out and if I don't have any issues mounting items to it securely without the upper bars then I will leave it like this and just make a new deflector. Otherwise I will chop the vertical bars in order to lower the upper bars to about a 2-3" height instead of 6".

Last edited:
Outdooraholic
Adventurer
I got some work done on the roof rack over the past couple of days. I installed eyelets around the perimeter, modified the deflector to work without the upper bars, and installed two sets of Quick Fist connectors to mount my full size axe and shovel. The whole package is very low profile and I am very happy with how it is coming together.

Outdooraholic
Adventurer
Thanks so much! My plan is definitely to be more ADVENTURE and less BUILD.I like what you have done to your truck and best of all is the use, I can't wait to be back home and able to work on my Monty and get out there with my family. Thanks for sharing!
Outdooraholic
Adventurer
Thank you! Yes, hopefully soon!Great write up. I hope you will be able to join us on a trip one day .
Outdooraholic
Adventurer
Thanks! Over the past couple of days I've been working on buttoning up some little projects before our middle NMBDR trip this weekend. Today I installed a 3 Carling switch panel in my center console and finally installed my actual ARB compressor switch (I was just using a temporary switch up under the dash before). I also made a simple mount to hold MFC cans on the rack, made some aluminum clamps to more firmly attach the rack to the cross bars, and made some lower mounting points for the front deflector so it is rock solid. Tomorrow and Thursday I will hopefully be installing some led flood lights under the rack pointing out to the sides and installing a CB radio in my Dad's truck so we can communicate while we are out on the trail. We have received reports of up to 10" of snow and trees blocking the trail along the route that we will be going. It should be lots of fun!love it. thanks for writing everything up.
Outdooraholic
Adventurer
Alamo Mountain - Otero Mesa, New Mexico
Yesterday I had a chance to go out and explore the Alamo Mountain petroglyph area. This is located in southern New Mexico, just north of the Texas border, between El Paso, TX and Calrsbad, NM. It features over 10,000 petroglyphs and the remains of a stagecoach relay station along the Butterfield Overland Mail route.
The Butterfield Overland Mail route ran from Memphis, TN and Saint Louis, MO to San Francisco, CA, carrying passengers and U.S mail in the mid 1800's. Prior to the Butterfield Trail, mail traveling from the east coast to the west coast was shipped across the Gulf of Mexico, transported across Panama, and then shipped across the Pacific Ocean to California. The Butterfield route took approximately 22 days from one end to the other, ran twice a week, and utilized 139 relay stations or frontier forts. It was replaced by the Pony Express in 1860, which could make the overland trip in approximately 10 days. In March of 1860, the founder of the route, John Warren Butterfield, was forced to sell the company to one of his partners, William A. Fargo (Wells Fargo), due to debts he owed.

A Pronghorn buck I saw along the way.
A BLM Cultural Resource Protection Area.

One of over 10,000 petroglyphs in the area.
The remains of a relay station along the Butterfield Overland Mail route.
Back to the big trip along the middle sections of the NMBDR coming up this weekend, I squeezed in a last minute project this morning and installed four flood lights under the rack, two on each side. They are bolted to the bottom of the eyelets along the perimeter of the rack. I joined the wires all together and ran them behind the rear hatch, into the cab behind the taillight, and then under the trim and up to a rocker switch in the center console. They should come in handy around the campsite for setting up in the dark, cooking dinner, or any number of other uses.

Yesterday I had a chance to go out and explore the Alamo Mountain petroglyph area. This is located in southern New Mexico, just north of the Texas border, between El Paso, TX and Calrsbad, NM. It features over 10,000 petroglyphs and the remains of a stagecoach relay station along the Butterfield Overland Mail route.
The Butterfield Overland Mail route ran from Memphis, TN and Saint Louis, MO to San Francisco, CA, carrying passengers and U.S mail in the mid 1800's. Prior to the Butterfield Trail, mail traveling from the east coast to the west coast was shipped across the Gulf of Mexico, transported across Panama, and then shipped across the Pacific Ocean to California. The Butterfield route took approximately 22 days from one end to the other, ran twice a week, and utilized 139 relay stations or frontier forts. It was replaced by the Pony Express in 1860, which could make the overland trip in approximately 10 days. In March of 1860, the founder of the route, John Warren Butterfield, was forced to sell the company to one of his partners, William A. Fargo (Wells Fargo), due to debts he owed.

A Pronghorn buck I saw along the way.

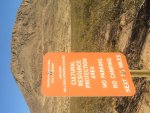
A BLM Cultural Resource Protection Area.

One of over 10,000 petroglyphs in the area.

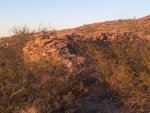
The remains of a relay station along the Butterfield Overland Mail route.
Back to the big trip along the middle sections of the NMBDR coming up this weekend, I squeezed in a last minute project this morning and installed four flood lights under the rack, two on each side. They are bolted to the bottom of the eyelets along the perimeter of the rack. I joined the wires all together and ran them behind the rear hatch, into the cab behind the taillight, and then under the trim and up to a rocker switch in the center console. They should come in handy around the campsite for setting up in the dark, cooking dinner, or any number of other uses.

Last edited:
Outdooraholic
Adventurer
Overview.
The New Mexico Backcountry Discovery Route (NMBDR) is a 1,189 mile route through the state of New Mexico starting in Dell City, Texas and weaving through mostly non-paved tracks all the way to Antonito, Colorado. It was originally designed for adventure/dual purpose motorcycles but is also a great overland route, as it is off the beaten path, very remote, and very scenic. It is split into 7 sections, ranging from 87 miles to 283 miles in length. They offer free GPS tracks you can download and sell hard copies of the maps. I recommend having both.

Last October we started the New Mexico Backcountry Discovery Route and completed Sections 1 and 2. We started in Dell City, Texas and went up through Cloudcroft, Ruidoso, Carrizozo, down the Jornada Del Muerto, and across to Truth or Consequences over the course of 3 days. You can read that Adventure Report here: Sections 1 and 2 of the New Mexico Backcountry Discovery Route (NMBDR)

Trip Report.
Day 1, Truth or Consequences to Snow Lake.
We left El Paso and drove up Highway 25 to the town of Truth or Consequences were we fueled up and rejoined the route where we had left off in October. Truth or Consequences was originally named Hot Springs, but changed its name to win a contest for a popular 1950's radio show of the same name. It is known for its hot springs and close proximity to Elephant Butte Reservoir, the largest lake in New Mexico. A little ways north we headed west along flat, open, dirt roads with occasional cattle guards. We soon arrived at the town of Winston, the last place to fuel up before Reserve, on the other side of the Gila National Forest. We passed the ghost town of Chloride and entered the Gila National Forest. Over the next several miles we crossed the Chloride Creek over 100 times as we meandered though the canyon. Along that section we also saw some petroglyphs on the rocks right off to the side of the trail. This section was my favorite of the whole NMBDR so far as the scenery was beautiful, the creek crossings were fun, and seeing petroglyphs along the trail was the icing on the cake. After leaving the creek area we began to ascend up into the mountains as we twisted and climbed our way up in elevation. After several hours the growling in our stomachs forced us to stop to make dinner, as we realized we wouldn't be making it to the Dipping Vats Campground before dark. We found a nice clearing, made a fire, and cooked a couple of chicken/basil/cheese pizzas in the Dutch Oven. We enjoyed our delicious meal as the day gave way to the night and darkness fell over the mountains. After packing up we hit the trail again and eventually made it to Dipping Vats around 11:00 pm. However, as we turned into our campsite, we heard a loud pop as one of my Dad's front tires came off the rim of his Avalanche. It was dark, cold, and we were tired. So we decided to leave the tire for the morning and proceeded to set up camp. We snuggled up and slept as the temperatures dropped into the upper 20's.


The New Mexico Backcountry Discovery Route (NMBDR) is a 1,189 mile route through the state of New Mexico starting in Dell City, Texas and weaving through mostly non-paved tracks all the way to Antonito, Colorado. It was originally designed for adventure/dual purpose motorcycles but is also a great overland route, as it is off the beaten path, very remote, and very scenic. It is split into 7 sections, ranging from 87 miles to 283 miles in length. They offer free GPS tracks you can download and sell hard copies of the maps. I recommend having both.
Last October we started the New Mexico Backcountry Discovery Route and completed Sections 1 and 2. We started in Dell City, Texas and went up through Cloudcroft, Ruidoso, Carrizozo, down the Jornada Del Muerto, and across to Truth or Consequences over the course of 3 days. You can read that Adventure Report here: Sections 1 and 2 of the New Mexico Backcountry Discovery Route (NMBDR)
Trip Report.
Day 1, Truth or Consequences to Snow Lake.
We left El Paso and drove up Highway 25 to the town of Truth or Consequences were we fueled up and rejoined the route where we had left off in October. Truth or Consequences was originally named Hot Springs, but changed its name to win a contest for a popular 1950's radio show of the same name. It is known for its hot springs and close proximity to Elephant Butte Reservoir, the largest lake in New Mexico. A little ways north we headed west along flat, open, dirt roads with occasional cattle guards. We soon arrived at the town of Winston, the last place to fuel up before Reserve, on the other side of the Gila National Forest. We passed the ghost town of Chloride and entered the Gila National Forest. Over the next several miles we crossed the Chloride Creek over 100 times as we meandered though the canyon. Along that section we also saw some petroglyphs on the rocks right off to the side of the trail. This section was my favorite of the whole NMBDR so far as the scenery was beautiful, the creek crossings were fun, and seeing petroglyphs along the trail was the icing on the cake. After leaving the creek area we began to ascend up into the mountains as we twisted and climbed our way up in elevation. After several hours the growling in our stomachs forced us to stop to make dinner, as we realized we wouldn't be making it to the Dipping Vats Campground before dark. We found a nice clearing, made a fire, and cooked a couple of chicken/basil/cheese pizzas in the Dutch Oven. We enjoyed our delicious meal as the day gave way to the night and darkness fell over the mountains. After packing up we hit the trail again and eventually made it to Dipping Vats around 11:00 pm. However, as we turned into our campsite, we heard a loud pop as one of my Dad's front tires came off the rim of his Avalanche. It was dark, cold, and we were tired. So we decided to leave the tire for the morning and proceeded to set up camp. We snuggled up and slept as the temperatures dropped into the upper 20's.
Last edited:
Outdooraholic
Adventurer
Day 2, Snow Lake to Reserve, NM
We woke up to sub freezing temps at Dipping Vats campground and quickly built a fire and started cooking a mountain man breakfast in the Dutch Oven. With our bodies rested and our insides warmed we set to work on fixing the tire. I have never had to reset a bead before but we had my ARB air compressor and a ratchet strap so we decided to give it a try. Within a few minutes we had the tire reseated on the rim and discovered a puncture in the tire. My thought is that he got a puncture and once the pressures dropped it didn't take much to pop the bead. This was a set of passenger rated street tires on his truck. We promptly plugged the hole and were ready to pack up our campsite and head down to Snow Lake for a little bit of fishing. The weather had warmed up nicely but unfortunately we didn't catch anything. We soon hit the trail and started making our way to Reserve. Once we passed the turn off for the alternate (easy) bypass things got challenging. There were lots of trees blocking the trail and we got to work with an axe, hand saw, and a tow strap clearing the trail and inching forward. Near the top of the mountain we started getting into snow on the trail. It was at this point we realized my Dad's Avalanche wasn't engaging 4WD, so I had to pull him through all of the deeper snow portions. We spent hours battling the mountain and finally arrived at the top at 9.5k feet above sea level. We stopped for a late lunch and then started working our way down the backside of the mountain. However as we did the snow got deeper. We came up to a section where a drift on the trail was over 3' deep. We broke out the shovels and knocked it down a bit and I was able to pull my dad's truck across it. Then the snow left for a mile or two and trail had cleared up and we thought we were home free... until we rounded another corner and saw a continuous section of snow for several hundred yards. We walked it out and while it seemed a little dangerous because it sloped towards the edge, we thought it was doable until we got to the bottom and found the drift there was over 6' deep and quite impassable. We decided it wasn't worth the risk and made the difficult decision the turn around and head back to the alternate bypass. On the way back we ran into another truck that had gotten stuck in the snow, apparently taking advantage of the newly cleared trail, and leaded a hand pulling them out. After that, we spent the next 30 minutes or so pulling out one truck, getting another stuck, pulling more, getting stuck, until we finally made it over the crest and started heading back back down. At this point it was getting late, I was low on gas (I had last filled up in TorC the day before), we were tired, and we still hadn't even finished section 3, after 2 days on the trail. We hightailed it the rest of the way to Reserve and made it just before 8pm, just in time to fuel up and eat dinner at Ella's Cafe (they close at 8). We slept great in Reserve after all that work!


We woke up to sub freezing temps at Dipping Vats campground and quickly built a fire and started cooking a mountain man breakfast in the Dutch Oven. With our bodies rested and our insides warmed we set to work on fixing the tire. I have never had to reset a bead before but we had my ARB air compressor and a ratchet strap so we decided to give it a try. Within a few minutes we had the tire reseated on the rim and discovered a puncture in the tire. My thought is that he got a puncture and once the pressures dropped it didn't take much to pop the bead. This was a set of passenger rated street tires on his truck. We promptly plugged the hole and were ready to pack up our campsite and head down to Snow Lake for a little bit of fishing. The weather had warmed up nicely but unfortunately we didn't catch anything. We soon hit the trail and started making our way to Reserve. Once we passed the turn off for the alternate (easy) bypass things got challenging. There were lots of trees blocking the trail and we got to work with an axe, hand saw, and a tow strap clearing the trail and inching forward. Near the top of the mountain we started getting into snow on the trail. It was at this point we realized my Dad's Avalanche wasn't engaging 4WD, so I had to pull him through all of the deeper snow portions. We spent hours battling the mountain and finally arrived at the top at 9.5k feet above sea level. We stopped for a late lunch and then started working our way down the backside of the mountain. However as we did the snow got deeper. We came up to a section where a drift on the trail was over 3' deep. We broke out the shovels and knocked it down a bit and I was able to pull my dad's truck across it. Then the snow left for a mile or two and trail had cleared up and we thought we were home free... until we rounded another corner and saw a continuous section of snow for several hundred yards. We walked it out and while it seemed a little dangerous because it sloped towards the edge, we thought it was doable until we got to the bottom and found the drift there was over 6' deep and quite impassable. We decided it wasn't worth the risk and made the difficult decision the turn around and head back to the alternate bypass. On the way back we ran into another truck that had gotten stuck in the snow, apparently taking advantage of the newly cleared trail, and leaded a hand pulling them out. After that, we spent the next 30 minutes or so pulling out one truck, getting another stuck, pulling more, getting stuck, until we finally made it over the crest and started heading back back down. At this point it was getting late, I was low on gas (I had last filled up in TorC the day before), we were tired, and we still hadn't even finished section 3, after 2 days on the trail. We hightailed it the rest of the way to Reserve and made it just before 8pm, just in time to fuel up and eat dinner at Ella's Cafe (they close at 8). We slept great in Reserve after all that work!
Last edited:
PirateMcGee
Expedition Leader
Is this the rack you got and simply didn't bolt the upper on? I have the raised side rails and it looks like I could just mount this directly to them and skip my round yakima bars.
https://www.amazon.com/Summates-Uni...rd_wg=A7wA4&psc=1&refRID=EWKYFEWY3PB8HGR2K5JX
https://www.amazon.com/Summates-Uni...rd_wg=A7wA4&psc=1&refRID=EWKYFEWY3PB8HGR2K5JX
Similar threads
- Replies
- 8
- Views
- 2K
- Replies
- 2
- Views
- 466
