Overland Trailer Build

joelN

New member
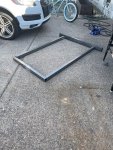
This weekend I am finally starting my custom overland trailer build. I tried this once before, but instead of creating the frame from scratch i stated with a cheep used cargo trailer and tried to strengthen it. After tearing it all apart and replacing the tongue, I realized the the strength of the frame was just not adequate for my needs. I wasted some money but I learned a few lessons along the way.

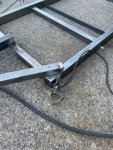
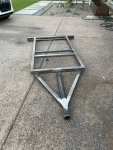
This time i have created my own design and ordered all of the steel. With my frame design I tried to get to as close to a 50° departure angle as possible while not going completely nuts with supports. I know I could have got away with 2"x3" rails, but I deiced on the rear bumper and rails will be 2"x4"x.120. Everything else on the the frame is 2"x3"x.120 or 2"x2"x.120. I want the tongue to be removable so it is a combination of a 3"x3"x.188 with a 2 1/2"x 2 1/2" x .188 tongue that slides into the 3x3. I designed it this way so that I could use an existing bolt on Lock-N-Roll hitch but now I am considering the switch the a Max Coupler. As for suspension, I bought a Timbren Axel-Less suspension for my last trailer so I plan to use it on this frame. I paid a lot for it so I would love to see it not go to waste.

Screen Shot 2021-06-24 at 2.09.16 PM.png
Screen Shot 2021-06-24 at 2.50.02 PM.png

This render doesn't show the doors or the rack for the rooftop tent, I have not created a 3d model of that yet. If the build goes well I want to fabricate some side boxes that are about 10" deep and flip down to store a stove, water heater, etc.

side.png
back.png
Screen Shot 2021-06-24 at 2.50.37 PM.png

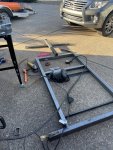
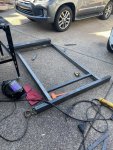
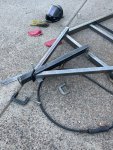
Once I start cutting and welding I will most some more pictures to document my progress.
 
Last edited:

john61ct

Adventurer
Seems lots heavier than necessary to me, will cost in vehicle wear and fuel over time not just up front.

But if you are speeding on off road washboard, overkill might be the way to go.

I would also do a single longer piece for the A-frame angles extending to the full outrigger side widths, rather than the short separate bits at a slightly different angle

More overlap points between those and the front 90° would be stronger

in the vertical dimension below the square frame not at the same level.

Just my 2¢
 

joelN

New member
After more thought I decided to lighten the trailer a bit by reducing the size of the tubing and switch in a few supports made of angle iron not square tubing. I kept the rear bumper as 2”x4” but most everything else went to 2”x3 or 2”x2”. Another big change was I ordered a max coupler. This allowed me to purchase a raw 36” receiver hitch and not use 3”x3” or 2.5”x2.5” to make one. This simplified the front of the trailer. As soon as I can I will up load some photos of the frame being welded.
 

billiebob

Well-known member
wow thats a lot of pieces, lots of rod too

I'd want to eliminate half the welds,
a few ideas.
on the tongue, run the diagonals straight to the tongue
if it works, extend those diagonals to the outside rail, mitre cut the main frame rail to fit
at the tongue end, keep the front crossmember one piece and weld the end of the tongue to it
at the other end cut it shorter and weld the front cross member to the main frame rail

Try to build it with as few pieces, keep the pieces as long as possible and minimize the welds
Fewer pieces will also make it easier to keep everything square
and every weld adds weight
 
Last edited:

joelN

New member
Well like most things in life it took me a lot longer to get this project started. This past weekend I got the main part of the frame tacked and ready for welding. My design changed a bit from my original idea mostly to save weight and deal with the crazy cost of steel. Quick disclaimer.....I am a DIY welder/frame builder. Please dont crap all over my work. I went into this project knowing that welding and metal work is not my day job but I plan to try to the best of my ability to make a great trailer!
 

Attachments

  • IMG_6365_600x.jpeg
    IMG_6365_600x.jpeg
    300.3 KB · Views: 58
  • IMG_6370_600x.jpeg
    IMG_6370_600x.jpeg
    287.2 KB · Views: 56
  • IMG_6367_600x.jpeg
    IMG_6367_600x.jpeg
    294.5 KB · Views: 60
  • IMG_6376_600x.jpeg
    IMG_6376_600x.jpeg
    317.4 KB · Views: 58
  • IMG_6377_600x.jpeg
    IMG_6377_600x.jpeg
    309.1 KB · Views: 61
  • IMG_6379_600x.jpeg
    IMG_6379_600x.jpeg
    303.8 KB · Views: 68
  • IMG_6380_600x.jpeg
    IMG_6380_600x.jpeg
    514.7 KB · Views: 68

joelN

New member
As I start to weld up my trailer I could use some advice. Before I close up all of the ends, should I be running my wires inside of the frame or should I weld on some tabs so I can run the wires on the underside? Should I be applying any time of metal protection to the insides of the tubing. I read on some form a guy sprayed some solution on the inside to protect from corrosion. (Keep in mind I live in desert where I dont get much rain or any snow)
 

slimtwo

Adventurer
Great progress on a good start. The really hard part, is when you're almost done. The little details seem to take forever to finish up. Good luck on your build!

Happy Trails!
 

joelN

New member
So today doesn’t look like much progress but I got most of the tacks welded and both the front and back outrigger pieces welded up. After a lot of internal debate I decided to go with one by one. The rear one will hold a propane tank and the front ones are just to protect the tires and fenders. Tomorrow I hope to weld on the front ones. I left the one piece long so I can make sure the 45 lines up perfectly with the front of the trailer.

0A837D27-0333-4A1A-B02F-89AE7E0064B0.jpeg3D3ED5A9-4FD0-42B9-BA8F-07117D8D074C.jpegB749E24B-4DC5-4E36-9055-FD4D116CC220.jpeg
 

joelN

New member
Just curious what people think is a better approach. I’m thinking about putting a receiver on the rear of the trailer. The question I have is should I install it through the 4 inch rear bumper or below it? The rear bumper is .120 in thickness

1D26407A-A6B0-4787-BA6D-A20C0FE31FF0.jpeg6178420F-6B1A-438B-AAB2-A3D129DC12CE.jpeg
 

joelN

New member
Today I got the front riggers welded on to the frame. I think they look good and will provide some additional protection for the tires and fenders. They will also give me a nice step for getting to the roof rack.

B1588E9B-BE91-42D1-A37B-734501B18729.jpeg
 

joelN

New member
I decided to place the tail lights flush with the rear bumper. I found these nice led ones that go inside of a rubber gasket. I drilled (2) 2.5” holes and will cut the middle out tomorrow. I have a pair of red ones and a pair of white ones. Just not sure if I want to install the white ones yet.

F5255AC0-5AF0-4D32-B186-4B5C73817E36.jpeg
 

slimtwo

Adventurer
I think it was a good call going through the bumper. I notched the top of mine so that it is flush with the bottom of the frame. That way. the rear hatch can fold all the way down flat if I need it too. And yah, it was a bit of work to make the cuts.

08142103.jpg

The only reason, in my way of thinking, you would need to have a hitch receiver on the back of a trailer, is for recovery . I just think it makes sense. Keep up the great work on your trailer.

Happy Trails!
 

Forum statistics

Threads
188,556
Messages
2,906,739
Members
230,666
Latest member
Cvonruex
Top