Point Five Ambo Build

cjken

Explorer
I'm in Pensacola Ken, right on the Gulf of Mexico. Four miles North of it to be exact.

Ohhh. I'm in Springhill for the week. A bit north of Tampa.

I'm seriously considering chopping off the front end of my black Mini-mid this spring.
I may be asking you for advice!!
 
Last edited:

patoz

Expedition Leader
Ohhh. I'm in Springhill for the week. A bit north of Tampa.

I'm seriously considering chopping off the front end of my black Mimi-mid this spring.
I may be asking you for advice!!


Sure, I'll be glad to help if I can. I have some info and pictures posted further back in this thread if you want a preview of what I did.
 

cjken

Explorer
Thanks Pat.
I do think I managed to read the majority of your thread.

I never would have thought of it on my own!!
 

patoz

Expedition Leader
Ken, are you thinking of pulling the chopped one behind your other one? That would be awesome with matching paint jobs, and look like a mini road train.
 

patoz

Expedition Leader
After much searching, discussion, debating options, and evaluating equipment, I have finally come up with solution that I think will work for replacing the side warning and work lights.

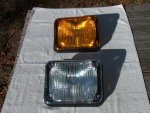
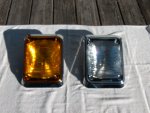
I finally located four amber and four clear Whelen 900 Series lightheads. These are ‘Warning’ lights, so they are not really suitable for work lights, however I got these brand new, sealed in the bag, lights with gaskets, for an unbelievable low price. They're Halogen and not LED, but they will fill up the holes and add some nice 'bling' to the camper until I can find some that are, or come up with another LED solution like we discussed here (post #73) with the plates and flanges.

HPIM1400.jpg

HPIM1403.JPG


I will also have four of the Rigid Industries 1x2 65º DC Scene Light - White - # 86620 in my hands tomorrow. I did a test with these lights (post #70) about a week ago, and found one unit was defective, but Rigid is replacing it under warranty.

attachment.php


What I may do is install the new Whelen lights like normal, and then install two of the Rigid LED lights in between the amber and clear lights. That way I can adjust the spacing to get them even, and for optimal coverage on the ground. They are going to do a better job and will throw light straight down for cooking, etc. I can then use the less expensive LED lights that mount with an adjustable bracket, and hang them under the light bars on the front and back.
 

patoz

Expedition Leader
Mike, the Whelen Halogen lights use a two pin proprietary bulb.

You could probably remove the existing socket and glue in a standard bayonet base socket fairly easily, but the problem you will run into is the focal length of the bulb vs. the reflectors. The Halogen bulbs have a specific 'hot spot' (the filament) in the center of the glass bulb, whereas the LED bulbs have a number of emitters spread around the circumference of a cylinder, which causes the focal point to be out of alignment. This is also why headlights cannot be converted to LED simply by changing out the bulb for an LED one.

I saved those links though for another source for the many other lights, especially interior ones found on RV's. :)
 

patoz

Expedition Leader
Transforming Furniture


Products - http://resourcefurniture.com/

Videos - http://resourcefurniture.com/about/media-press/watch-videos/

The majority of this furniture would not work in an ambulance or small camper, but I'm posting it just to show how innovation can change things to serve several different purposes, which is the name of the game when building a small camper space. If nothing else, some of the ideas and mechanisms could be adapted to our existing needs with the use of a little imagination.

I wish they had more detail about the mechanisms used to allow the pieces to articulate, but since they pay a room full of Mechanical Engineers to develop those items, I imagine it's a closely guarded secret.
 

DzlToy

Explorer
Any CAD guru worth his salt should be able to draw that out and produce a materials list, cut sheet, hardware list, etc., within a few weeks, not 1-2 years. Any metal fabricator worth his salt should then be able to take said drawings, cut sheets, etc and build it.

I understand their committment to quality, lifetime warranty, etc., and I love the idea of making something perform 2-3 tasks in a small space, but a bed that weighs 600 pounds so you can lift it with one finger is a bit absurd.

Think of how much space is wasted in a traditional RV, you have a large area for a kitchen, which probably gets used the most, but space like showers are only used for 10-15 mins at a time. Master bed rooms take huge amounts of space, just for you to sleep 7-8 hours. Wall desks, beds and tables would make so much more sense.

I do have a contact to a designer who could pen this if you are interested in pursuing it.
 

patoz

Expedition Leader
I do have a contact to a designer who could pen this if you are interested in pursuing it.


After seeing some of those designs, I'm kicking around some ideas in my head. If I come up with something feasible, I'll sure get back with you.

Thanks for the offer...
 

mk216v

Der Chef der Fahrzeuge
Way cool, I LOVE design for small spaces. Creativity abounds there, whereas with large spaces, no one gives a damn about thinking much about the size of space.
 

patoz

Expedition Leader
Time for an update...

Florida doesn't really have a season called Spring; we go from Winter almost straight to Summer. We have been having rain 3-4 days out of every week and it's raining right now, so that really slows down any big projects when you're having to work on your vehicle/camper/trailer outside.

In addition to getting a lot of parts and components ordered, I did manage to get a couple of small projects done.

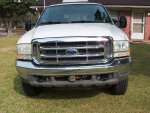
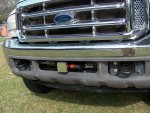
One was to install a front receiver hitch on my F250 Tow Vehicle for ambo/camper trailer. I used a Reese Front Mount Receiver, which is made by Draw-Tite.


51OVGW5bKPL._SL1500_.jpg


Getting the hitch mounted on the truck wasn't so bad, but getting the bumper and hitch combination aligned back with the body was a real pain. This should make snaking the camper into tight places much easier.
HPIM1412.jpg


I have one of those Bolt Lock receiver locking pins installed that opens with my ignition key. I still need to apply a little flat black touch up paint on the bolts and brackets, and some 3M Protectant on the plastic parts. If it ever stops raining...
HPIM1413.jpg


I also have a Warn 9000i winch mounted in a cradle that I will be using with the front receiver mount.

004446.jpg

All of this will eventually be replaced with a real winch bumper, once I find one I like and don't have to mortgage my house to pay for it!


The other project (sort of) I did this week, was find and purchase a Ferno Model 29M Ambulance Stretcher.

Somewhere near the beginning of this thread, I mentioned I was looking for one to build my outdoor camp kitchen on. This model is no longer made, but is the exact one I was looking for. It's replacement, which is basically the same stretcher with a few upgrades added, sells for about $5,000.00 new, and $1,500.00 - $2,000.00 refurbished. I kept checking eBay periodolicy, and found several that were somewhat reasonable in price, but the shipping cost was equal or more than the purchase price. So after two years of looking, I finally found one in Ohio that met all criteria. I used Old Dominion Freight at a cost of $210.00, and only two days to get it here…not bad. All total, I have less than $500.00 invested in it.

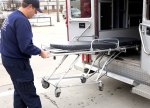
The thing about this model is it doesn't have a lot of crap sticking up on top of the bed part that I will need to remove to get a flat surface, and it is capable of being loaded and unloaded by one person. No, that's not me, it's a stock photo.
121014-fire-grant-2.jpg

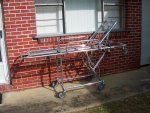
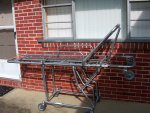
It arrived with no damage and is in extremely good condition, with no corrosion at all. It has a property tag on it from a Community College just like the seller said, and the wheels show no evidence of it ever being rolled outside on concrete or asphalt, as they are perfectly smooth with no dents, dings, or tears. It was used as a training aid and has never seen service in the field. The finish still looks like new.

The only thing I could find wrong with it, is a small stress crack in one of the cross bars. This will be easy enough to repair or even if I leave it alone, the stretcher will still be more than strong enough for my intended purpose. It also needs a little cleaning and lubricating from not being used, but that’s it. I also have the mattress, which is in good shape too.
HPIM1414.JPG

HPIM1415.JPG

Other than cleaning it up and lubricating the moving parts, it will be a while before I get to building the kitchen. I have a lot of ideas in my head, but I haven't decided on the final design or components yet.

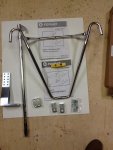
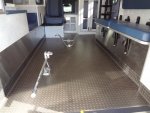
Now, I need to find a Ferno Model 175 Series Cot Fastening System, in real good condition and at a reasonable price.
s-l1600 - 01.jpg

1383912_639329859440998_506459921_n.jpg

If you have a set you want to get rid of, let me know and please include some detailed pictures so I can verify it's the correct one. If it's all corroded up, sorry but I'm not interested.
 

Forum statistics

Threads
188,296
Messages
2,905,101
Members
229,959
Latest member
bdpkauai
Top