Rambo Penguin's Gen 3 Build!

After spending a whole summer on the spacer lift i learned a lot about the handling and suspension upgrade needs. The weakest link is saggy springs and bouncy shocks in the rear (but I ended up doing all 4). On the highway it swayed a lot and likes to wonder after bumps. I already want to replace the springs, but figured i would start with shocks first for better performance sooner. I polled the montero community and decided on Bilstein 4600s. Fronts are Bilstein 24-062718 and rears are 24-062725.


I should have done this upgrade much sooner but didn’t know how bad it really was. I have no record of the struts or shocks being changed in the history of the truck. Upon removing the rear shocks i discovered that they offered almost no dampening at all. I was able to compress one of them with one finger and it would not bounce back. This means I spent the summer wheeling around and road tripping with basically no shocks and just stock springs in the rear. Epic fail. Since the rears were so bad I bit the bullet and did the front ones too. They weren’t as bad but definitely had seen some wear.
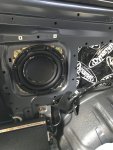

Rears

9NKJifHl.jpg


D8JTxkDl.jpg


T95zuTrl.jpg


Front

VMTm4pCl.jpg


KTtVkYMl.jpg


So now I have new struts in the front and shocks in the rear…. And it rides like a dream! All the vagueness and body roll I was used to disappear and instead the truck is planted, smooth and stable. The highway is no longer a death trap and offroad it just eats up the bumps and rocks. This might be my favorite upgrade after the 33” KO2s


An interesting point on the rear Bilsteins. When I installed the new shocks I noticed that they were slightly (½”) shorter than the stock ones I was removing. I was nervous about having the shock be the limiting factor for my droop. I called Bilstein and they confirmed that I had the right part, and that it was the correct measurement from the factory. So I put my fears to rest since I figured they would know what they are doing and that they would know if it had resulted in major problems. Plus they are covered by Bilsteins lifetime warranty.


gCxkgtJl.jpg
 

offthepath

Adventurer
Looks great, nice work!

I have not bumped up to 33s yet, but I did change the gearing to 4.9s in anticipation of new tires. Based on what you said I'm glad I did. You should consider changing gears. I think it was under $500 for front and rear 4.9 3rd members off ebay. I installed ARB lockers, but without those the installation would have been pretty straight forward.

With the new gears, I kind of hate to get bigger tires. I have been enjoying the extra punch!

Great thought! New gears are high on my priority list. I plan on sourcing them from a junk yard as soon as I find some. I also hope to score a rear 3rd member with an LSD in it.
 
I just bought my 4th Montero....this is a Gen 3 2005 3.8l I m also interested in the dual battery install you did..and a roof rack/storage system,. See fotos of my Monty
 

Attachments

  • JA4MW51S85J004774_1533843599627.jpg2g.jpg
    JA4MW51S85J004774_1533843599627.jpg2g.jpg
    114.9 KB · Views: 52
  • 640x480.jpg
    640x480.jpg
    128.2 KB · Views: 58
  • 0d9c6e7d6c764e358cf5e6bceee28049.jpg9m.jpg
    0d9c6e7d6c764e358cf5e6bceee28049.jpg9m.jpg
    84.1 KB · Views: 58

evomaki

Observer
Rambo Penguin,

I read the stereo part of your thread with great interest. I would like to upgrade the stereo in my son's gen 3 for a Christmas present. He's a college kid with little money. Apple CarPlay (particularly with phone plug in the upper glovebox) will be nice and much safer than how tempting it is to pick up a phone while driving.

I'm not interested in the most cranking system. He can buy that for himself someday, but something that gets the job done. Do you know of a sub which would work in the factory location? The one in his vehicle was shot before we bought it. I just need something that gets the job done. The space looks like a good size, but you had a hard time. Crutchfield says they have nothing that fits. Curious for your thoughts. Maybe you went with a "good" sub. Is there possibly a more modest sub that might fit. If he and his buddies want to crank up the base, they can take someone else's car.

I think door speakers and tweeter have options, so good there. Did you have to make trim pieces to trim out your Pioneer double DIN head unit into the stock dash surround, or modify the stock dash panel? Thank you!
 
Do you know of a sub which would work in the factory location?

Did you have to make trim pieces to trim out your Pioneer double DIN head unit into the stock dash surround, or modify the stock dash panel? Thank you!

I used this 8" Polk sub in the factory spot. Just make new connectors for the wires and use self-tapping sheet metal screws to mount. Any similar sized 8" sub should fit. Also make sure you get the FSM pages for removing the panels. Not difficult, but very time consuming.

https://www.amazon.com/gp/product/B0016GX21G/ref=oh_aui_detailpage_o07_s00?ie=UTF8&psc=1

Thanks for the interest and question! The polk replacement is everyone's favorite for using that spot. Everyone says it fits well and sounds good. As for the trim piece, no modifying is needed. It just fits in behind the factory trim pannel
 

evomaki

Observer
Worked like a charm, exactly as you said. Used the mounting flange from the old sub. Cut it out with a cut off wheel. Image of the throw away part shown. Used pop rivets and silicon the attach sub to flange.
 

Attachments

  • IMG_1411.jpg
    IMG_1411.jpg
    1.3 MB · Views: 89
  • IMG_1412.jpg
    IMG_1412.jpg
    1.6 MB · Views: 90
  • IMG_1413.jpg
    IMG_1413.jpg
    1.6 MB · Views: 84
I scored an inexpensive (but good quality) light bar recently so i decided to put it on. It’s a 24” Blazer spot/flood combo. Nothing special, but a good step above the cheap Chinese stuff. Used some scrap aluminum that i had to make a bracket for it and cut the grill to match. I wired it to come on when I hit the high beams for simplicity. It is surprisingly bright with really good spread. Not exactly a pencil beam but it is great for trail work and night driving on dark back roads.

9ELmDINl.jpg

MR1Jdfjl.jpg

XVlNw9Pl.jpg

0csXGnnl.jpg
 
And if you were being observant in the last post you might have noticed… That I scored cheap wheels!! Finally, i’ve been hunting for a wider stance since the second i bought this. I found some Eagle Alloy wheels (set of 5) for cheap and jumped on it. 4 came painted in bedliner and i sprayed the spare to match. The details: -11 offset, 8” x 16” Aluminum with a 108mm center bore. I was really hoping for 0 offset for fitment but another ½” isn't too much and the price was right. Here’s a few things i’ve learned about wide wheels on a Gen 3. They look amazing, fix that tippy feeling that makes you crap your pants and they absolutely require hub centric rings. A hub centric ring is used to center the wheel on the hub. Simple conical lugnuts is not enough for the sensitive Gen 3 front end. I got some plastic 67.1mm to 108mm rings and they eliminated any front end shake or vibration. These barely clear the front calipers (problem with the steel wheels from earlier) but they do in fact clear.


pYdUkB4l.jpg


40FxIZ3l.jpg


Hub centric rings


KI9JdoNl.jpg


So how do the wheels compare? Track width was my primary goal here. Sure, they look mean, but I was far more worried about performance. The new wheels are 2.75? Wider per side than the stock wheels with the 33” tires. So i’ve gained 5.5” of total track width which feels and looks massive! The back wheels are just about flush with the guards and the front wheels stick out about ½”.


ED6wUlQl.jpg


A few issues. The first is that wide wheels will rub on front and rear of the fenders in the front. I had already trimmed the front bumpers so i didn’t need to do any more work there. I did however need to trim about 2” of the rear front fenders. There wasn’t any science to this, I just cut until they fit. It wasn’t much cutting, but now i need to figure out how to remount the fender guards to keep mud and dirt out of my body panels.


GUiiklUl.jpg


b2pF6NVl.jpg


The other big issue is suspension travel. At slow flex the tires will not hit the fenders. However, add a little bit of speed and everything changes. I found this out when I took a dive into a muddle that was much deeper than expected. Smashed my front driver fender and passenger rear. Luckily it wasn’t anything crazy.. But it did make me realize that i was going to have to fix the issue. Before considering more serious modifications i decided to extend the bump stops. After messing with some spacers and flexing the rig out a bit i decided to run ½ spacers in the rear and 1” in the front. I extended the bolts on the stock bump stops by cutting the original bolt, cutting up a different bot and welding them together. Seems to work well and allows for me to run spacers. If this becomes a more permanent fix i will order custom bump stops to replace these.


gmW0biJl.jpg


yICDTjEl.jpg


EbgqHmrl.jpg


Longer term solutions involve getting a real lift, running different wheels, or cutting. I’ve decided to go with a true lift spring and run OME medium duty springs instead of my spacer lift. This should help dramatically since the stock suspension is soft and worn out. I will see if that fixes the issues before doing anything else.


AP4uMzYl.jpg
 
The final drawback of the wide wheels was that my sliders also had to be cut down to accommodate the wider turning radius. I needed to take abou 1.5” off of them so while i had them off the car I decided to beef them up a bit. These siders did save my doors once this summer when i slipped off an obstacle and almost smashed my door. I wanted to re-enforce them so that they would hold up for more hits, and I also wanted to add some support so I could use them as a hi-lift point.


I used a hole saw to notch some tubing, cut it to size, smashed it in and welded it up. Very pleased with how they turned out! Now i will have a little more confidence using a hi-lift on them if i need to and they will take a beating without losing shape.


klJ4sYQl.jpg


HLFqGSFl.jpg


H5c33JTl.jpg


lLXUCoZl.jpg


lhmoaAjl.jpg


Qffsiael.jpg


cBZR0vHl.jpg


Lastly, I really wanted rock lights.. But the kind that all the posers have that just light up there suspension set ups in their wheel wells, I wanted to be able to see under the rig for night wheeling. I had saved the factory side step plugs and reused them to add some lights attached to the sliders. They are bright enough to light up the entire underside of the Montero and they also come on when i unlock the car and open the doors, which is a cool touch. Later on I will install a switch so i can run them all time.


zsRZjJBl.jpg


7DDr0gal.jpg
 

Forum statistics

Threads
186,687
Messages
2,888,964
Members
226,872
Latest member
Supreet.dhaliwal
Top