Se7en62
Adventure Seeker
[Follow along on Instagram @overland_pajero]
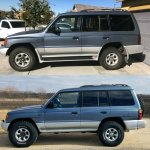
I've had this Montero --> Pajero in my garage for about a month now so I figured I'd put together another build thread since things are starting to rock and roll.
After my wife and I spent some time in our XJ traveling around Texas and the Southwest, we realized we wanted something a little bigger. I did the typical search for an FJ80, but after I started reading about the Gen 2.5 Montero my search was over. I found this clean one in Palm Springs, CA, so after a couple conversations with the owners I bought a one-way plane ticket and flew to pick it up.

After meeting the previous owners at the airport and exchanging funds for a title and bill of sale, I turned around and drove it the 1,100 miles back to Austin.


I stopped in Phoenix to met up with another member and install a set of manual hubs. After we were through, I only had enough energy to drive about half-way to Tuscon. Which was perfect timing to fold the seats flat and get some good rest.

UPDATED: 03/12/19
BEGAN AS:
1999 Mitsubishi Gen 2.5 Montero 4x4 Winter Package w/ 196k
Gen 2.5 (NL) Body
Anchorage Gray Pearl (F4470) / Munich Silver (F1688)
Factory Rear Air Locker
Power Windows and Locks
Moonroof
Leather Seating for 7
Heated Front Seats
15" x 7" Factory Wheels
MAINTENANCE by PO:
[CHECK @ 174k] Timing Belt
[CHECK @ 174k] Timing Belt Tensioner
[CHECK @ 174k] Water Pump
[CHECK @ 174k] Rear Camshaft Seals
[CHECK @ 174k] Valve Stem Seals
NECESSARY MAINTENANCE @ 197k:
[CHECK] Duracell Platinum AGM Group 24 ($140) <-- Made by Deka/EastPenn.
[CHECK] Replace Rear Door Latch Assembly ($8)
[CHECK] Hart Slotted Zinc-coated Brakes Rotors and Ceramic Pads ($227)
[CHECK] (4) Timken Wheel Bearings & (2) Seals ($78)
[LABOR] R&R Front Brakes, CV Axles, and Bearings ($290)
[CHECK] A.D.D. Updated Crankshaft Bolt ($35)
[LABOR] R&R Crankshaft Pulley & Update Bolt ($30)
[CHECK] Replace CV's w/ Cardone Reman. Units ($81)
[CHECK] Flush Radiator and Coolant System w/ Blue Devil Radiator Flush ($7)
[CHECK] Drain & Fill Coolant System w/ 2.375 Gallons Green 50/50 Antifreeze ($30)
[CHECK] Drain & Fill Transmission w/ 8.9 Quarts Mitsubishi Diamond SP-III Transmission Fluid ($32) [4qt Drain & Fill]
[CHECK] Drain & Fill Transfer Case w/ 2.6 Quarts Lucas Synthetic 75w90 [API Class GL-4] ($54)
[CHECK] Drain & Fill Front Differential w/ 1.2 Quarts Red-Line or Lucas 85w90/80w90 [API Class GL-5] ($18)
[CHECK] Drain & Fill Rear Differential w/ 3.3 Quarts Red-Line or Lucas 85w90/80w90 [API Class GL-5] ($27)
[CHECK] Drain & Fill Engine with 4.8 Quarts Rotella T6 5w40 and new K&N Oil Filter ($65)
[CHECK] Lifetime 4x4 Alignment ($87)
[CHECK] 8-Piece Steering System w/ UCA's w/ Ball Joints, Lower Ball Joints, Inner & Outer Tie Rods - ($134)
[CHECK] R&R EGR Valve ($48)
[CHECK] EGR Control Solenoid ($30)
[CHECK] Build and Install "Big 3 Upgrade" w/ 1/0 Wire ($136)
[CHECK] Replacement Front Passenger Window Regulator ($44)
[CHECK] R&R 4x4 Vacuum Switch Solenoid ($27)
[CHECK] R&R Fuel Filter ($19)
[CHECK] R&R Air Filter, Clean MAF, Clean Throttle Body ($40)
[CHECK] Detail Interior and Condition Leather ($28)
[CHECK] Replace Floor Mats ($40)
NECESSARY MAINTENANCE @ 202k:
[CHECK] Drain & Fill Engine with 4.8 Quarts Rotella T6 5w40 and new K&N Oil Filter ($65)
[CHECK] Rotate & Balance Tire w/ Spare Rotation
[CHECK] R&R Aftermarket Radiator with Spectra Radiator and Gates Hoses (Temp.) ($144)
[CHECK] R&R OEM Thermostat ($25)
NECESSARY MAINTENANCE @ 207k:
[CHECK] Drain & Fill Engine with 4.8 Quarts Rotella T6 5w40 and new K&N Oil Filter ($65)
[CHECK] R&R Auxiliary Fan w/ Spal 12" Pusher Fan ($80)
NECESSARY MAINTENANCE @ 215k:
[CHECK] Drain & Fill Engine with 4.8 Quarts Rotella T6 5w40 and new K&N Oil Filter ($65)
NECESSARY MAINTENANCE @ 218k:
[CHECK] Drain & Fill Engine with 4.8 Quarts Rotella T6 5w40 and new K&N Oil Filter ($65)
NECESSARY MAINTENANCE @ 225k:
[CHECK] Timing Belt, Hydraulic Tensioner, Water Pump, Cam Seals, Spark Plug Seals, Pulleys, and Belts ($308)
[CHECK] NGK Plugs and Wires ($47)
[CHECK] Flex Technologies 3.5mm, 6mm, 8mm, 10mm Silicone Vacuum Hose ($45)
[CHECK] Fel-Pro Valve Cover Gaskets ($25)
[CHECK] OEM Low Pressure Fuel Line ($5 take-off)
[LABOR] R&R TB, Tensioner, WP, etc etc etc ($1,400)
NECESSARY MAINTENANCE @ 225k:
[CHECK] Drain & Fill Engine with 4.8 Quarts Rotella T6 5w40 and new K&N Oil Filter ($65)
PENDING MAINTENANCE:
[Pending] Drain & Fill Engine with 4.8 Quarts Rotella T6 5w40 and new K&N Oil Filter ($65)
[Pending] Drain / Flush Diffs and Transfer Case
[Pending] R&R Starter
[Pending] R&R Fuel Sending Unit, Fuel Pump, & Fuel Filter
EXTERIOR UPGRADES & MODIFICATIONS:
[CHECK] AVM Series 400 (443) Manual Locking Hubs ($142)
[CHECK] (5) General Grabber X3 33x10.5R15 ($1,300)
[CHECK] Remove Factory Running Boards
[CHECK] Remove Factory Roof Rack
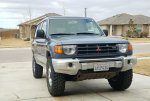
[CHECK] Rebadge as "PAJERO" ($100)
[CHECK] De-badged Gen 2 Grill ($18)
[CHECK] ARB Winch Bumper ($855)
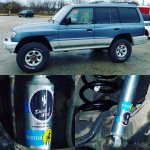
[CHECK] A.D.D. Old Man Emu Expedition Lift w/ Bilstein 5100's ($950)
[CHECK] A.D.D. Adjustable Panhard Bar ($180)
[CHECK] A.D.D. 3-Piece Skid Plate Combo (Front, Mid, and Trans)Front Skid Plate ($500)
[CHECK] LED Headlights ($35)
[CHECK] Fabricate Full-Length Roof Rack ($180)
[CHECK] Install (2) Pelican iM2700 Cases to Roof Rack ($FREE)
[CHECK] (8) Surco GM100 5-1/2" Gutter Mounts ($120)
[CHECK] Rhino Rack Foxwing Mounts for Rear Awning ($58)
[CHECK] Cascadia Vehicle Tents - Mt. Shasta Extended Pioneer w/ Annex + Summit Rails and Shoe Bags ($700)
[CHECK] Teton 20°F Canvas Double Sleeping Bag ($180)
[CHECK] Teton Flannel Pillows ($24)
[CHECK] ARB 4.5' x 8.5' Rear Awning ($80)
[CHECK] Rear Ladder from Cassetta Fabrication ($295)
Trail Gear 67" Rock Sliders
Fabricate Fender Side Bars
[CHECK] Tint ($82)
[CHECK] LED Reverse Lights ($20)
[CHECK] Wizzy Wheel ($22)
[CHECK] Replace Hood w/ Hood in Better Shape ($40)
[CHECK] Spare OEM Gen 2.5 Headlights ($40)
[CHECK] Spare OEM GEn 2.5 Taillights ($40)
[CHECK] 35w LED Cube Lights Combo Beam ($24)
[CHECK] 100w Lightforce Blitz 240 10" Halogen Off-Road Lights ($100)
[CHECK] Lightforce Combo Beam - Crystal Blue - Lens Covers ($60)
[CHECK] Lightforce Hi-Mounts for RMDL Lights ($30)
[CHECK] Cleanwaste Go-Anywhere Toilet ($65) w/ 15-pack Toilet in a Bag ($15)
[CHECK] ECCPP Billet 6061-T6 AL 1.25" Wheel Spacers ($70)
INTERIOR UPGRADES & MODIFICATIONS:
Replace Front Seats Mounts w/ "Bouncy" Seats, but retain heated-seat function (Pending Project)
[CHECK] Remove 2nd and 3rd Row Seats
[CHECK] SafariStraps 41"x28" ($85)
[CHECK] Powertye 16"x32" Net to be used as Attic ($15)
[CHECK] Replace All Interior Bulbs w/ LEDs ($35)
[IN PROGRESS] Build Drawer System ($135)
[CHECK] Dometic CFX95DZW Dual-Zone Fridge/Freezer w/ Wi-Fi ($600)
[CHECK] DFG Offroad Fridge Slide w/ Cutting Board for CFX95DZW ($440)
[CHECK] LED Courtesy Lights ($FREE)
[CHECK] LED Cargo/Map Lights ($40)
[CHECK] Build Cargo Compartment 12V/80A Power Supply ($162)
[CHECK] KPPOL 50w 6-port USB 2.0 Quick Charger ($16)
RECOVERY:
[CHECK] Smittybilt XRC9500 ($200)
[CHECK] UltRanger Winch Hook ($30)
[CHECK] Luso Overland Pintle Hitch Recovery Point ($75)
[CHECK] UltRanger 3" x 20' Tree Saver
[CHECK] UltRanger 10-Ton Snatch Block
[CHECK] Converted to Synthetic Winch Line ($60)
NUTS & BOLTS:
[CHECK] Everything I've bought has been Grade 8.8 or higher, so... ($130)
I've had this Montero --> Pajero in my garage for about a month now so I figured I'd put together another build thread since things are starting to rock and roll.
After my wife and I spent some time in our XJ traveling around Texas and the Southwest, we realized we wanted something a little bigger. I did the typical search for an FJ80, but after I started reading about the Gen 2.5 Montero my search was over. I found this clean one in Palm Springs, CA, so after a couple conversations with the owners I bought a one-way plane ticket and flew to pick it up.

After meeting the previous owners at the airport and exchanging funds for a title and bill of sale, I turned around and drove it the 1,100 miles back to Austin.


I stopped in Phoenix to met up with another member and install a set of manual hubs. After we were through, I only had enough energy to drive about half-way to Tuscon. Which was perfect timing to fold the seats flat and get some good rest.

UPDATED: 03/12/19
BEGAN AS:
1999 Mitsubishi Gen 2.5 Montero 4x4 Winter Package w/ 196k
Gen 2.5 (NL) Body
Anchorage Gray Pearl (F4470) / Munich Silver (F1688)
Factory Rear Air Locker
Power Windows and Locks
Moonroof
Leather Seating for 7
Heated Front Seats
15" x 7" Factory Wheels
MAINTENANCE by PO:
[CHECK @ 174k] Timing Belt
[CHECK @ 174k] Timing Belt Tensioner
[CHECK @ 174k] Water Pump
[CHECK @ 174k] Rear Camshaft Seals
[CHECK @ 174k] Valve Stem Seals
NECESSARY MAINTENANCE @ 197k:
[CHECK] Duracell Platinum AGM Group 24 ($140) <-- Made by Deka/EastPenn.
[CHECK] Replace Rear Door Latch Assembly ($8)
[CHECK] Hart Slotted Zinc-coated Brakes Rotors and Ceramic Pads ($227)
[CHECK] (4) Timken Wheel Bearings & (2) Seals ($78)
[LABOR] R&R Front Brakes, CV Axles, and Bearings ($290)
[CHECK] A.D.D. Updated Crankshaft Bolt ($35)
[LABOR] R&R Crankshaft Pulley & Update Bolt ($30)
[CHECK] Replace CV's w/ Cardone Reman. Units ($81)
[CHECK] Flush Radiator and Coolant System w/ Blue Devil Radiator Flush ($7)
[CHECK] Drain & Fill Coolant System w/ 2.375 Gallons Green 50/50 Antifreeze ($30)
[CHECK] Drain & Fill Transmission w/ 8.9 Quarts Mitsubishi Diamond SP-III Transmission Fluid ($32) [4qt Drain & Fill]
[CHECK] Drain & Fill Transfer Case w/ 2.6 Quarts Lucas Synthetic 75w90 [API Class GL-4] ($54)
[CHECK] Drain & Fill Front Differential w/ 1.2 Quarts Red-Line or Lucas 85w90/80w90 [API Class GL-5] ($18)
[CHECK] Drain & Fill Rear Differential w/ 3.3 Quarts Red-Line or Lucas 85w90/80w90 [API Class GL-5] ($27)
[CHECK] Drain & Fill Engine with 4.8 Quarts Rotella T6 5w40 and new K&N Oil Filter ($65)
[CHECK] Lifetime 4x4 Alignment ($87)
[CHECK] 8-Piece Steering System w/ UCA's w/ Ball Joints, Lower Ball Joints, Inner & Outer Tie Rods - ($134)
[CHECK] R&R EGR Valve ($48)
[CHECK] EGR Control Solenoid ($30)
[CHECK] Build and Install "Big 3 Upgrade" w/ 1/0 Wire ($136)
[CHECK] Replacement Front Passenger Window Regulator ($44)
[CHECK] R&R 4x4 Vacuum Switch Solenoid ($27)
[CHECK] R&R Fuel Filter ($19)
[CHECK] R&R Air Filter, Clean MAF, Clean Throttle Body ($40)
[CHECK] Detail Interior and Condition Leather ($28)
[CHECK] Replace Floor Mats ($40)
NECESSARY MAINTENANCE @ 202k:
[CHECK] Drain & Fill Engine with 4.8 Quarts Rotella T6 5w40 and new K&N Oil Filter ($65)
[CHECK] Rotate & Balance Tire w/ Spare Rotation
[CHECK] R&R Aftermarket Radiator with Spectra Radiator and Gates Hoses (Temp.) ($144)
[CHECK] R&R OEM Thermostat ($25)
NECESSARY MAINTENANCE @ 207k:
[CHECK] Drain & Fill Engine with 4.8 Quarts Rotella T6 5w40 and new K&N Oil Filter ($65)
[CHECK] R&R Auxiliary Fan w/ Spal 12" Pusher Fan ($80)
NECESSARY MAINTENANCE @ 215k:
[CHECK] Drain & Fill Engine with 4.8 Quarts Rotella T6 5w40 and new K&N Oil Filter ($65)
NECESSARY MAINTENANCE @ 218k:
[CHECK] Drain & Fill Engine with 4.8 Quarts Rotella T6 5w40 and new K&N Oil Filter ($65)
NECESSARY MAINTENANCE @ 225k:
[CHECK] Timing Belt, Hydraulic Tensioner, Water Pump, Cam Seals, Spark Plug Seals, Pulleys, and Belts ($308)
[CHECK] NGK Plugs and Wires ($47)
[CHECK] Flex Technologies 3.5mm, 6mm, 8mm, 10mm Silicone Vacuum Hose ($45)
[CHECK] Fel-Pro Valve Cover Gaskets ($25)
[CHECK] OEM Low Pressure Fuel Line ($5 take-off)
[LABOR] R&R TB, Tensioner, WP, etc etc etc ($1,400)
NECESSARY MAINTENANCE @ 225k:
[CHECK] Drain & Fill Engine with 4.8 Quarts Rotella T6 5w40 and new K&N Oil Filter ($65)
PENDING MAINTENANCE:
[Pending] Drain & Fill Engine with 4.8 Quarts Rotella T6 5w40 and new K&N Oil Filter ($65)
[Pending] Drain / Flush Diffs and Transfer Case
[Pending] R&R Starter
[Pending] R&R Fuel Sending Unit, Fuel Pump, & Fuel Filter
EXTERIOR UPGRADES & MODIFICATIONS:
[CHECK] AVM Series 400 (443) Manual Locking Hubs ($142)
[CHECK] (5) General Grabber X3 33x10.5R15 ($1,300)
[CHECK] Remove Factory Running Boards
[CHECK] Remove Factory Roof Rack
[CHECK] Rebadge as "PAJERO" ($100)
[CHECK] De-badged Gen 2 Grill ($18)
[CHECK] ARB Winch Bumper ($855)
[CHECK] A.D.D. Old Man Emu Expedition Lift w/ Bilstein 5100's ($950)
[CHECK] A.D.D. Adjustable Panhard Bar ($180)
[CHECK] A.D.D. 3-Piece Skid Plate Combo (Front, Mid, and Trans)Front Skid Plate ($500)
[CHECK] LED Headlights ($35)
[CHECK] Fabricate Full-Length Roof Rack ($180)
[CHECK] Install (2) Pelican iM2700 Cases to Roof Rack ($FREE)
[CHECK] (8) Surco GM100 5-1/2" Gutter Mounts ($120)
[CHECK] Rhino Rack Foxwing Mounts for Rear Awning ($58)
[CHECK] Cascadia Vehicle Tents - Mt. Shasta Extended Pioneer w/ Annex + Summit Rails and Shoe Bags ($700)
[CHECK] Teton 20°F Canvas Double Sleeping Bag ($180)
[CHECK] Teton Flannel Pillows ($24)
[CHECK] ARB 4.5' x 8.5' Rear Awning ($80)
[CHECK] Rear Ladder from Cassetta Fabrication ($295)
Trail Gear 67" Rock Sliders
Fabricate Fender Side Bars
[CHECK] Tint ($82)
[CHECK] LED Reverse Lights ($20)
[CHECK] Wizzy Wheel ($22)
[CHECK] Replace Hood w/ Hood in Better Shape ($40)
[CHECK] Spare OEM Gen 2.5 Headlights ($40)
[CHECK] Spare OEM GEn 2.5 Taillights ($40)
[CHECK] 35w LED Cube Lights Combo Beam ($24)
[CHECK] 100w Lightforce Blitz 240 10" Halogen Off-Road Lights ($100)
[CHECK] Lightforce Combo Beam - Crystal Blue - Lens Covers ($60)
[CHECK] Lightforce Hi-Mounts for RMDL Lights ($30)
[CHECK] Cleanwaste Go-Anywhere Toilet ($65) w/ 15-pack Toilet in a Bag ($15)
[CHECK] ECCPP Billet 6061-T6 AL 1.25" Wheel Spacers ($70)
INTERIOR UPGRADES & MODIFICATIONS:
Replace Front Seats Mounts w/ "Bouncy" Seats, but retain heated-seat function (Pending Project)
[CHECK] Remove 2nd and 3rd Row Seats
[CHECK] SafariStraps 41"x28" ($85)
[CHECK] Powertye 16"x32" Net to be used as Attic ($15)
[CHECK] Replace All Interior Bulbs w/ LEDs ($35)
[IN PROGRESS] Build Drawer System ($135)
[CHECK] Dometic CFX95DZW Dual-Zone Fridge/Freezer w/ Wi-Fi ($600)
[CHECK] DFG Offroad Fridge Slide w/ Cutting Board for CFX95DZW ($440)
[CHECK] LED Courtesy Lights ($FREE)
[CHECK] LED Cargo/Map Lights ($40)
[CHECK] Build Cargo Compartment 12V/80A Power Supply ($162)
[CHECK] KPPOL 50w 6-port USB 2.0 Quick Charger ($16)
RECOVERY:
[CHECK] Smittybilt XRC9500 ($200)
[CHECK] UltRanger Winch Hook ($30)
[CHECK] Luso Overland Pintle Hitch Recovery Point ($75)
[CHECK] UltRanger 3" x 20' Tree Saver
[CHECK] UltRanger 10-Ton Snatch Block
[CHECK] Converted to Synthetic Winch Line ($60)
NUTS & BOLTS:
[CHECK] Everything I've bought has been Grade 8.8 or higher, so... ($130)
Last edited:


