Sewing Thread....A discussion on making your own adventure textile gear.

Fenderfour

Active member
I have done some research but definitely not as much as you. I like that you are unzipping the top of the window to prevent water from getting inside the canvas if you made your zipper at the bottom. That is the primary decision I have made. I also like that you are radiusing the corners, this will prevent the potential for tearing if it was a right angle. I want to do this but not sure given I feel it will be harder to sew. Still learning, scheming, questioning my commitment to learn how to sew, procrastinating, etc.


Okay, wow, that is very thick. I should be well within those tolerances. I will have to look at that sewing machine. I wish it had a longer throat (I think that is the right term) though.
It is a small throat, and I've made very large tents (24' dia) with this machine. It takes a little planning, but it works.
 

taugust

Adventurer
I spent some time engineering the windows for a successful build. The windows open from the top, the bottom doesn't open.

The windows are cut out of the main body, leaving a 3" flap at the bottom and a generous seam allowance around the opening. This material is offcut, to be used for patching/reinforcement. This allows me to finish the openings by rolling the edge. I designed a 15" dia on the corners to facilitate rolling. Each opening is rolled & ironed before sewing. This turned out better than I expected and I credit that to using canvas. This approach wouldn't be possible with the Vinyl Coated Polyester (VCP) i'm used to.

Each window panel is cut from a different piece of material, again with seam allowances to fold over the edge. Each edge is folded and ironed then the zipper is pinned on. The zipper flap covers the raw edge of the window panel. I sew two seams, one as close to the sipper as I can with a zipper foot, the other at the edge of the sipper flap to capture the raw edge.

The window panels are then pinned back into the main tent body, all around the zipper and lower flap. I start by sewing around the zipper, close to the teeth with a zipper foot. Next is to sew one straight seam at the flap to window panel join. Then I roll the remaining flap over a couple of times to capture the raw edge and add a second seam. Next is to add a faux bar-tack to the edge where the flap is slit on the opening. Final step is to sew the second seam on the zipper.

Here's the drawing I made. The radius switched to 15, and there seam diagram on the right has changed. I decided to not try to get the window and the screen on the same seam.
View attachment 844395

-this is as far as I have gotten, the rest is only a plan-

Once all the windows are in the main tent, I will come back and add reinforcing patches where the zippers terminate at the flap. This closes a small hole and will prevent the silt from the flap from migrating.

After patches are in, I'll cut the screens. They will need have the edges rolled, and I may use bias tape and a binder attachment to keep the edge tidy. They will get sewn on the outside.

I acknowledge that this all may not be the best set up for a tent, the selection of cotton canvas being a possible source of mold, etc... But this is the easiest part of the camper build and if I need to make a new tent in a year or two, it's not the end of the world.
Looking forward to seeing the finished product. I have a Sailrite LS-1 with the Worker B. It's a good machine!
 

Fenderfour

Active member
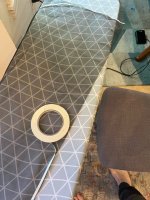
I have a quick tip to share - I was working on adding screens to the tent for my popup camper (build thread here). I needed to get the edges rolled to add strength to the seam, but the fabric was super slippery and didn't want to sit flat, especially around curves. I used some 1/4 wide masking tape to define the cut, then I used the tape as a core to roll the edge, ironing at medium heat for each of 3 fold-overs. In the end, the edges were crisp and easy to sew.

image3(12).jpeg
 

modernbeat

Jason McDaniel
I have a quick tip to share - I was working on adding screens to the tent for my popup camper (build thread here). I needed to get the edges rolled to add strength to the seam, but the fabric was super slippery and didn't want to sit flat, especially around curves. I used some 1/4 wide masking tape to define the cut, then I used the tape as a core to roll the edge, ironing at medium heat for each of 3 fold-overs. In the end, the edges were crisp and easy to sew.

I use double sided basting tape for any projects like that. Makes it easy to fold and stich.

I use a circa 1915 Singer 31-15. It had been rebuilt by Singer in the '60s. I've rebuilt it and repowered it again.
IMG_8628-L.jpg


The most recent project was all the canvas curtains and tenting for my 1926 Model T Camping Car.


IMG_8789-L.jpg


IMG_8765-L.jpg
 

Fenderfour

Active member
I use double sided basting tape for any projects like that. Makes it easy to fold and stich.

I use a circa 1915 Singer 31-15. It had been rebuilt by Singer in the '60s. I've rebuilt it and repowered it again.
IMG_8628-L.jpg


The most recent project was all the canvas curtains and tenting for my 1926 Model T Camping Car.


IMG_8789-L.jpg


IMG_8765-L.jpg
Thats a great tip, thanks.

Great car too. Love the old school overlanding.
 

Forum statistics

Threads
188,293
Messages
2,904,989
Members
229,961
Latest member
bdpkauai
Top