so I started another project, Apache Raven revision #2

jeep-N-montero

Expedition Leader
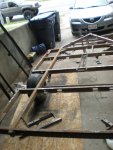
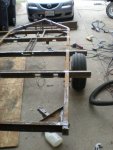
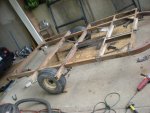
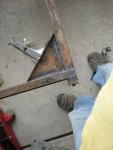
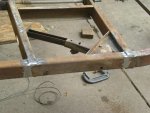
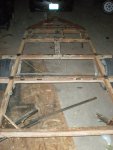
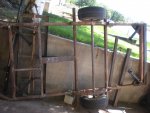
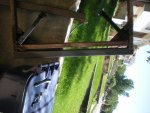
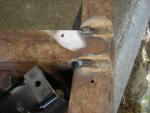
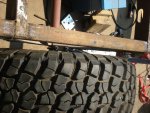
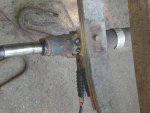
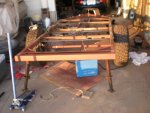
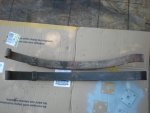
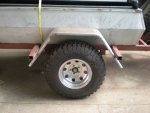
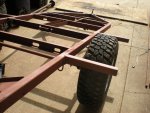
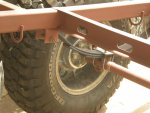
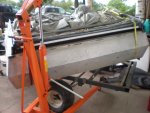
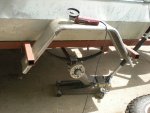
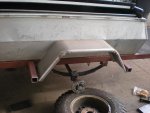
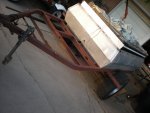
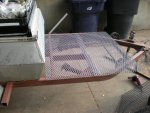
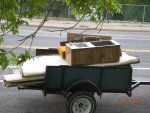
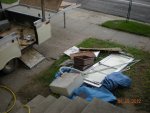
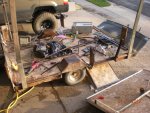
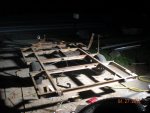
Last summer I built this http://www.expeditionportal.com/for...f-road-quot-tent-trailer-long-post?highlight= but have been wishing the frame was a bit longer to build some storage on the front. So last month I picked up an 80's Coleman Gettysburg tent trailer for $150 and stripped it out over the last few evenings. The frame is about 26 inches longer than the current frame I am using so it will allow for some fun ideas. I should break even with selling off some parts from the trailer and selling the aluminum and stainless steel for scrap, and might use the water tank and power inverter from it. The trailer is a bit long for some tighter trails but that is not what I am building it for, although it will still have more clearance than most of the "off the shelf" trailers that claim to be built for trail use. At the moment my hand aches from using the drill and sawzall so much, drilling out all of the rivets and cutting everything up took more effort than I expected. I started taking pictures once I already started gutting it, but you get the idea.

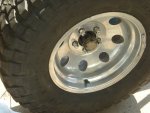
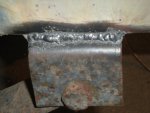
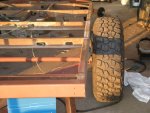
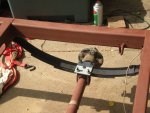
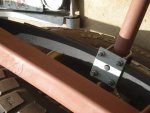
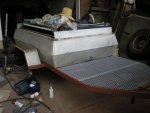
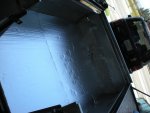
Now that it is about all stripped it will get scrubbed down, every joint welded, and then some paint. Everything you see outside of the main frame will be cut off and ground smooth once welded. I measured the distance from the hub surface to the frame and may get away with just swapping out the hubs, but am also considering electric brakes and a different axle. I will update this as things progress but it will be fun, although my wife doesn't think so as much.
 

Attachments

  • DSCN5202.jpg
    DSCN5202.jpg
    548.9 KB · Views: 32
  • DSCN5205.jpg
    DSCN5205.jpg
    552.4 KB · Views: 21
  • DSCN5206.jpg
    DSCN5206.jpg
    546.6 KB · Views: 20
  • DSCN5208.jpg
    DSCN5208.jpg
    564.6 KB · Views: 22
  • DSCN5215.jpg
    DSCN5215.jpg
    521 KB · Views: 22
Last edited:

TheThom

Adventurer
I'm having flashbacks! Good luck. Subscribed. I know it's somewhat of a party foul, but if you need lift information or pop-up specific questions, popupportal is a great resource.
 

jeep-N-montero

Expedition Leader
I'm having flashbacks! Good luck. Subscribed. I know it's somewhat of a party foul, but if you need lift information or pop-up specific questions, popupportal is a great resource.

There will be no lift system on it, but I do need to get on popup at some point.
 

jeep-N-montero

Expedition Leader
started working on the frame

Last night I found a few hours to get started on some cutting and welding, after about 3 hours my hands and back had enough of it so I called it a night, got quite a bit done though. Ordered new support jacks/legs for it and discovered that the trailer is pre-wired for electric brakes even though it didn't come with them, but I may decide to just run all new wiring if there are any continuity issues when I start testing things out.

And don't laugh at my chicken poop welding!
 

Attachments

  • DSCN5265.jpg
    DSCN5265.jpg
    527.6 KB · Views: 19
  • DSCN5264.jpg
    DSCN5264.jpg
    526.4 KB · Views: 20
  • DSCN5263.jpg
    DSCN5263.jpg
    540.4 KB · Views: 22
  • DSCN5266.jpg
    DSCN5266.jpg
    513.8 KB · Views: 39
  • DSCN5268.jpg
    DSCN5268.jpg
    523.5 KB · Views: 31
  • DSCN5272.jpg
    DSCN5272.jpg
    520.3 KB · Views: 19

bunger

Adventurer
And don't laugh at my chicken poop welding!

HaHa looks just like my weld jobs, not pretty but they hold.

Question, why leave the beams in front and behind the tires? Seems like you will limit your tire size to just something that fits between those beams.
 

jeep-N-montero

Expedition Leader
HaHa looks just like my weld jobs, not pretty but they hold.

Question, why leave the beams in front and behind the tires? Seems like you will limit your tire size to just something that fits between those beams.

The axle is getting flipped and will be lifted with longer shackles, those beams are going to be reinforced and the fenders welded to them.
 

TacoDell

Adventurer
I'm not going to laugh at yer chicken poop welds...
'cause I have a few booger welds I'm not so proud of as well

however... your welds don't look like good penetrating welds... and instead look somewhat cold
as I see no discoloration adjacent to the weld areas and the welds seem irregular and on the tall side.

what welder are you using ? are you prepping the metal good before welding ?
insuring a good ground ?

I could be wrong... as I didn't take the time to zoom in on the pictures and study them closer...
but they do look fairly terrible from your picture's perspectives.

sorry to share my criticism
 

jeep-N-montero

Expedition Leader
I'm not going to laugh at yer chicken poop welds...
'cause I have a few booger welds I'm not so proud of as well

however... your welds don't look like good penetrating welds... and instead look somewhat cold
as I see no discoloration adjacent to the weld areas and the welds seem irregular and on the tall side.

what welder are you using ? are you prepping the metal good before welding ?
insuring a good ground ?

I could be wrong... as I didn't take the time to zoom in on the pictures and study them closer...
but they do look fairly terrible from your picture's perspectives.

sorry to share my criticism

It's just a cheap 90 amp flux core Harbor Freight welder, if you have any suggestions on the settings I would love some tips. I hit all my welds with a hammer after to make sure they are sticking.
 

reece146

Automotive Artist
Start with the settings on the inside panel of your welder... Off the cuff I'd say more heat, more speed, more fluid movement.

It really helps to clean up the metal you are welding with a flapper disk before welding as well. It looks like you did it for some but not all... could just be the picture quality looking muddy as well.
 

jeep-N-montero

Expedition Leader
some updates

Worked on the trailer this week; got the rest of the frame welded up, axle properly flipped with new perches, swapped in the 5 lug hubs from the other trailer, started priming it, put the new support jacks on, welded on the 3inx3in .25in wall bumper, and mounted the wheels and tires. I ended up cutting off the side beams that were going to be used for the fenders and am going a different route. I decided on the rust-colored primer and may just leave it that way without painting over it. One thing I didn't anticipate is that the springs are a tad higher than expected so the support jacks are a bit too short, I will just carry some 2x6x6 pieces to stack under the feet if needed. Tomorrow I hope to have the priming done, fenders on, and the tub swapped over, this will leave me with just the wiring to go through. I put the welder on the higher heat setting and messed with the wire speed and my welds have gotten much better, as good as one can expect from a cheap 90 amp flux cure setup anyway. Assuming they get these fires put out I will take out on its maiden voyage next weekend for some fishing.
 

Attachments

  • DSCN5372.jpg
    DSCN5372.jpg
    536.9 KB · Views: 11
  • DSCN5373.jpg
    DSCN5373.jpg
    553.6 KB · Views: 11
  • DSCN5375.jpg
    DSCN5375.jpg
    526.4 KB · Views: 13
  • DSCN5401.jpg
    DSCN5401.jpg
    520.1 KB · Views: 9
  • DSCN5400.jpg
    DSCN5400.jpg
    552.6 KB · Views: 9
  • DSCN5397.jpg
    DSCN5397.jpg
    534.2 KB · Views: 11
  • DSCN5407.jpg
    DSCN5407.jpg
    506.3 KB · Views: 10
  • DSCN5412.jpg
    DSCN5412.jpg
    511.5 KB · Views: 10
  • DSCN5413.jpg
    DSCN5413.jpg
    532.1 KB · Views: 12

jeep-N-montero

Expedition Leader
not as much done as I had hoped

Saturday got hot early so I was only able to finish with the primer on the underside of the frame, but I did pull the springs off and paint them as well. Haven't touched it since because it has been 100 every day this week, plus I am having a friend set up my fenders so they sit perfectly level with the frame.
 

Attachments

  • DSCN5423.jpg
    DSCN5423.jpg
    515.4 KB · Views: 8
  • DSCN5424.jpg
    DSCN5424.jpg
    563.7 KB · Views: 7
  • DSCN5425.jpg
    DSCN5425.jpg
    523.1 KB · Views: 7

jeep-N-montero

Expedition Leader
Pretty much finished

I finished this up a few weeks ago but might repaint the fenders in the future. As you can see in the pictures I added wheel spacers even though I was hoping to avoid them, this was done to give a bit more clearance away from the trailer body and will allow for up to 35 inch tires. The trailer fenders turned out great, my buddy fitted them and did the main welds, then I filled in the relief cuts and ground them down and cut/ground off any excess fender material prior to painting them. After the fenders it was time to swap the tent body over from the old frame to the new frame, easily accomplished with my engine hoist. My wife and I decided to clean up the aluminum tub with some steel wool and boat/marine polish and it made a nice difference. Next up was to finish the support pieces for the cargo area where I welded in a new section and re-welded existing sections. Then it was on to measuring and cutting the expanded metal for the cooler/cargo area, this was probably the easiest part of the entire project and only took about 2 hours to cut, prime, and bolt it in place. And finally it was time to do the floor, the was the most expensive part of the project because I used 2 sheets of sanded hardwood plywood and had them cut it to size before I brought it home. Before putting down the plywood I decided to lay down some sheet insulation and everything came together nicely.

Overall this has gone much faster and smoother than its first revision last summer, total cost this time was around $600. The frame is perfectly balanced even though everything weighs about 250 pounds more than before, and after having it out twice in the last month I can say we have just the right amount of cargo space. The trailer tub and frame will last forever and there is a company I can order a new canvas through, so we are set for many years to come.

The pictures may not be in the correct order.
 

Attachments

  • DSCN5478.jpg
    DSCN5478.jpg
    512 KB · Views: 9
  • DSCN5466.jpg
    DSCN5466.jpg
    561.1 KB · Views: 8
  • DSCN5467.jpg
    DSCN5467.jpg
    521.7 KB · Views: 10
  • DSCN5469.jpg
    DSCN5469.jpg
    524.2 KB · Views: 9
  • DSCN5479.jpg
    DSCN5479.jpg
    522.1 KB · Views: 8
  • DSCN5480.jpg
    DSCN5480.jpg
    523.4 KB · Views: 11
  • DSCN5471.jpg
    DSCN5471.jpg
    522.2 KB · Views: 8
  • DSCN5482.jpg
    DSCN5482.jpg
    567.2 KB · Views: 10
  • DSCN5486.jpg
    DSCN5486.jpg
    529.2 KB · Views: 13
  • DSCN5487.jpg
    DSCN5487.jpg
    530.5 KB · Views: 12

Forum statistics

Threads
189,971
Messages
2,922,756
Members
233,207
Latest member
Goldenbora

Members online

Top