Spare tire carrier hinge idea/help

4671 Hybrid

Adventurer
$900!? They've lost their daggum minds...either that or he's using a hinge made of unobtanium. Depending on where you're located, I'll be back in the States in a couple months and will gladly trade you the labor of welding it up and fixing it for a cold root beer. Seriously. The updates I mentioned wouldn't take more than a couple hours and new hinges would probably run about the same.

$900 is completely ridiculous, you could buy a new carrier for far less than that.
 

net4n6

Adventurer
$900!? They've lost their daggum minds...either that or he's using a hinge made of unobtanium. Depending on where you're located, I'll be back in the States in a couple months and will gladly trade you the labor of welding it up and fixing it for a cold root beer. Seriously. The updates I mentioned wouldn't take more than a couple hours and new hinges would probably run about the same.

$900 is completely ridiculous, you could buy a new carrier for far less than that.

I am in Orange County, So California. I was shock when the guy told me $900. I paid $600+$200 for shipping.

I am very appreciated the ideas you guys provided to me.
 

net4n6

Adventurer
I am very appreciated expo members here gave me ideas on fixing my tire carrier. I finally got it fixed (80% of it). I will come back to the shop to have it work on more when I have extra time. I will post pictures in a little bit.
 
Last edited:

net4n6

Adventurer
I didn't have time to paint it yet.

Removing the toggle clamps

IMG00045-1.jpg


All removed.

IMG00050.jpg


Close up front - A pad lock or quick release pin will replace the bolt. The bolt only for temporary.
The clamp down idea was from member TedZ post #3. The bolt idea was from member 4671 hybrid post #9 and 10. I am looking to replace heavy duty hinges which recommended by member XJMike. ---- @XJMike. Do you have link that sell heavy duty hinges?

IMG00053.jpg


IMG00052.jpg


Close up side - A pad lock or quick release pin will replace the bolt. The bolt only for temporary.

IMG00054.jpg


From top

IMG00055.jpg


Far shot - I will replace the hinge with heavy duty one. Can someone please give me recommendation for the heavy duty hinge?

IMG00057.jpg
 
Last edited:

ExpoMike

Well-known member

4671 Hybrid

Adventurer
Don't you hate it when you type out a well worded reply and then whether the computer crashes, you accidentally hit close, or for any other inexplicable reason, you lose it? That's where I am so I'll try and duplicate what I just wrote.

From the pictures, it looks like the latch and the bolt are doing the same thing. It's my fault really, I didn't explain the bolt idea better and should have posted a picture of what I meant (what I'll do now).

If you keep your latch as is and change the bolt arrangement, you will have really minized the front/back and up/down movement. Put some sliding material between the bottom and top bars, and you'll pretty much alleviate the stress on the hinge as well. The latch will pull the top bar down, and the bolt will pull it back.

The bolt you have now will sorta act as a safety if the hinge breaks but being that it's mounted outboard of the bar, it's going to see alot of stress if the hinge breaks and the tire starts leaning away from the body. I imagine you could gusset it and make it stronger but I'd just drill a vertical hole through both bars close to the hinge and drop a trailer hitch pin through. Between the hitch pins and the bolt screwed tight, it wouldn't be going anywhere and should be pretty solid.

Did that explain my previous post's better?
 

Attachments

  • exp1.jpg
    exp1.jpg
    29.5 KB · Views: 39
  • exp3.JPG
    exp3.JPG
    21.5 KB · Views: 40
Last edited:

net4n6

Adventurer
The bolt you have now will sorta act as a safety if the hinge breaks but being that it's mounted outboard of the bar

You are correct. The bolt only act as a safety measurement. This is the only "first stage" of modifying it. We will incorporate your idea into the next phase. We didn't have time to do major modification. It was all "designed and completed" during my lunch time. It is very solid now. We will install better, stronger hinges.
Thank you so much.:beer:
 

squint

Adventurer
My two cents..

Sorry, I just saw this thread, otherwise I would have responded sooner.
You really need a 90 degree clamp on this in my opinion. The bumper looks really nice by the way, but it was not designed with the clamp in mind.
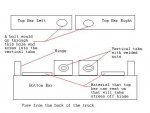
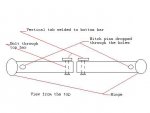
What would have been ideal is to have a gap between the two swing aways so that you could mount a 90 degree clamp at the end of each. The bad news is that you already started welding. The good news is that you can still fix this easily! From what I can see, you can cut a portion of the main bar off the end of the driver's side swing away to create that gap. Then just weld two tabs/flat hooks to the bumper and you will have an extremely solid swing away. For clamps, I would order them from Garvin Industries.
(Phone: 619-44(zero)-7415). Call them and they will explain why these are so much better than other clamps. They are a bit pricey (at $70 a pop-includes shipping I believe) but this will be the best moeny you have spent on your vehicle. (I had mine 3 days after I ordered)There is no pin to pull and you can operate it with one hand because it has a saftey catch that can be released with your thumb. We replaced both of our clamps with these on our jeeps and they are fantastic. Here are pictures of what I am talking about:
photo-18.jpg

photo2-1.jpg


There are lots of discussions on the web about how much better the 90 degree clamps are so you don't need to take my word for it.

So basically, you would cut the bar off right where your new clamp is mounted.

Let me know if that does not make sense to you, but trust me, this is the way to go- you will not regret it.

Hope this helps.
 

squint

Adventurer
Here is what I am talking about:

Ok, excuse my poor paint skills but this should help illustrate.
If you make both sides exactly like the pictures above, it will work perfectly (with the 3/4 inch steel mounting plate that the clamp is bolted to). If you choose to bolt the clamp directly to the square tubing without adding a the mounting plate, the ubolt on the clamp will need to be longer so you may have to go to Ace Hardware to buy one. (Lowe's and Home Depot do not carry a square Ubolt)

clamps.jpg


I would order the clamps first and measure when you get them before you do any cutting. The old Garvin swing aways came with a bolt instead of this new clamp so they sell kits to upgrade. Just tell them you want 2 kits to upgrade from the old, bolt style fastener. This will give you the mounting plate, hook and the clamp.

Good luck and let me know if you have any questions.
 
Last edited:

bat

Explorer
I would weld a small lip just behind the clamp so the main bar is sitting in a channel. You might have to lift the swing out a little but it will keep the front to back motion in check.
 

Forum statistics

Threads
190,274
Messages
2,925,835
Members
233,643
Latest member
4xCoffee
Top