Structural stability for my Camper box build and materials selection.

Buildingfreedom

New member
Hello from Italy, forum.
I’m about to build my own camper box on the back of the truck version of the vw T5 4motion van.
So I’d like to get some help from the veterans here.

Sadly, I have to respect the severe limitations about the allowed weight, because of the driving license limits that we have here in Yurop, wich limit the GWVR to (3500kg) approx. 7716lbs.
My basis truck’s payload (already considered 3 the passengers in the turck’s cabin) is less than 2750lbs (1150kg).
Dimensions:
L 173 inc (4400mm)
W 94,5 inc (2400mm – but I m not sure about this)
H 92 inc (2340mm)
including the cabover that is about 78,8 inc long and 39 high.

Must have a tetfhord toilet, 100lt of fresh water, a shower and all the usual rest (TV included), which is a lot of weight, I think.

I made a rendering, extremely simplified, just to give an idea (I suck with sketchup).
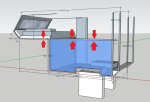
cabover.jpg

My main problem is the safety and stability of the cabover. It must be strong enough to support, in a static condition (aka not while I’m driving), the load of 880lbs (400kg), wich is composed by the insulation material (like armaflex sheets), internal trim, the double bed composed by a mattress of the same type used at home, and of course the weight of 2 persons.
I just don’t trust by default to rivet 2 bars of aluminum, each one long about 78,8 inc and attached with just 2 angular (90°) segments.
So I have decided to use a bar wich is located in the left side and which is long like the camper box itself; in the pic it's highlighted by red arrows.
Such bar will be kept down by a series of vertical bars that are not portrayed in the pics, each one riveted with angulars.

What do you think about this topic and about my idea? Is such long bar strong enough to guarantee the safety of the cabover?

Then, about the material, at first I wanted it to be 40x20x3mm aluminium boxed bars, but a friend who is expert in carpentry (only by indirect experience, he drives machines amd has no school or uni titles) told me to use instead 40x40x1mm.

What do you think about the materials I should use? Which option is the best for my project?

Thanks for cheking my post.
 

Fenderfour

Active member
I have a similar build going and I posted how to calculate deflection in the build thread: Expedition Portal Compact Van forum.

I think it shows all of the information you will need to collect and also has an online beam calculator linked.

Just looking at your design, I think you definitely want the main beam running from the forward section all the way to the back without a break. It will need to be a single piece of material. Also, I think either of the materials specified will probably bend 50+mm downward when loaded. They may not break, but that much deflection is probably not acceptable.
 

Buildingfreedom

New member
I have a similar build going and I posted how to calculate deflection in the build thread: Expedition Portal Compact Van forum.

I think it shows all of the information you will need to collect and also has an online beam calculator linked.

Just looking at your design, I think you definitely want the main beam running from the forward section all the way to the back without a break. It will need to be a single piece of material. Also, I think either of the materials specified will probably bend 50+mm downward when loaded. They may not break, but that much deflection is probably not acceptable.


Thank you so much! I would have never found that website... and yep, I want the left side beam to be one piece; while the one on the right can't be so because there will be a door.

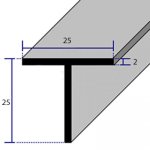
I also would like to consider to use L shaped profiles like this:
Profilo_in_allum_L.jpg

and T shaped profiles like this:
Profilo_in_allum_T.jpg

Do you have other websites to share that allows the same calculations for this type of matherials?
Thank you again.
 

Alloy

Well-known member
You are better off using the panels (inside/outside) to support the load than trying to get a beam that is strong enough. The framing in the wall only needs to prevent the panel from buckling. The framing could be
a W truss \/\/\/\/ or a W truss with verticals is easier to fabricate I\/I\/I\/I.

The door is in a poor (structurally) location so on this side the cabover will need to be supported with a 90 degree bracket that is attached to the front.

3mm is better than 1mm for holding fasteners

I would suggest using an adhesive as well as the rivets

Aluminum framing isn't the best material to use if you worried about thermal transfer.
 

ITTOG

Well-known member
You will have issues with the way you show it. However, if you use a few vertical or angled beams from the cabover beam to the top of the camper you will be fine.

In this pic you can see I have three vertical beams (excluding the very front one) welded from the front of the cabover to where it ends. I am using 1.5" 16-gauge steel tube. Before welding the three vertical tubes I probably had at least a 3/8" deflection with just my 165 pounds. By adding the three beams there is zero deflection with about 280 pounds up there.
1666461013960.png
 
Last edited:

dstefan

Well-known member
Well, your Sketchup and English skills are way better than my Sketchup and Italian skills!

These pictures from my camper might help?
1666474778788.jpeg
1666474842534.jpeg
1666474911838.jpeg
All the aluminum square tubing is 1”x2”x1/8” except for the 1x3x1/8 vertical reinforcement at the far left in the 3rd picture where the cabover section starts, which is right at the wooden lip of the pullout bed.

The frame is beautifully TIG welded. I would NOT listen to your friend and go with 1mm thick tube. 1/8” is 3.175 mm.

Over 2 years and 15,000 miles with a lot of off-road, we’ve had zero issues with this design (not mine, and I’m not the builder).

Also, not sure its obvious from the first picture, but the skin, which is 1/16” (1.6mm) aluminum is a significant structural aspect, as others have mentioned. It’s attached to the frame with 3M VHB tape and riveted into the frame every 8”. This is similar to how aircraft skins are attached. It’s all very rigid.

edit: oh yeah …the camper weighs 360 lbs/163 Kgs.

Hope this helps you!
 

Fenderfour

Active member
I think you should stick with square or rectangular tubing. The rigidity of the material is a function of the surface area of the profile, and the distance from the center of the profile. The L-shaped material is only two walls, where a square profile is 4 walls, probably twice the material. The T-section is also two-walls, half the material of the square tube.

Creating a truss is a good idea, but it does add complexity. I think if you really wanted to prioritize a lightweight build you would go with a welded aluminum structure like dstefan shows above.

Using rivets requires holes, holes create weak joints, and require thicker material to prevent localized cracking. Aluminum is more prone to work-hardening and cracking over time than steel. Welding removes the need for (most) holes.

The steel welded frame that ITTOG shows is very beefy and would be relatively easy to build with inexpensive equipment and by a novice welder. If it is carefully designed, it will only be about 20% heavier than an aluminum frame.


Thank you so much! I would have never found that website... and yep, I want the left side beam to be one piece; while the one on the right can't be so because there will be a door.

I also would like to consider to use L shaped profiles like this:
View attachment 748502

and T shaped profiles like this:
View attachment 748503

Do you have other websites to share that allows the same calculations for this type of matherials?
Thank you again.
 

Buildingfreedom

New member
You are better off using the panels (inside/outside) to support the load than trying to get a beam that is strong enough. The framing in the wall only needs to prevent the panel from buckling. The framing could be
a W truss \/\/\/\/ or a W truss with verticals is easier to fabricate I\/I\/I\/I.

The door is in a poor (structurally) location so on this side the cabover will need to be supported with a 90 degree bracket that is attached to the front.

3mm is better than 1mm for holding fasteners

I would suggest using an adhesive as well as the rivets

Aluminum framing isn't the best material to use if you worried about thermal transfer.

Hi! Thanks for helping me.
You are completely right about the door, I’m fully aware about so, but I have no other choices: in the back side I need to place a dinette-bed and on the sides there are the wheel-arches, and I can’t place the door over them (I will have to add a stepladder, TUV request, and the higher the lower step inside the box is, the longer the stepladder must be).

I want to avoid glues because I would like my box to have the property of Faraday cage in case it gets struck by a lighting (which is a possibility not so rare when you do wild camping) with me inside… for this reason I would have liked better to weld my box instead of using rivets, but it looks like I have to settle for the rivets.

In order to avoid the buckling, I can always glue more profiles or beams, maybe not in aluminum… wood or plastic can do the same. I will add also the self-gluing insulating patches (like the ones used in automotive to insulate doors and sides); you know like the “tar paper”.
 

Buildingfreedom

New member
You will have issues with the way you show it. However, if you use a few vertical or angled beams from the cabover beam to the top of the camper you will be fine.

In this pic you can see I have three vertical beams (excluding the very front one) welded from the front of the cabover to where it ends. I am using 1.5" 16-gauge steel tube. Before welding the three vertical tubes I probably had at least a 3/8" deflection with just my 165 pounds. By adding the three beams there is zero deflection with about 280 pounds up there.
View attachment 748529

Hi! Thanks for helping me.
Of course, if I could weld, I would add just 1 beam and connect it with short vertical beams ike in your box, but I don’t think that riveting is enough because of the 90° angulars, which imo will bend.

So I’m thinking to add to the lateral rectangular tube long beam (40mm x 20mm x 3mm, long 4285mm) 2 more of the same beams, one riveted over the other. The calculator that Fenderfour shared here says that it will bend about 15mm (I’ve just splitted the 400kg/880lbs in 3); so it should be acceptable, also because this group of beams is connected to the sidewall sheet, to the upper beam and to the rest of the cabover structure.

BTW, I like your pop-top design, I would do the same if I wasn’t in the need of the highest thermal insulation and wind resistance (actually this thing I’m about will not be just a RV, at least for several months).
 

Buildingfreedom

New member
Well, your Sketchup and English skills are way better than my Sketchup and Italian skills!

These pictures from my camper might help?
View attachment 748541
View attachment 748542
View attachment 748543
All the aluminum square tubing is 1”x2”x1/8” except for the 1x3x1/8 vertical reinforcement at the far left in the 3rd picture where the cabover section starts, which is right at the wooden lip of the pullout bed.

The frame is beautifully TIG welded. I would NOT listen to your friend and go with 1mm thick tube. 1/8” is 3.175 mm.

Over 2 years and 15,000 miles with a lot of off-road, we’ve had zero issues with this design (not mine, and I’m not the builder).

Also, not sure its obvious from the first picture, but the skin, which is 1/16” (1.6mm) aluminum is a significant structural aspect, as others have mentioned. It’s attached to the frame with 3M VHB tape and riveted into the frame every 8”. This is similar to how aircraft skins are attached. It’s all very rigid.

edit: oh yeah …the camper weighs 360 lbs/163 Kgs.

Hope this helps you!


Hi! Thanks for helping me.
Your box structure is pretty much what I would like for the mine, the TIG welded areas of your box look so beautiful…. I’m also considering MIG welding (TIG is for professionals).
 

Buildingfreedom

New member
I think you should stick with square or rectangular tubing. The rigidity of the material is a function of the surface area of the profile, and the distance from the center of the profile. The L-shaped material is only two walls, where a square profile is 4 walls, probably twice the material. The T-section is also two-walls, half the material of the square tube.

Creating a truss is a good idea, but it does add complexity. I think if you really wanted to prioritize a lightweight build you would go with a welded aluminum structure like dstefan shows above.

Using rivets requires holes, holes create weak joints, and require thicker material to prevent localized cracking. Aluminum is more prone to work-hardening and cracking over time than steel. Welding removes the need for (most) holes.

The steel welded frame that ITTOG shows is very beefy and would be relatively easy to build with inexpensive equipment and by a novice welder. If it is carefully designed, it will only be about 20% heavier than an aluminum frame.


Hi Fenderfour, thanks for writing to me again.
You are right, but I was considering to use such L and T profiles because the box would have no closed spaces I can’t insulate, like how the tubes are.
In such case would use more L and T shaped profiles than the tubes, making a kind of “reticulate”, in order to balance such loss of strength.

There is also another reason why I’m studying this option of L and T profiles, which is that they told me that there are limitations about the dimensions the alu-sheets which are sold, like that one side is max 1500mm (I don’t remember well the correct size) so such scheme composed by a “dense reticulate” could make easier to make the walls.

Anyway, I could make something similar by adding some profiles to the tubes, creating a mixed structure, and covering the tubes with riveted flat alu profiles (if the beam is 1,5 the profile is 3) that I can use as bases to rivet the sidewall sheets, positioned in the internal side of the profiles.
Like this:

expedition_portal_2.png


(the rectangular tube is red, while the flat profile is blue; plz forgive the windows 10’ Paint made nasty made drawing LOL)

This option will increase the weight tho, that’s why I asked you about another calculator that considers type L and T shape.

As I said to ITTOG, I’m considering to add 2 more beams, all riveted together.
So I’m thinking to add to the lateral rectangular tube long beam (40mm x 20mm x 3mm, long 4285mm) 2 more of the same beams, one riveted over the other. The calculator that Fenderfour shared here says that it will bend about 15mm (I’ve just splitted the 400kg/880lbs in 3); so it should be acceptable, also because this group of beams is connected to the sidewall sheet, to the upper beam and to the rest of the cabover structure.

I’d like to use the aluminum because of the weight but more because of its resistance to corrosion as well. But if there are means to get the steel to resist against rust, I could go for it (steel is so much cheaper! and as you said I could weld instead of riveting!). I don’t have access to the automotive technology (aka galvanization and cataphoresis), and the way in which the steel-made fences rot out discourages me (and here it’s so far from the sea...).
Do you have any idea about how to solve this? (the protection of steel against rust)
 
Last edited:

Fenderfour

Active member
As I said before, I would stay away from the L or T shaped profiles unless you significantly increase their size. I ran the T-profile you showed above, and it would fail. I increase the T-profile dimensions to 3" x 3" x .25"thick (76mm x 76mm x 6mm thick) . My load was ~200kg, evenly distributed along the bed area. The single large t-shaped beam deflected ~6" (150mm) down ward. This won't break, but it will stress all sealed sections causing leaks and it will probably work harden and break over time.

If you want to use a single beam to support the bed, you will need to significantly increase the dimension and the amount of material. I found the 1545 t slot extrusion to be acceptable. It's a rectangular tube 1.5" x 4.5" (38mm x 114mm) with significant internal structure.

Making a welded structure as other have shown needs some different calculations. The tools I show here are for a single beam, not a system. I'll see what I can find to calculate loads for them.
 

Buildingfreedom

New member
Btw I'm facing something that I would have never thought...
You know, here there's a real years-long-lasting muh "economic crisis", italy is a failed state, so I'm surrouded by tons of industrial sheeds which are dismissed for years already; I gave as granted to be able to get one for rent for like 3/6 months...
NOTHING!
They like better to keep the properties closed in lace than renting it to me, in the hope they will get requests for a minimum 6 years!!!! They can keep dreaming but this is preventing me from starting my work. It's not somthing that concerns my nearest areas only, it's a whole bounch of counties.
I stated in the beginning that I need to find a place near me coz driving 1 hour to go and another to come back doesn 't make sense and a near place could allow me to work in case of lockdown; but now I'm not able to find a place even far from me.
It's crazy and I'm very frustrated.

******... :mad:
 

Buildingfreedom

New member
So.... it looks like I was right about the cabover's stability, this €54.000 made-by-trained-personnel(TM) box waves so beautifully:


(the show starts at 5:48)

Actually, i m not sure if this is because of the truck's frame bending or if it's due to the box's structural construction... what do you think?

(Hopefully, in late april I will get a backyard where to work, making the empty box should not take more than 3 days if the beams are already cut).
 

ExpoMike

Well-known member
That looks like typical frame flex that almost all cabover's are going to experience. The front vertical wall is the junction at the frame, between a cab and box. That has a lot of leverage hanging out and that is where the frame will typically flex at.
 

Forum statistics

Threads
188,029
Messages
2,901,364
Members
229,411
Latest member
IvaBru
Top