After seeing jwestpro's Group 31 auxiliary battery stuffed into his LR3, a Group 31 battery was on my short list of things to do. I already had the Traxide dual battery controller and had been running an Optima D34 battery as the aux which has a capacity of 55 Ah. The advantage of the D34 is that it drops right into the aux battery location in the LR3 without any modification and LR sells a factory battery hold down and bolts for it. Now the advantage of the group 31 batteries is that they come in at 100 Ah, nearly doubling the available capacity of the D34. The down side is that the 31 is a HUGE battery both in physical size and weight: 13.00"(L)x6.75"(W)x9.50"(H) at 66.5 lbs (Deka) verses the Optima D34 10.06"(L)x6.94"(W)x7.88"(H) at 43.5 lbs. Being both longer and higher than the D34, fitting the 31 required some modifications to the LR3.
For the battery choice I opted to go with a Deka Intimidator AGM 31 as I recently purchased the Deka Intimidator AGM 49 as my crank battery. I confirmed with Deka/EastPenn that the Oreily Auto SuperStart AGMs are indeed rebranded Deka Intimidators so I picked up the 31 from Oreily because that had a $40 off $200 coupon plus free shipping which made for a nice price. Super Start Heavy Duty 31 AGM Battery (item# AGM31T): http://www.oreillyauto.com/site/c/detail/SSBL/AGM31T/.oap
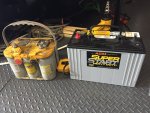
Here is the Optima D34 vs the Deka AGM Group 31:

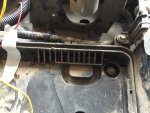
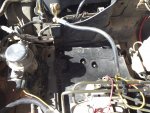
The first step in fitting this 100 Ah beast is that you have to cut the forward facing portion of existing battery tray to allow for the extra three inches in length. You need a Dremel with a cutting wheel to do this as there isn't enough room for a hacksaw and trying to remove the battery tray is more trouble than its worth. See the before and after below.


You then need to use 3 brackets to push that valve thing on the braket forward about 1 inch to make room for the battery. I used these brackets here to do this: http://www.amazon.com/gp/product/B0107269L4?psc=1&redirect=true&ref_=oh_aui_detailpage_o06_s00 . Note they come in packs of 4 and you will need to use 3 of them, You will also need to expand/drill-out 1 hole on each of the brackets to 6mm (from the existing 5mm) in order to utilize the factor bolts and mount points.
For a hold down, you will want to pick up this one as it allows you to utilize the factory off set M6 screw ins for the hold down: http://www.oreillyauto.com/site/c/d...469&categoryRedirect=N0363&pt=N0363&ppt=C0005 . I picked up two of these because I wanted an additional bolt down as there are two points to bolt to on the right side of the battery tray. You will also need three (or two if you opt to not go with the additional bolt down) 300mm M6 stainless steel threaded rods. You will need to cut them down to fit under the hood. These can be purchased here: http://www.mcmaster.com/#94185A586
Finally you will want to purchase some 3/8" Stud covers for the battery terminals to protect the terminals from contacting anything.
While the battery will fit with the hood down without any modification to the battery studs, I did decide to cut roughly a little less than 1/4" off each to give some extra room just to be on the safe side. In order to cut the studs down and still have enough room for the wire terminal lugs and a bolt I had to pick up some Thin Stainless Steel Nylon-Insert Locknuts from McMaster too: http://www.mcmaster.com/#97367A115. These are reduced height lock nuts that take up as little room as possible on the stud and still lock.
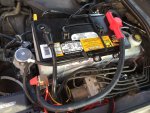
As you can see from the picture I wired in a 4-post negative bus bar and a two post positive bus bar. I did this to allow me to add in the accessories without having to bolt them to the battery's post as these would take up height and I wanted the height of the post to be kept to a min (remember I loped off roughly 1/4" of the post height from the battery in order to have some safety space between the post and the hood). Note on the positive two post bus bar I also added a 150 AMP fuse and fuse post from Blue Sea for the incoming power from the battery as extra precaution from a short situation.
End result here:

For the battery choice I opted to go with a Deka Intimidator AGM 31 as I recently purchased the Deka Intimidator AGM 49 as my crank battery. I confirmed with Deka/EastPenn that the Oreily Auto SuperStart AGMs are indeed rebranded Deka Intimidators so I picked up the 31 from Oreily because that had a $40 off $200 coupon plus free shipping which made for a nice price. Super Start Heavy Duty 31 AGM Battery (item# AGM31T): http://www.oreillyauto.com/site/c/detail/SSBL/AGM31T/.oap
Here is the Optima D34 vs the Deka AGM Group 31:

The first step in fitting this 100 Ah beast is that you have to cut the forward facing portion of existing battery tray to allow for the extra three inches in length. You need a Dremel with a cutting wheel to do this as there isn't enough room for a hacksaw and trying to remove the battery tray is more trouble than its worth. See the before and after below.


You then need to use 3 brackets to push that valve thing on the braket forward about 1 inch to make room for the battery. I used these brackets here to do this: http://www.amazon.com/gp/product/B0107269L4?psc=1&redirect=true&ref_=oh_aui_detailpage_o06_s00 . Note they come in packs of 4 and you will need to use 3 of them, You will also need to expand/drill-out 1 hole on each of the brackets to 6mm (from the existing 5mm) in order to utilize the factor bolts and mount points.
For a hold down, you will want to pick up this one as it allows you to utilize the factory off set M6 screw ins for the hold down: http://www.oreillyauto.com/site/c/d...469&categoryRedirect=N0363&pt=N0363&ppt=C0005 . I picked up two of these because I wanted an additional bolt down as there are two points to bolt to on the right side of the battery tray. You will also need three (or two if you opt to not go with the additional bolt down) 300mm M6 stainless steel threaded rods. You will need to cut them down to fit under the hood. These can be purchased here: http://www.mcmaster.com/#94185A586
Finally you will want to purchase some 3/8" Stud covers for the battery terminals to protect the terminals from contacting anything.
While the battery will fit with the hood down without any modification to the battery studs, I did decide to cut roughly a little less than 1/4" off each to give some extra room just to be on the safe side. In order to cut the studs down and still have enough room for the wire terminal lugs and a bolt I had to pick up some Thin Stainless Steel Nylon-Insert Locknuts from McMaster too: http://www.mcmaster.com/#97367A115. These are reduced height lock nuts that take up as little room as possible on the stud and still lock.
As you can see from the picture I wired in a 4-post negative bus bar and a two post positive bus bar. I did this to allow me to add in the accessories without having to bolt them to the battery's post as these would take up height and I wanted the height of the post to be kept to a min (remember I loped off roughly 1/4" of the post height from the battery in order to have some safety space between the post and the hood). Note on the positive two post bus bar I also added a 150 AMP fuse and fuse post from Blue Sea for the incoming power from the battery as extra precaution from a short situation.
End result here:

Last edited:
