Super Budget Build F350 - Northstar 850sc.....The Work Begins!

ALBERMA

Member
I'll start by saying I have been a member of Exp. Portal for many years. Like many of us, I am overworked and don't have a ton of spare time. But at heart I am always pulled to a little adventure. My wife and I have been camping for many years and we have a nice class A coach and an older Roadtrek. But I wanted something for light offroad adventure. So after spedning many years on the side lines, last year we decided to get a truck camper. We found a used Northstar 850sc (what we were looking for) and pulled the trigger. I paid $8500 for it, and it is in really good condition. So I put the brackets on my 2000 Ram 2500 diesel and away we went. After a year we are attemping to (as cheap as possible) get another truck that solved a couple basic "wants":

  1. A One Ton Truck (the 2500 struggles a little bit more than I like)
  2. A long bed truck
  3. A truck we can configure to gain more storage
  4. Increased Payload Capacity
Our current rig just doesnt have much room for storage. Short Bed extended cab with a Northstar makes it hard to "equip" for anything other than very short trips. Below are pictures of our current setup. We budgeted less than $15,000.00 for the new rig (total) so for months I looked for a cheap truck. What we were looking for was:

  1. A one ton truck
  2. Single Rear Wheel
  3. Less than $12,000.00
  4. Flatbed (configure for more storage)
  5. With existing toolboxes (money saver)
  6. Something not totally worn out
We actually found a truck last month...F350 work truck in TN and we bagged it for $8,900. Had all the basic requirements of our future adventure rig.

We'll post the progress of our project and I hope you enjoy!


Ram3.jpg008d2550334e4949ba59285cfcb9ce57.jpg
 

ALBERMA

Member
Update.....

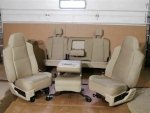
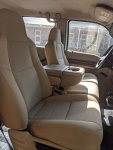
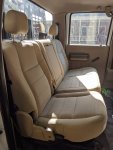
SInce this was a work truck it had some god awful bench seats in it. So we got on ebay and found a full set of camel tan interior from a salvage dealer. I think we were lucky to find them so quickly. Tan isn't the most common color and totally manual seats are also a little rare. There are tons of leather, full power and even king ranch seats (i was tempted...very tempted) but keeping in mind this is a budget build I jumped at the full manual replacements to the manual benches I have. After several days of "offers" and "counter offers" we settled on $700 dollars. Not bad since his origional price and first counter offer was over $1200. I will give him credit....fast shipping...we recieved the seats and got them all tucked in. Seats were as advertised and in exellent condition. Some dirt here and there, nothing we can clean up. These make a huge difference in comfort and function (center console seat is helpful) and since the back seat is a 60/40 and will fold all the way up, or down this give us extra options for storage configuration.

FIrst item done....next item is to take off the ladder rack, tool boxes and "paint" the bed. Bad thing about an old flatbed it is worn and "rusty". Want something a little more fresh to work with.
 

Attachments

  • seats3.ep.jpg
    seats3.ep.jpg
    33.8 KB · Views: 83
  • front seats .ep.jpg
    front seats .ep.jpg
    296.1 KB · Views: 85
  • back seats.ep.jpg
    back seats.ep.jpg
    300.5 KB · Views: 79

ALBERMA

Member
Update....

It was definately a lot more challenging than I thought.....but we finally got the "ladder rack off" and it almost killed us. I can't even imagine how much it weighs....but we used the bucket on my small tractor and it almost flipped over on us.

Also got the tool boxes off. The two boxes on the top of the flatbed are 96" long and I'll have to modify to accompany the camper since the last 27" are 12"s wider than the standard 48" floor. Bad news is that the two underbed boxes were rusted more than I anticipated.....I used my angle grinder with a paint stripper and found several places where I could poke my finger through. So I'll have to replace those...but the 96" weatherguard boxes are in pretty good shape.

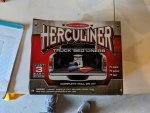
After doing some research, I decided to go with herculiner to coat the top of the bed and the headache rack. I chose gray since I didn't want black. A gallon kit is on amazon for $147.00. I bought two gallons. We used our orbital floor buffer with a large scotch brite type pad under it to scuff the bed. I also think I am going to use Herculiner on the outside of the tool boxes since the factory paint seems thin and may not hold up...based on what we found on the underbed boxes.


bb_2.jpgBB_1.jpg
 

Attachments

  • BB_3.jpg
    BB_3.jpg
    283.1 KB · Views: 23

ALBERMA

Member
It's a 2009 V10 in very good shape....I've always had diesels and have loved them. Actually bought my wife a colorado diesel last year. When it came to the budget build it just didn't make for a practical decision. The cost benefit of desiels have lost their luster. With the high cost of the diesel trucks, reduced mileage because of emission controls, reduced payload capacity, DEF, increase in maintenance cost (not to mention repair costs) it is just plain cheaper to have a gas motor (my opinion). I can replace a v10 twice for the cost of a good rebuild on most diesels. And gas motors are built so well today you can get a couple hundred thousand miles out of them without issue anymore.
 

ALBERMA

Member
Update....not a ton of progress....been raining (a bunch). I did get the flatbed painted with herculiner and it came out great. I still have to do the headache rack. One thing about these roll on bed liners is they have added grit / sand for the non skid quality. You have to make sure that you mix the paint very well, and continue to "mix" a bit in the roller pan to ensure you get a uniform coat of grit. It also takes some time to cure for use. Everyday it seems to harden more. Definately not something (in my opinion) that you do and use 2 days later. It seems to take at least a week to begin to cure well and harden enought to take light / medium abuse.

I also pulled together all my measurements for the tool box modifications. I have to 96" weatherguard boxes. I have to cut a section out of each to allow for the camper to fit properly. Not sure what I am going to do once I cut them out....not sure I want to spend the time to weld in sheet to cover the new found holes. I'll ponder that and get to a decision when it comes time. First I have to cut them, clean sand and prep for coating, then I'll decide how to address the section I cut out. Once I get those cut up I'll post pictures with an update on the cuts.


BB_4.jpg
 

ALBERMA

Member
Update....

Ok, got the headache rack painted...very please how the bed came out so far. Also did a rought visual of my plan for the layout of the bed (pictured) below. All the measurements work out well and even managed to have a little "open" space.

You see in the rough outline why I had to cut the tool boxes. I decided that one of them I would cut in half, to leave room to mount my Honda generator on the bed itself and locate it directly below where the 30 amp plug comes out of the Northstar. Hate to loose the storage space in the tool box, but I'll gain some space inside the backseat of the truck and wont have to deal with any of the smells that the generator creates when carting it around inside the truck. Tool box cuts came out nice.....next step is to clean them up, paint them, replace the old seals and close the gap resulting from the cuts. Still thinking about that one. I can use 3/4 in plywood (quick and easy) or I can weld them up with the sheet that I cut off (not so quick). Anyway, I'll most likely use plywood because if I change campers in the future I may have to modify them again and I wont regret spending all the time welding them up. BB_5.jpgBB_8.jpgBB_7.jpgBB_6.jpg
 

ALBERMA

Member
Been several weeks since an update.

My day job has been nuts and we are redoing our kitchen. However, should have some new pics soon. Have both tool boxes modified and should have them "refinished" and installed in a week or so. Will post new pics then. Also took the truck in and had a good one over by a mechanic and everything checked out A-OK.
 

ALBERMA

Member
Working the tool boxes right now, hope to have them all refinished and installed in two weeks time. I did get the diver set of boxes done, now working on the passenger boxes. I'll post some pictures of those soon. I Hope to have the driver side boxes installed this weekend. Then, I am going to install Timbren helper springs (have them on my Dodge and they work great) and look at new wheel tire combo with a new front bumper, winch and light package for front and rear.

I just took the truck in had a good once over from a mechanic and it checked over, alignment done and AC recharges. It runs out really nice.
 

ALBERMA

Member
Update:

OK.....key part of the Budget Build complete. On the driver side I have a 1/2 of the former tool box and on the passenger side I mounted the full size. I did get the boxes modified to fit the last 2+ feet of the wider part of the Northstar. These boxes were in pretty rough shape so I sanded on them primed some rusty spots and coated them with the same gray bedliner paint. On the small box I used bedliner paint on the inside and I didn't like it much. The larger box was in a little better shape on the inside so I used POR 15 gray to seal up and paint the bottom which had just been beat to death it came out very nice.

I still have the two underbed boxes to complete and mount. The bed boxes alone drastically increase the amount of storage which is very limited in a truck camper set up. The underbed boxes will just be icing on the cake. The extra space can be used for everything from food to tools.

My plan is still to mount the Honda Generator in front of the smaller box. Working on how to do that in a secure fashion. And if everything works out well, I should still have room for a spare tire in front of the camper against the headache rack and 3 Jerry cans (water or gas). Hopefully this weekend or later this week I'll get a test fit of the camer on. The only concern I have with the test fit is the Northstar has the gray water tank lines and gas lines on the outside of the camper, I measured everything several times and I should have clearance on the boxes but we'll see for sure.


BB_12_1 (2).jpgBB_11 (2).jpgBB_10 (2).jpg
 

ALBERMA

Member
Update......did the first test fit this afternoon and all the measuremenst worked out perfect.

Couple items I have to address.....cut the flatbed "side" over the tire to gain more clearance for tire range. There is another four inches to the top of the bed which would give me 8" of range. Then I want to put some "fender" unter the bed.

Have to workout the:
  1. anchor points for the truck camper.
  2. the generator mounts for the genset to be placed in front of the driver side bed box
  3. the spare tire mount against the headache rack
  4. the extra gas / water can mounts.

BB_15.jpgBB_14.jpg
 

ALBERMA

Member
No pictures with this update.....been working on lots of small items. I am fabricating a strap rail to mount my generator, working on some wiring for the camper pigtail and some wiring inside the truck camper itselt. I am adding a fuse block. for some reason, everything seemes to be directly connected to the battery with inline fuses, which doesn't give me the option to have a battery cut off switch...which I will be adding with the new fuse bock. I'll have to track down all the fuse requirements for each item that will be connected to the battery.

Still looking at some wheel tire combinations. I think we are going to do a 5 day test run the first week of August. That's the plan anyway.
 

Regcabguy

Oil eater.
Update......did the first test fit this afternoon and all the measuremenst worked out perfect.

Couple items I have to address.....cut the flatbed "side" over the tire to gain more clearance for tire range. There is another four inches to the top of the bed which would give me 8" of range. Then I want to put some "fender" unter the bed.

Have to workout the:
  1. anchor points for the truck camper.
  2. the generator mounts for the genset to be placed in front of the driver side bed box
  3. the spare tire mount against the headache rack
  4. the extra gas / water can mounts.

View attachment 597623View attachment 597624
You got a good buy on the camper. Longbed model in great shape w/awning and A/C.
 

Forum statistics

Threads
188,030
Messages
2,901,370
Members
229,411
Latest member
IvaBru
Top