The Second Set of Major Repairs!
After nearly a year of ownership with my truck it was nearing time to re-register which meant emissions inspection. My county specifically requires OBD1 vehicles less than 25 years old to pass a two stage emission test on a dyno. Finding a local inspection shop with a working dyno is roughly equivalent to being stabbed repeatedly so I wanted everything to go smoothly. The week before my inspection the truck threw a check engine light. I pulled the code using a paper clip (I enjoy how simple this truck is) and it turned out to be the dreaded Code 52. In the 1st and 2nd gen 4Runner community this is a well known and dreaded code since it means the ECM has lost contact with the knock sensor. The knock sensor is buried underneath the air plenum, fuel rails, and intake manifold. The 3VZE is renown for being a pain to work on due to the extreme amount of vacuum lines and poor positioning of emissions equipment. To give you a small idea here is what the engine bay looks like with nothing removed. See the mass of lines on the passenger side mixed with emissions equipment and smooshed between the air plenum and the fender? Fun stuff..

While the sensor was not communicating properly the timing for the motor was automatically retarded causing me to run rich (in order to prevent knock). I needed to fix this before emissions testing so after doing some research I determined that there were two possible causes.
1) The knock sensor itself was dead and therefore the code was accurate. This was the least likely option.
2) The pigtail that runs to the knock sensor from the engine harness had failed. This was the most common issue.
After digging through dozens of threads I kept running into the "while you are in there you might as well..." and it became clear that i was essentially going to have to disassemble everything above the heads. Therefore I decided to get to my leaky valve cover and take care of everything else. After purchasing a Factory Service Manual (do this for your truck it is worth it), preparing a step by step excel doc of my own, and ordering all OEM parts I started the process.
Here is a quick list of parts I ended up replacing during the following sequence:
-Air plenum gasket
-Intake manifold gasket x2
-Throttle body gasket
-Water coolant bypass gasket
-EGR gasket
-Valve cover gasket x2
-Idler pulley coolant pass gasket
-Engine Coolant Temp sensor
-PCV valve
-6 fuel injectors and o rings
-Knock sensor pigtail
-Knock sensor
-Misc bolts and studs
As a side note the most involved maintenance I had performed on a vehicle prior to this point was replacing the CV axles on this same 4runner. Before that it was all brakes and oil changes. If you are patient, prepared, and buy the proper tools anyone can work on their own vehicle. It is quite a joy to know everything I do on my truck is done correctly and it gives me the peace of mind I need when trusting a vehicle this old for long trips. I also want to give credit to my parents for allowing me to use their garage, to my Mom for letting me spend a weekend in that garage instead of spending time with her, and my Dad who spent the whole time fixing the truck with me as an assistant and source of common sense.
The first major step was to pull the air plenum off. This required disconnecting and labeling each vacuum line and attachment. The studs for this air plenum were easy to access, however there was a large coolant hose behind and under it which was a real challenge. Removed in picture below.

Next up was the air intake, however to get to that I had to remove the fuel rails. The process was to remove two large nuts on the passenger side fuel rail first and then remove the rails independently. However the nut furthest forward would not come off no matter what I did to it. I ended up being able to wiggle the rails off their mounting studs as a unit with a lot of effort.

Random shot of the patient and the operating room:

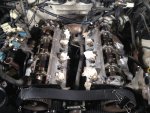
Next I had to remove the idler pulley and front timing cover. Before removing the idler pulley and therefore releasing tension on the timing belt I marked the belts tooth location on each camshaft gear. I also used some small document clips to hold it still while I moved the intake manifold out of the engine bay. I then removed the intake manifold with no real issues. I then had to remove the previous intake manifold gaskets and clean the surface properly so that I could properly apply the new ones. With all of this off of the engine I was able to easily remove both valve covers and the PCV valve which is in the passenger side valve cover. At this point I could see the knock sensor and pigtail in order to replace them.
Continued in next post...
Before:

During:

After:


