The Tortuga !

DustinJanes

New member
After looking at the payload for my 2006 Toyota Tacoma Extra Cab 4wd I was let down by the apparent lack of capacity. I was initally stoked about the 4 Wheed Drive Pop Up unit, but lacked the $14K entry price. I figured, I am handy - I can make my own. This started with some trials on Heavy Wall aluminum welding. Most know that the way to do this is with a spool gun. This is a hand held welding gun that you hook up to your DC constand voltage welding source. A small spool of aluminum welding wire is on the gun ( about 2 Lbs ). This is because you can't shoot pool with a rope - In other words, aluminum does not like to get pushed through the gun. A normal MIG welder has a spool of wireon the machine and a 10' long cord to the gun. That 10' length is too long and the wire just balls up in the machine. The rats nest !

With the proper settiings and methods I was able make the sample parts stick together. The problem was the end of weld crater. Most of the aluminum tanker trucks you see on the road today are aluminum and welded together with a MIG process using a pulsing type of power source. That would be another $1500 or more. So, with that fun over, I changed my material and method to MIG welding thin wall steel. For this, I could use another weld unit I already had. I would also give up any weight advantage that aluminum would bring.

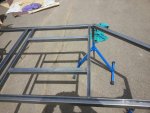
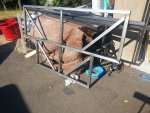
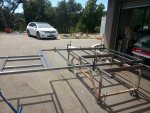
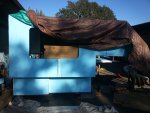
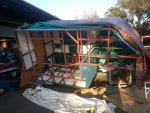
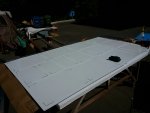
In looking over the truck and avilable space, I shetched some design ideas and continued to refine the design on paper. Paper is so much less costley than Steel ! As soon as I was happy wih the design I started making the modules or sections that form the Base, Side Walls, Back Wall and Front Bulkhead. The smaller sections fit on my welding table. I will post pictures when I figure out how.

My 5 year old son is keen on a PBS program that is a cartoon. On the cartoon the two characters have a space ship that is a turtle and it is called the Tortuga. Turtle in Spanish.

Progress !

More Later

Dustin
 

FLoffroad1

Observer
The man's free to use Spanglish if he wants to.


Sounds like a cool build though, Dustin. Hope your progress goes smoothly.
Minor note - this thread might be better off in the FJ-Hilux-Tacoma-4Runner sub-forum.
 

DustinJanes

New member
Progress !

The Project has made progress far beyond what I show in the pictures below. I think it will be helpful to provide text, descriptions and thoughts as I step through this project.

The basic concept started with a few simple sketches and good measurments from the Toyota Tundra. The 2006 model year with the extended cab has about a 6'-6" bed length.
You need to pay attention to a few critical distances like:

1) Bed floor to side wall height
2) Distance between wheel well - normally in excess of 48" ~ fits sheet of plywood
3) Distance from front bed bulkhead to start of wheel well
4) Distance / width of tail gate opening
CamperSketch.jpg
CamperSideSketch.jpg

Also see pics of the start of the welded front bulkhead that goes up to the bed front and the side wall on the welding table. The basic concept was to make the camper in sections that could be welded up in a flat plane. Once the sections are complete, then weld section to section. Seems smiple?

Progress !
 

Attachments

  • SideOnJig2.jpg
    SideOnJig2.jpg
    444.7 KB · Views: 23
  • CamperFrontBulkhead.jpg
    CamperFrontBulkhead.jpg
    476.9 KB · Views: 23

DustinJanes

New member
Progress 2

Progress 2

Continuation of the welding of the sections. The floor, side walls, and back wall. Once the sections are complete, then you weld it all together, but first - laser level your weld table or the first section ( floor that you are starting with ). Prior to making a big part that would not come off the weld table for some time, I checked the fit of the base in the truck bed. I had planned to remove the tail gate when the camper was in place. It also seemed quite easy to design/make a simple stair step system that would slide into the hitch. More on that later.Assembly00.jpgCamperBase.jpg


Progress 2 !


Dustin
 

Attachments

  • SideOnJig.jpg
    SideOnJig.jpg
    448.8 KB · Views: 18

DustinJanes

New member
Progress 3

Progress 3

Continuation of the modular frame welding process. Now the sections go together. The "Tortuga" would now be in the way of my wife for the next month or so. The weld sequence starts with the base welded to the front bulkhead. Next is the attachment of the sides - Left and Right. You need to always pay attention to the tape measure. Make sure that your distance at the bottom is the same as the top. The space at the top of the side walls will need stringers that are the same length as the distance at the base. Pay attention to squareness. Once you start to go off square or lengths Left to Right you will pay for it later when you start adding the covering material.

Assembly1.jpgAssembly3.jpg

Progress 3 !


Dustin
 

DustinJanes

New member
Progress 4

Welding and part assembly continues. Once the Side walls are attached, you need to fill in the space between the bottom edge of the side wall and the floor. The basic concept is come up from the floor some distance and then branch out to the side wall. The floor has a contour that is that 48" wide sheet distance between the wheel wells, but bumps out to the distance between the tail gate mounts beyond the wheel wells. Also, add cross tubes to permit placement of a standard sheet (48" wide)


jungleJim2.jpg
JungleJim1.jpg

In order to permit a normal sheet of aluminum to skin the camper with, a tube needs to be placed every 48". This provides the landing for the sheet edge and the lap joint for the next sheet. Next post is all about the red stuff on the face of the tubing.


Progress 4 !


Dustin
 

Attachments

  • SideSkinOn.jpg
    SideSkinOn.jpg
    543.7 KB · Views: 14
  • 20150831_185715.jpg
    20150831_185715.jpg
    573.6 KB · Views: 14

DustinJanes

New member
Progress 5

In normal construction of aluminum sided RV's or trailers, the skin is attached using some sort of mechanical method. It could be a screw, staple or rivit. I used none of the above. The basic problem with an attachment using a screw or rivit is the aluminum panel is restrained and can't expand from rivit to rivit. This leads to sort of a potato chip look of the skin. The steel frame will also expand or shrink a smaller amount than the aluminum skin. This also leads to more skin problems. Sound is also an issue. hard attachment tends to transmit the sound of the skin, sort of like a drum head.

The solution:

3M makes a product that is an adhesive tape that comes in 2 thicknesses depending on the joinnt type. Unfortunately it is not seen on the open market. It is only sold to pre-qualified users. In working with an Engineer from 3M, I was able to understand the process required to make the correct joint. If you search on Youtube for 3m VHB, you will see a few videos on the product. It is faster and better method that screws or rivits. Due to the thickness of the adhesive (in the case of the VHB CV62F = .062" thick, VHB CV45F = .045" ) it permits shifting or movement in the attached panel to steel frame. The method that was devised in order to have a good bonding of the frame to panel, A few steps are required each time you prepare a surface. The Process is as follows:

Steel frame prep:
1) Clean steel surface using Isopropyal Alcahol and clean tack rags. Clean surface on rag each time you wipe.
2) Abrade clean surface with rotary pad to provide a texture for adhesion
3) Clean surface again with Isopropyal Alcahol
4) Apply CV Adhesive per Engineering plan
5) Imboss adhesive with roller, covering same surface 3 times minimum.

Aluminum Skin Prep:
1) Mark using sharpie pen the tube contact area
2) Do not bring the skin to the bottom of the tube, hold it up or create a gap top to bottom to permit expansion.
3) I used pre-painted white aluminum .030" thick skin that required skuffing of the paint in the adhesion area.
4) Clean adhesion and skuffed area with Isopropyal Alcahol.

Note: Once you remove the red tear strip and mount the panel - It is stuck ! You can't move it or shift it. The trick on this one is to just peel back a small corner of the tear strip to permit a finger grasping strip exposed - but not too much of the adhesive showing. Once the panel is in place, start from one crner and work away in both directions. This will prevent trapping a blister or pucker of material. As you go along, strip away more of the red tear strip away.


Progress 5 !

Dustin
 

Attachments

  • 20150831_185715.jpg
    20150831_185715.jpg
    573.6 KB · Views: 15

DustinJanes

New member
Progress 5.1

Progress 5.1


I did not attach a picture of the skin with scotch brite scuff patern for bonding prep. Also - Pic showing all the skin on.

Next is the interior fit out and addition of aluminum angle at exterior edges.


Progress 5.1 !

Dustin
 

Attachments

  • ScuffSkin.jpg
    ScuffSkin.jpg
    440.9 KB · Views: 15
  • SideSkinOn.jpg
    SideSkinOn.jpg
    543.7 KB · Views: 15

DustinJanes

New member
Progress 6.0

Progress 6.0
This weekend I was able to complete the aluminum angle trim on one entire side. Also mounted the outside shower box and test fit of the Girard tankless hot water heater. A trip to Home Depot resulted in another stack of 1-1/2" thick insulation and a few sheets of 1/8" birch skin for the interior. This week should see the windows go in and the construction of the 4 corner jacks. Also the tie down mounts for the truck. I plan to use existing holes in the frame - No drilling !
AluminumTrimOn.jpg

Progress !

Dustin
 

DustinJanes

New member
Progress 7

Progress 7

Even though it looks like this project has come together in a few weeks, that is not the case. I started actual fabrication back in June 2015. My posting of the progress pictures would lead you to another conclusion. In reality I have come this far in 4 months. The major time issue has been work. I have a regular job that has prevented faster progress. I normally have 2 to 3 hours Monday through Friday. If I can get out of the "Honey Do" list, that may bring A full Saturday and/or a partial Sunday. I did notice a distinctive change in the days are not as long and slightly cooler. I have less that two weeks and the camper needs to be on the truck headed to Wyoming. Opening day is October 1st. We have Doe and Buck Antelope tags to fill ! The big push is on. I am still excited to get it on the back of the truck and check weight.

More later this week

Progress 7 !

Dustin
 

Forum statistics

Threads
186,687
Messages
2,888,977
Members
226,872
Latest member
Supreet.dhaliwal
Top