EdwardBernal
Adventurer
Hello Folks:
Ed Bernal here and I'd like to share my plans for customizing a great little trailer that I bought this past fall from a fellow ExPo member from Rhode Island.
My 11 year old son and I really enjoy to camp/hike/fish/canoe in wilderness settings as opposed to campgrounds and we usually go to Vermont or the Adirondacks in NY state.
Like most of you here at ExPo, I like to get away from civilization as often as I can. As our adventures became longer and the amount of gear and suppiles grew
over the years, it became apparent that I needed a better way to haul this stuff. Stuffing all my crap into every cubic inch of space of my wife's Jeep Liberty got OLD.
A couple years ago, my old man gave me his beautifully maintained Ford F250 diesel and I used it on a couple of trips but the truck had 2 major disadvantages:
It was a 2 x 4 (Pop lives in florida) and it was a diesel. I MUCH prefer to camp in the cool/cold temps of fall/early winter and where I like to camp there are NO outlets to plug
in an engine block heater into. The 2 x 4 aspect is well, pretty self-explanatory. So as much as I liked the truck to tool around town, I decided to sell it and look for a small camping trailer.
I read a ton of threads on this particular board and learned alot about what would work for me. I soon realized that this type of camp trailer was no where near as popular
here on the east coast as it is "out west". I first thought of doing what alot of you guys did and look for a surplus military trailer but honestly, I did not really look forward
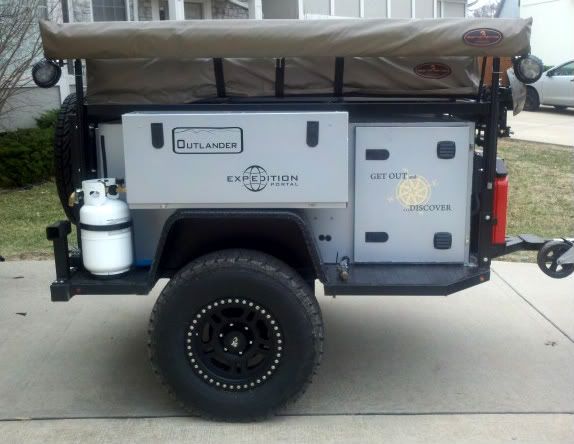
to a big-time restoration project. I looked around for one in very good condition for a while with no luck. I came across a different type of trailer for sale here on ExPo within a 4 - 5 hour drive of home so looked into this brand of trailer called Outlander Trailers located in Arkansas. The Sherpa II is thier largest model and what drew me to the design was its modularity. Alot of expo-type trailers
are a tub design in its most basic form. This trailer is a rectangular, tubular steel "space frame" if you will, that is roughly a 4' wide, 6' long and 2.5' high. The tougue assembly is about 4' long
and the trailer has 2 side boxes @ 10Hx10Wx38L and a large 48Wx48Lx30H main cargo box. A 24Wx48Lx30H open cargo area and 2 jerry can holders. Here are a couple of production shots the seller posted on his for sale ad:


After realizing how well this trailer fit my needs and how easy it would be for a person of my moderate skill to customize this rig I asked "the boss" for the additional greenbacks to be able
to close the deal with the seller. A week or so later, I was rolling home to NJ with my new big-boy-toy. I poured over this thing what seemed like every day for a week coming up with
ways to customize it to suit my particular needs - wait it WAS everyday for a week!! :wings: :luxhello: :drool: :friday: :jumping: :clapsmile: OK enough of that.....these are the major
modifications I would like to make:
1. Remove the 10 x 10 x 38 side boxes and replace them with larger 18 x 18 x 48 steel side boxes
2. Buy a third of the original side box and install them stacked in the front of the trailer right over the tougue.
3. Relocate the jerry can holder on the right side over to the left side, next to the other JC holder to provide clear access
to the open cargo area.
4. Add a swing-out spare tire carrier onto the back of the trailer.
5. Build a Camp Kitchen / Galley into one of the new, larger sideboxes.
6. Build a "power station" with perhaps a small honda generator and battery system (will need lots-o-help with that)
7. Install 5lb propane bottles (the short/fat ones) and holders on the right and left side rear fenders
8. Clean and repaint the tube steel frame and expanded metal mesh.
9. Repaint all storage boxes ( or preferably have the boxes "wrapped" in a custom vinyl wrap - maybe a camo pattern or topo map design)
10. Of course and lastly, install a rooftop tent.
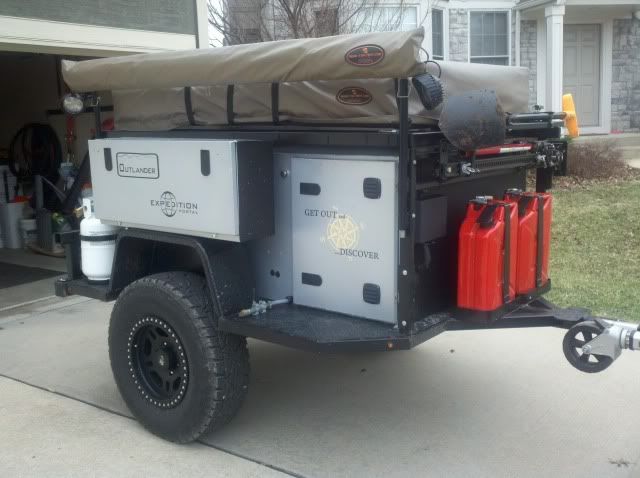
She looks Like this at the moment:

Sooooooo, come christmas time, santa saw it fit to give me a couple of new side boxes for my new-to-me-mule and after all the holiday
hustle and bustle, I began to layout PHASE I of my evil plan: Remove existing side boxes and install the new, larger ones AND build
the kitchen / galley into one of these new boxes. Thanks for reading and I'll post up the galley build in the next one...
Ed Bernal here and I'd like to share my plans for customizing a great little trailer that I bought this past fall from a fellow ExPo member from Rhode Island.
My 11 year old son and I really enjoy to camp/hike/fish/canoe in wilderness settings as opposed to campgrounds and we usually go to Vermont or the Adirondacks in NY state.
Like most of you here at ExPo, I like to get away from civilization as often as I can. As our adventures became longer and the amount of gear and suppiles grew
over the years, it became apparent that I needed a better way to haul this stuff. Stuffing all my crap into every cubic inch of space of my wife's Jeep Liberty got OLD.
A couple years ago, my old man gave me his beautifully maintained Ford F250 diesel and I used it on a couple of trips but the truck had 2 major disadvantages:
It was a 2 x 4 (Pop lives in florida) and it was a diesel. I MUCH prefer to camp in the cool/cold temps of fall/early winter and where I like to camp there are NO outlets to plug
in an engine block heater into. The 2 x 4 aspect is well, pretty self-explanatory. So as much as I liked the truck to tool around town, I decided to sell it and look for a small camping trailer.
I read a ton of threads on this particular board and learned alot about what would work for me. I soon realized that this type of camp trailer was no where near as popular
here on the east coast as it is "out west". I first thought of doing what alot of you guys did and look for a surplus military trailer but honestly, I did not really look forward
to a big-time restoration project. I looked around for one in very good condition for a while with no luck. I came across a different type of trailer for sale here on ExPo within a 4 - 5 hour drive of home so looked into this brand of trailer called Outlander Trailers located in Arkansas. The Sherpa II is thier largest model and what drew me to the design was its modularity. Alot of expo-type trailers
are a tub design in its most basic form. This trailer is a rectangular, tubular steel "space frame" if you will, that is roughly a 4' wide, 6' long and 2.5' high. The tougue assembly is about 4' long
and the trailer has 2 side boxes @ 10Hx10Wx38L and a large 48Wx48Lx30H main cargo box. A 24Wx48Lx30H open cargo area and 2 jerry can holders. Here are a couple of production shots the seller posted on his for sale ad:
After realizing how well this trailer fit my needs and how easy it would be for a person of my moderate skill to customize this rig I asked "the boss" for the additional greenbacks to be able
to close the deal with the seller. A week or so later, I was rolling home to NJ with my new big-boy-toy. I poured over this thing what seemed like every day for a week coming up with
ways to customize it to suit my particular needs - wait it WAS everyday for a week!! :wings: :luxhello: :drool: :friday: :jumping: :clapsmile: OK enough of that.....these are the major
modifications I would like to make:
1. Remove the 10 x 10 x 38 side boxes and replace them with larger 18 x 18 x 48 steel side boxes
2. Buy a third of the original side box and install them stacked in the front of the trailer right over the tougue.
3. Relocate the jerry can holder on the right side over to the left side, next to the other JC holder to provide clear access
to the open cargo area.
4. Add a swing-out spare tire carrier onto the back of the trailer.
5. Build a Camp Kitchen / Galley into one of the new, larger sideboxes.
6. Build a "power station" with perhaps a small honda generator and battery system (will need lots-o-help with that)
7. Install 5lb propane bottles (the short/fat ones) and holders on the right and left side rear fenders
8. Clean and repaint the tube steel frame and expanded metal mesh.
9. Repaint all storage boxes ( or preferably have the boxes "wrapped" in a custom vinyl wrap - maybe a camo pattern or topo map design)
10. Of course and lastly, install a rooftop tent.
She looks Like this at the moment:
Sooooooo, come christmas time, santa saw it fit to give me a couple of new side boxes for my new-to-me-mule and after all the holiday
hustle and bustle, I began to layout PHASE I of my evil plan: Remove existing side boxes and install the new, larger ones AND build
the kitchen / galley into one of these new boxes. Thanks for reading and I'll post up the galley build in the next one...
Last edited: