UK Sankey build

djaraceandrally

Adventuring somewhere...
Ok, so been looking and thinking about this for a while. After hitting the storage stops and realising how long it takes to pack up even for a trip a few hours from camp, i bit the bullet and decided to build my own trailer. I sold my small erde that had been gathering dust (from camper van days) and bought something that would handle the Eezi-awn RTT.
 

djaraceandrally

Adventuring somewhere...
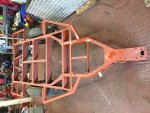
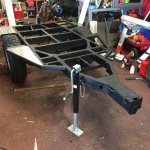
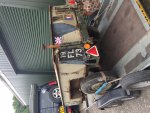
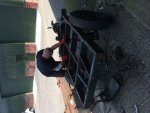
Ok, trying to work how to rotate them on the portal. But first off, the trailer as bought. Its a ex Royal Marine narrow track. Looks to be from the comms brigade according to the stickers. Now I was a Booty for 15 years, so no doubt this thing has been chucked off the back of landing craft, moved by air and covered in mud, more than once. But dispite this, the chassis is sound and thats all i wanted it for. The tub was scrap and didnt take much to remove.

My dad help clean off the flaky old paint and the rubberised sealent that had been applied in the past, then off it went to the blasters.

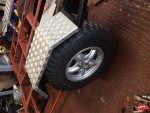
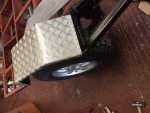
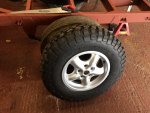
I managed to pick up matching alloys and thanks to fleebay, matching tires to the Discovery.

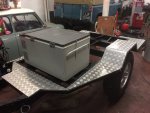
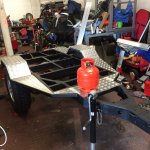
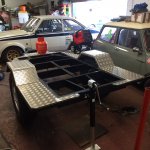
Ive extended the frame to allow me to build the box too 2m and give me a little more room at the front for the bottle rack
 

Attachments

  • image.jpg
    image.jpg
    569.9 KB · Views: 53
  • image.jpg
    image.jpg
    555.1 KB · Views: 39
  • image.jpg
    image.jpg
    558.3 KB · Views: 42
  • image.jpg
    image.jpg
    552.6 KB · Views: 46
  • image.jpg
    image.jpg
    538.2 KB · Views: 39
Last edited:

djaraceandrally

Adventuring somewhere...
Ive stripped and rebuilt the axle, cleaned up and straightened the brake rods and stripped, re painted the springs and regreased. Need to add additional triangulation on the extended frame, then onto the mud guards. Ordered the adaptors for the wheel pcd. These will also provide some additional increase in track.
 

Gren_T

Adventurer
Nice start, i'm going to be watching with interest.. do you know how much the rolling chassis weighs?

cheers
 

djaraceandrally

Adventuring somewhere...
Not really acurately. I would guess the frame is around 40-50kg, the axle around 35kg and the wheel/tire 25kg each.

So at a guess it would be 130 ish so far.

The nato hitch is no featherweight, maybe 20-25kg.

Im not using the original tub or the light frames but online it says that the total original weight was 357kg unladen

It certainly was easy to push about in its original form and is even easier now!!
 
Last edited:

DanCooper

Adventurer
You had me at "Royal Marine." Do you have any additional shots of the extension? Are you limiting the width of the load to the width of the framing? I look forward to seeing this develop.
 

djaraceandrally

Adventuring somewhere...
Hi, I need to take some more but will do so when ive added the trianglation. I want the "box" to sit on or as near as dam it to the chassis rails. Currenty I dont want it to overhang the wheels, but the mock up will make me look at it closely. The idea is the box is for storage and maybe a simple kitchen. Ive even thought of having it demountable and building a tub for other usage, using the same fixing points
 
Last edited:

djaraceandrally

Adventuring somewhere...
Im going as fast as i can and as funds allow!!:):):) Did a little more today - added the frame for the box to sit on around the new extension. Just awaiting the wheel adaptors that will define the width of the mud guards/side rails. These will also provide additional bracing to the front. Im told these were being shipped today or tomorrow, so shouldnt be long now. Also need to look into getting a metal cutting blade for my chop saw, will make things a little quicker and easier.
 
Last edited:

djaraceandrally

Adventuring somewhere...
The wheel adapters arrived and are a lovely piece of engineering, only downside is that the 15/16" socket i have will not fit into the recess drilled for then to tighten the nut (adapter to the Sankey drum) Ive ordered a snap-on thin walled socket that should do the job. But it wont be here till next week. Cant just borrow one, need it in the tool kit going forward. Heyhum

http://www.expeditionportal.com/forum/asset.php?fid=306536&uid=138331&d=1469120157x

With the overall width now known, I also managed to get a few good hours measuring, moking up and eventually tacking the additional framing. Its predominately 40mm 2.5mm box. Hopefully I will weld it up fully tomorrow.

http://www.expeditionportal.com/forum/asset.php?fid=306537&uid=138331&d=1469120180

Ive ordered the sidewinder legs for the front and rear, they should be here next week.

Now if i can only work out to spin the pictures around, i'll be a happy man!
 
Last edited:

djaraceandrally

Adventuring somewhere...
Has anyone any ideas on what these sankey drum and shoes are off? Anyone found any matches from same period vehicles (champ, series land rover?)
 

djaraceandrally

Adventuring somewhere...
Finished the welding the frame and added tabs for the checker plate and mudguards. Once i had smoothed off the corners and fitted the stubs for the legs, front and rear, I painted the new steel with red oxide.

Cut and started to form the mudguards.

New Snap-socket arrived but still had to be run down in the lathe to allow it to fit, will require me to case harden it tomorrow, more photos to follow
 

Attachments

  • image.jpg
    image.jpg
    578.8 KB · Views: 30

djaraceandrally

Adventuring somewhere...
Finished folding and welding the guards today. Also applied a little black satin paint that will be ultimately the under coat for the truck bed liner. Cased hardened the new socket and fitted the wheels to ensure the guards are located correctly. Really pleased with the work so far...but still not worked out how to rotate the pictures!!

Will add more paint to the frame next week and start the handbrake refurb.
 

Attachments

  • image.jpg
    image.jpg
    552.6 KB · Views: 23
  • image.jpg
    image.jpg
    554.3 KB · Views: 26

djaraceandrally

Adventuring somewhere...
Painted most of the chassis with black undercoat, awaiting the truckbed liner to arrive to finish it. Cut all the chequer plate and just need to alloy weld the corner pieces together. Starting to look more like now.

Mocked up the box but having a rethink and now looking at making the box not as tall and mounting the RTT on a rack that lifts up to allow head room under it when folded out. Looking to use some 12v linear actuators to do this, thanks to advice from another thread on this forum.

As you can see, the engel fridge takes up 1/3 of the chassis space already!!
 

Attachments

  • image.jpg
    image.jpg
    547.3 KB · Views: 25

djaraceandrally

Adventuring somewhere...
Managed to spray the frame with truckbed liner and finished off the welding and fitting the alloy tread plate.

Used a bonding/sealing agent (upol tiger seal) to stop disimilar metal reaction along with stainless cap head bolts/locking nuts.

Measured and cut the alloy corner posts and cant rails, awaiting the grp panel to arrive and the grp coated foam roof panel.

Still need to work out where the gas bottles and batteries will go, taking into acount nose weights, but its coming along.

Started a new contract (my day job unfortunately!!) so it could slow down a bit now, but looking forward to building the box.
 

Attachments

  • image.jpg
    image.jpg
    538.4 KB · Views: 26
  • image.jpg
    image.jpg
    531.5 KB · Views: 24
  • image.jpg
    image.jpg
    523.8 KB · Views: 25

Forum statistics

Threads
188,624
Messages
2,908,006
Members
230,800
Latest member
Mcoleman
Top