You are using an out of date browser. It may not display this or other websites correctly.
You should upgrade or use an alternative browser.
You should upgrade or use an alternative browser.
Ursa Minor Pop-Top Jeep JK
- Thread starter cobblecrazy
- Start date
no but what are you hoping to learn?
I lost power in the top, so I need to chase a lose/broken connection.
shays4me
Willing Wanderer
It's a pretty simple circuit if yours is like the JK top. Forgive me if this seems obvious and you've tried it, but the first thing to do is check the fuse. After that is the switch in the header. Is it lighting up when you turn it on? If it isn't and your fuse is good check the ground wire. The switch is the first thing after the fuse and it requires the positive and the ground in order to light up. The JKU buss bar is above the sound bar, I'm not sure if your JLU top is that way or not. If it is, it's a simple checkout with a test light. On one buss bar is all the positive wires (all red) and the other side is all the negative wires (mostly black). There may be wires up there that are hot all the time, but probably not on the buss bar since most of them are powered by the switch. The downsatirs light in the cargo compartment is hot all the time I beleive (I don't have that but it makes sense).I lost power in the top, so I need to chase a lose/broken connection.
It's a pretty simple circuit if yours is like the JK top. Forgive me if this seems obvious and you've tried it, but the first thing to do is check the fuse. After that is the switch in the header. Is it lighting up when you turn it on? If it isn't and your fuse is good check the ground wire. The switch is the first thing after the fuse and it requires the positive and the ground in order to light up. The JKU buss bar is above the sound bar, I'm not sure if your JLU top is that way or not. If it is, it's a simple checkout with a test light. On one buss bar is all the positive wires (all red) and the other side is all the negative wires (mostly black). There may be wires up there that are hot all the time, but probably not on the buss bar since most of them are powered by the switch. The downsatirs light in the cargo compartment is hot all the time I beleive (I don't have that but it makes sense).
Thanks, that is very helpful. First thing I did was check the fuse, all good there. I do not have power on the switch in the header. I need to check the ground. Have not had time yet. I also contacted UrsaMinor. It'll have to wait until next weekend anyways.
Check above roll bar driver side back door. When I had that issue there was a connection that came loose there.
Thanks for the tip, I'll check that.
campertramper
Active member
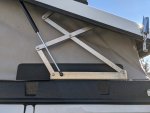
Well, I installed my hinge tamers today and I'm thrilled! @shays4me thanks for the great innovation!
John, your video and Instructions we're very helpful. As you suggested I enlisted a buddy and the two of us were able to do it in just over 2 hours. Here are a couple of additional ideas for installation that we discovered along the way to build upon all of yours John:
1. When you put the ratchet straps on the strut, to keep them from slipping off I wrapped masking tape around them on either end - it worked great!
2. I came up with a technique to minimize washers slipping out and keep the bolts aligned which is the part that burned up most of the time. First I tapped out the original threaded bolts with a punch and used the punch to hold all of the parts in place. Then I took the same original bolt and threaded it from the front. Once in it kept everything lined up perfectly. Then as I inserted the new bolt from the inside I backed out the original bolt in the front using an allen wrench. If I had this technique from the beginning I think I could have accomplished all four bolts in under an hour.
I hope this is helpful to someone. In case you are on the fence about the hinge tamers, just get a set while they are still available - you won't regret it!

shays4me
Willing Wanderer
Thanks for the update, I'm very happy that you're pleased with them and it's nice to see them installed! I used a similar method for lining up the washers with a #2 Phillips screw driver. As for the remaining Hinge Tamers, I have four sets ready to ship.Well, I installed my hinge tamers today and I'm thrilled! @shays4me thanks for the great innovation!
John, your video and Instructions we're very helpful. As you suggested I enlisted a buddy and the two of us were able to do it in just over 2 hours. Here are a couple of additional ideas for installation that we discovered along the way to build upon all of yours John:
1. When you put the ratchet straps on the strut, to keep them from slipping off I wrapped masking tape around them on either end - it worked great!
2. I came up with a technique to minimize washers slipping out and keep the bolts aligned which is the part that burned up most of the time. First I tapped out the original threaded bolts with a punch and used the punch to hold all of the parts in place. Then I took the same original bolt and threaded it from the front. Once in it kept everything lined up perfectly. Then as I inserted the new bolt from the inside I backed out the original bolt in the front using an allen wrench. If I had this technique from the beginning I think I could have accomplished all four bolts in under an hour.
I hope this is helpful to someone. In case you are on the fence about the hinge tamers, just get a set while they are still available - you won't regret it!
View attachment 710353
campertramper
Active member
Is the red wire still connected to the battery? I know it's an obvious question but we all miss things sometimes.I lost power in the top, so I need to chase a lose/broken connection.
Bruce_B
New member
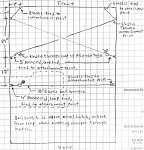
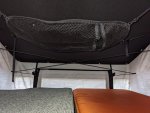
Soon after I got my Ursa Minor I reconfigured the tent side elastic as shown in the attached sketch. This keeps inward tension on the tent side fabric, which keeps it away from the hinges when raising and lowering the top and also reduces flapping in the wind. I leave the two elastic cords in front connected all the time, I just slide my feet underneath them when sleeping. The rear elastic cord is a ball bungie, so it is easily disconnected from the paracord loop before I go up through the hatch. I don't remember how these were originally arranged, but I remember this was a big improvement.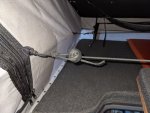


rustypayne
Active member
Soon after I got my Ursa Minor I reconfigured the tent side elastic as shown in the attached sketch. This keeps inward tension on the tent side fabric, which keeps it away from the hinges when raising and lowering the top and also reduces flapping in the wind. I leave the two elastic cords in front connected all the time, I just slide my feet underneath them when sleeping. The rear elastic cord is a ball bungie, so it is easily disconnected from the paracord loop before I go up through the hatch. I don't remember how these were originally arranged, but I remember this was a big improvement.
I'll have to give this a try. On my old Sportsmobile top the elastic around the canvas had inward pull so you never had to think about it when pulling the top down. Always wished to have something similar on the J30 but wasn't sure how to accomplish it without blocking the opening. Very clever!
campertramper
Active member
I like this solution too! With the hing tamers and the tent folding technique from the rear bumper I am not really having fabric getting caught problems, but flapping fabric in the wind is a consideration. I was thinking of trying the opposite approach to solve this, namely fabricating custom tent poles to push the fabric out when in windy conditions. Anyone out there tried it yet?I'll have to give this a try. On my old Sportsmobile top the elastic around the canvas had inward pull so you never had to think about it when pulling the top down. Always wished to have something similar on the J30 but wasn't sure how to accomplish it without blocking the opening. Very clever!
Red_shift
New member
Interesting idea...how about a curtain tension rod?I like this solution too! With the hing tamers and the tent folding technique from the rear bumper I am not really having fabric getting caught problems, but flapping fabric in the wind is a consideration. I was thinking of trying the opposite approach to solve this, namely fabricating custom tent poles to push the fabric out when in windy conditions. Anyone out there tried it yet?
ventura911
Adventurer
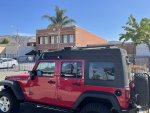 Adding a GMRS radio next week. Easiest antenna location is on a ditch light mount on the driver’s A pillar, but before I settle on that, is there a better spot you all have found on the top? My other thought would be off one of the solar panel mounts, but is it worth running the wire all the way up, back, and out?
Last edited:
View attachment 713985Adding a GMRS radio next week. Easiest antenna location is on a ditch light mount on the driver’s A pillar, but before I settle on that, is there a better spot you all have found on the top? My other thought would be off one of the solar panel mounts, but is it worth running the wire all the way up, back, and out?
I'm partial to the Rugged Radios Jeep A pillar mount. They make one for the passenger and the driver side.
That said, I wish they stuck with the original 2 bolt design but the single bolt works fine.
-D
Similar threads
- Replies
- 2
- Views
- 1K
- Replies
- 0
- Views
- 1K
- Replies
- 0
- Views
- 769
- Replies
- 0
- Views
- 691

