Yet to be named Power Wagon Build Thread

crismateski

American Adventurist
I have a couple of posts in various places on my "build" not that I have done much yet. It will be a slow process. Just a little back info on the truck, it is a 2006 Power Wagon, I purchased it all most exactly a year ago with 74k miles, and it now sits at 105k miles. I run 100 miles round trip to work, and take it out every weekend I can. I will copy my Snorkel install into post 2, and put some of what I have done in the last week to post 3

and if you have a suggestion for a vehicle name, I am all ears.
 

crismateski

American Adventurist
Airflow Snorkel

The original thread is at http://www.expeditionportal.com/for...rkel-install-2006-Dode-Power-Wagon?highlight=


I got an airflow snorkel for Christmas, and installed it on Friday. I was rather nervous about doing the install. Looking at the instructions it did not look to difficult, but the idea of drilling a 4" hole in the fender really made me nervous. Well, it all went well, and the hardest part was pulling the trigger on the drill. It took me a little over 4.5 hours to do, but now that I have done it I think it could go much faster. I just took my time and made sure I had it right.

This is the template cut out and laying on my living room floor
file.jpg


One last shot with the fender and stock intake still intact
file-1.jpg


Template taped to the fender
file-2.jpg


Drilling the 1/4" pilot holes, 6 in all
file-3.jpg


This is where it got a pit scary
file-4.jpg


It came out pretty good, I did have to file it a bit to clean it up, but the instructions said I would need to
file-5.jpg


All of the holes except for the A-pillar drilled
file-6.jpg


a quick test fit, the instructions tell you to open up the top two holes larger, I tried to get away with leaving them smaller, but it bound up a bit and did not sit flat.
file-7.jpg


fitting the airbox with the new fitting and hose. I did not assemble it the way the instructions said. The instructions tell you to put the fitting on the box, put it in place, put the snorkel on, put the elbow on the snorkel and then try to fit the flex hose between the two. What I did was take the bracket that holds the air box off and put the fitting and hose on the airbox. With the bracket off I was able to put the airbox, fitting and hose in place all in one piece, bend the hose down through the wheel well, put on the elbow fitting, then slip the bracket up through the wheel well and bolt it all down. I then put the snorkel on and snapped the elbow into place on the bottom of the snorkel
file-8.jpg


file-13.jpg


the rest are a few shots of it finished

file-9.jpg


file-10.jpg


file-12.jpg


file-12.jpg


btw, I know the truck is dirty, and scratched, but I think that is how a power wagon is meant to be.
 

crismateski

American Adventurist
Leer Camper Shell

When I purchased the truck it had a hard fiberglass tonneau that was installed at the dealership. It was a nice selling point for me, but I quickly found it did not really suit my needs. It did the job, but not the way I wanted. I decided I wanted a shell, but everything I found was either the wrong color, or more then I could justify spending. Well, I finally happened across one on Craigslist and was able to pick it up a week ago Thursday (the night before Desert Rendezvous)

Here it is on the truck about 10mins after picking it up in Big Bear

IMAG0102.jpg


IMAG0095.jpg


Last week at work I was able to get a prototype sleeping deck built and painted, and I put some carpet on it yesterday.

with the tailgate closed
file-3.jpg


with the tailgate open (holds 4 milk crates in the back section
file-5.jpg


Flip open section at the front
file-4.jpg


I have already learned some things I don't like about this build that I will change for the final build. This was just to get something back there to allow me to try and it and see what worked for me and what does not. So far, the final build will be lower, and I will switch to something other then milk crates. I would like to get it closer to the height of the wheel wells. The compartment at the front will either hinge from the sides, or be lift off trap doors, not the way it is now, and I will build side pieces to go over the wheel wells and relocate the axe and shovel (most likely to the top corners of the shell.
 

mountainpete

Spamicus Eliminatus
Great job! I remember my first snorkel install. It took me over an hour to drill the first hole. I must have measured it 50 times.

Based on this pic, here I my name suggestion: BISON.

file-12.jpg
 

crismateski

American Adventurist
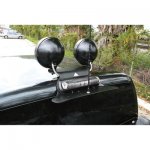
I had this mount on the cab with the tonneau cover
baja-champions-cab-top-light-mount-ford-f250-series-model-bc761.jpg
It worked great for my CB antenna and some KC lights. Putting the shell on, this bracket no longer fit, so I relocated the KC lights behind the grill

file-1.jpg


file-2.jpg


and moved the CB antenna to the Driver side Hood

file.jpg


I have 2 pair of the kc lights, but the way the truck is I just could not get all 4 to fit. There are brackets in the way on the driver side. I will either need to build a bracket put 2 of them in the top half of the grill, or put a light bar on the front. The truck is already on the large side so i was trying to avoid the bar, but think that may be the route I take. I am also not real thrilled with the antenna on the hood. I keep catching it out of the corner of my eye and so far am just not used to it. I plan on a rack on the shell that will allow me to move the antenna back up top, and when I can finally do a custom bumper I may be able to work in a solution for the lights, but a bumper is still a long ways down the road.
 
Last edited:

sxharr05

Adventurer
Nice PW. I like the direction it is taking so far. Where did you get the original HMBL mount for the fogs? That's pretty darn slick!
 
Last edited:

Plannerman

Wandering Explorer
Nice truck! I swear I saw this beast at REI week ago. I would have been the guy standing in the parking lot staring in a dreamy sort of way. Love the Dodge trucks and yours is a great specimen!
 

crismateski

American Adventurist
That was me at rei, I replied to your post in the spotted thread. It is at rei on a pretty regular basis.
 

verdesardog

Explorer
Hmmm that seems like a not so good place for your high lift, it will get very dirty there and might not work well when you most need it....just thinking out loud.
 

bob91yj

Resident **************
I had a HiLift mounted on the front of my Jeep like that for a short period of time, bent the main bar when I bumped a berm with it.
 

crismateski

American Adventurist
it is not my ideal spot for it, I want to get it onto the roof rack, but since I have neither designed or built my roof rack yet it is hard to mount to it. I cleaned it pretty often, and had the mechanism wrapped in shrink wrap to help keep it clean. There was a mishap though, hard to explain, but a moving rail road tie made contact with the handle, breaking the zip tie, causing the handle to fall and "roll" under the truck. This bent the bumper a touch, and damaged the hi lift, so it went in the dumpster and has not been replaced yet.
 

AA1PR

Disabled Explorer
nice looking truck

I wish they made a snorkel for my style of suv with out having to mod this or that

so sorry to hear about the hi-lift biting the bullet
 

chilliwak

Expedition Leader
Really clean :Wow1:install on the snorkel Crismateski! I believe you are right when you say that a Power Wagon should be dirty and scratched. They do look better that way. It shows that they are used as they should, as a 4 wheeling vehicle and not as a shopping mall truck. Perhaps you could call your truck the `Power Dragon´as it does have a fire breathing snorkel.... Cheers, Chilli....:)
 

crismateski

American Adventurist
So I have not been real good at updating this, so here is a quick update.

The temporary sleeping platform is now temporary sleeping platform version 2. Cut down about 3 inches off of the height, turned the hatch at the front around, and replaced the milk crates with 2 drawers. It also got Aluminum trim holding down the new carpet.

IMAG0054_zpsf1f49ac6.jpg


IMAG0052_zps6af35fe2.jpg


IMAG0053_zpsecadea70.jpg


I also picked up a roof rack that a friend of Adventureduo had

roofrack_zps86f92196.jpg


Today i went over to Jeff Wanamog shop, and we got it mounted up.

IMAG0095_zpsaf1cc174.jpg


(by we I mean he did 90% of it)

IMAG0094_zpsd55930e5.jpg
 

Forum statistics

Threads
188,337
Messages
2,905,752
Members
229,959
Latest member
bdpkauai
Top