Aspen X Trails Kelly Tear Drop build

jeepdreamer

Expedition Leader
I love how this is coming along and looks great! I have one side question I didn't see addressed. The frame seems to be 1" square tubing with the carpet stuff being the main component. I was just curious if instead of carpet, could you have used spray in expanding foam then cover it? The foam could add structural rigidity while offering insulation value...Maybe?
 

Aspen Trails Trailers

Supporting Sponsor
The walls are 3/8 plywood, 2 1/8 sheets luan, 1 1/8 fiberglass, with carpet glued to the plywood. It is very warm and extremely quiet. I have slept in at 13k and the outdoor temperature was 21 degrees, no problems and that was without the heat strip or the heater installed.

I do not like the wood walls in the other trailers. I use my trailer, hard. It is not a show trailer. I know when I am ready to leave, sometime I just want to throw everything in and go. The luxury of a trailer. With carpet, you do not get the rubs, the scratches, the knarley scrapes from poles or back pack with a knife rubbing on wood.

Mine are designed for serious off roading anywhere, any time. By adding a wooden interior I would be adding extra weight, a lot of it. Mine have the creature comforts that most want and need, but not the frills. Kinda like a tank, great for what it does, but not a beauty contest winner. They are attractive, just not like the others.

Bob
 

Aspen Trails Trailers

Supporting Sponsor
The sleeping compartment is finished. Barrier in, and 9 inch memory foam mattress from Restava. Laid on it for a few minutes, feels exactly like my 4000 dollar tempurpedic. Will consider them when buying a new mattress for the house. Most everything is done, still have to finish the brake wiring on the passenger side, and the back door, install the fridge, finish the monitoring system and the stupid hot water heater switch. Never seen anything like this, cannot for the life of me get a polar white switch. DUH

Some pictures to follow shortly.

Bob
 

Aspen Trails Trailers

Supporting Sponsor
Here are a few of the finished interior. The mattress arrived a couple of months ago. I never opened, did today and it is 4 inches short. Have a call, told to measure again Thursday morning. It is rolled very tight for shipping, they say it will expand. I do not recall that happening on the first three, but who knows. I think I have figured out the hinge, spoke with Gabe and he said I was right. Hope to cut it down tomorrow and get the back door in process. Would like to finish this this week. Need to do some work on mine for the summer. lol.
 

Attachments

  • Kelly tear drop, insullation barrier and the mattress 001.jpg
    Kelly tear drop, insullation barrier and the mattress 001.jpg
    99.9 KB · Views: 67
  • Kelly tear drop, insullation barrier and the mattress 002.jpg
    Kelly tear drop, insullation barrier and the mattress 002.jpg
    98.2 KB · Views: 62
  • Kelly tear drop, insullation barrier and the mattress 003.jpg
    Kelly tear drop, insullation barrier and the mattress 003.jpg
    86.1 KB · Views: 60
  • Kelly tear drop, insullation barrier and the mattress 004.jpg
    Kelly tear drop, insullation barrier and the mattress 004.jpg
    56.5 KB · Views: 58
  • Kelly tear drop, insullation barrier and the mattress 005.jpg
    Kelly tear drop, insullation barrier and the mattress 005.jpg
    66.6 KB · Views: 59

Aspen Trails Trailers

Supporting Sponsor
Got the brakes done today, all crimped, soldered and shrink wrapped, ground bolted to the frame by the skid plate. Next build will have a loom guide welded to the bottom to fit behind the axle. Had to zip tie this one, but all are up and out of the way.

Building the back, as it seems many are on this site. Will finish it tonight and take it for powder coating in the AM.
 

Attachments

  • Kelly tear drop build 001.jpg
    Kelly tear drop build 001.jpg
    57.4 KB · Views: 62
  • Kelly tear drop build 002.jpg
    Kelly tear drop build 002.jpg
    61.2 KB · Views: 60
  • Kelly tear drop build 003.jpg
    Kelly tear drop build 003.jpg
    58.5 KB · Views: 62
  • Kelly tear drop build 004.jpg
    Kelly tear drop build 004.jpg
    61.3 KB · Views: 60
  • Kelly tear drop build 005.jpg
    Kelly tear drop build 005.jpg
    60.4 KB · Views: 63
  • Kelly tear drop build 006.jpg
    Kelly tear drop build 006.jpg
    69.1 KB · Views: 64
  • Kelly tear drop build 007.jpg
    Kelly tear drop build 007.jpg
    77 KB · Views: 68

skersfan

Supporting Sponsor
Out of retirement? Have not seen you around much. Great to hear from you.

I took the rear door for powder coating, no such luck, week to ten days to get it back. So having it painted at local body shop. did not want to rattle can it. Should have the trailer finished this weekend. Deliver it next week sometime. Will drive at least to Moab and meet the customer, take my Oztent and do some mountain biking near Navajo Lake, Thunder Mountain, Virgin River Rim trail. May spend a week up there having fun.

Bob
 

skersfan

Supporting Sponsor
Not going as planned, finished the main parts of the galley door, installed the galley light, ran wire for license plate light. Still have sliding doors, drain and trim to finish. So much silicone, and having to tape it all takes a great deal of time. Hopefully will wrap it tomorrow.

I have left the main galley light on most of the evening, will check in the morning to see where the battery is. Anxious to see. It is drawing 1.9 amps. After 4 hours it had went from 12.8 to 12.7.
 

Attachments

  • Kelly Tear Drop build 001.jpg
    Kelly Tear Drop build 001.jpg
    59.1 KB · Views: 59
  • Kelly Tear Drop build 002.jpg
    Kelly Tear Drop build 002.jpg
    72.9 KB · Views: 62
  • Kelly Tear Drop build 006.jpg
    Kelly Tear Drop build 006.jpg
    79.5 KB · Views: 60
  • Kelly Tear Drop build 007.jpg
    Kelly Tear Drop build 007.jpg
    53.7 KB · Views: 58
  • Kelly Tear Drop build 010.jpg
    Kelly Tear Drop build 010.jpg
    48.8 KB · Views: 59
  • Kelly Tear Drop build 011.jpg
    Kelly Tear Drop build 011.jpg
    35.9 KB · Views: 58
  • Kelly Tear Drop build 012.jpg
    Kelly Tear Drop build 012.jpg
    47.4 KB · Views: 60
  • Kelly Tear Drop build 013.jpg
    Kelly Tear Drop build 013.jpg
    60.5 KB · Views: 59

skersfan

Supporting Sponsor
Set in the fridge, ARB slider is bolted to the sub frame. One draw back, is that you have to remove the skid to remove the slider. Doubtful that you ever would though. The fridge is set on 3M anti skid grey rubber, and 4 turn buckles, the turn buckles are attached to connector loops drilled through the handle bracket. I have used this system for two years, never comes loose and so far has not broken. Purple wires are for the 110 and 12 volt power. They are color coded the same as the power wires to them, 12 volt on a 15 amp fuse and 110 on a 15 amp breaker. Fridge is operating at 41 degree, with temperature node in it. Beacons to the thermometer in the trailer wirelessly. It appears to be drawing 4.1 when running, of course when full of food, it will run far less.
 

Attachments

  • Kelly Tear Drop build 001.jpg
    Kelly Tear Drop build 001.jpg
    49.6 KB · Views: 50
  • Kelly Tear Drop build 002.jpg
    Kelly Tear Drop build 002.jpg
    50.6 KB · Views: 51
  • Kelly Tear Drop build 003.jpg
    Kelly Tear Drop build 003.jpg
    67.7 KB · Views: 49
  • Kelly Tear Drop build 004.jpg
    Kelly Tear Drop build 004.jpg
    66.5 KB · Views: 51

skersfan

Supporting Sponsor
Some maybe wondering, why the water lines are ran so hap hazzardly. I try to keep them from rubbing each other at all times. Vibration, friction will wear through them over time. These are bent and guided to be away from each other for when the trailer is taken over very rough trails. I do not know that, that is the best idea, but it made sense to me.

The drain is in and working, I have great water pressure, the monitor is working on holding and freshwater settings. Drain for holding tank is working.

Also working on fitting in porta potty. With the regular sink, it was not a problem, this one it may be. Will know when I do the sliding doors.

Getting closer to my trip to Montana.
 

Attachments

  • Kelly Tear Drop build drain system 001.jpg
    Kelly Tear Drop build drain system 001.jpg
    58.9 KB · Views: 47
  • Kelly Tear Drop build drain system 002.jpg
    Kelly Tear Drop build drain system 002.jpg
    41.6 KB · Views: 49
  • Kelly Tear Drop build drain system 003.jpg
    Kelly Tear Drop build drain system 003.jpg
    47.1 KB · Views: 48
  • Kelly Tear Drop build drain system 004.jpg
    Kelly Tear Drop build drain system 004.jpg
    50.2 KB · Views: 47
  • Kelly Tear Drop build drain system 005.jpg
    Kelly Tear Drop build drain system 005.jpg
    63.1 KB · Views: 51
  • Kelly Tear Drop build drain system 006.jpg
    Kelly Tear Drop build drain system 006.jpg
    55.3 KB · Views: 52

silvrzuki77

explorer
I like the simple fridge tiedown on the handle!!! I have the same brand 40ct might have to steal that!!! Bummed i wont be seeing any updates after its finished!
 

Dirtytires

Explorer
Things are back to normal as much as it can be. Good to hear that the builds are awesome as expected. One day I will order mine.
 

skersfan

Supporting Sponsor
Yea it seems the ones I build them for, never seem to post much on here. No complaints or compliments. I guess that is okay, it is theirs. I become pretty close friends with them, and camp with them. Mine draw a different group than most on here it seems. Older guys, that are getting more into being comfortable. I will keep you in the loops silver.

DT, I think maybe you have missed the opportunity. I think this will be my last one like this. I am looking at Aframes and a four sided idea for folding trailer.

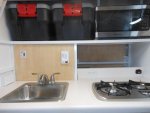
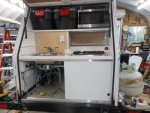
I like to be able to stand up inside, cook inside is easier for the wife. I am not sure. I am supposed to build two more, but one put off until December and the other does not want to move up. So I have 3-4 months of not doing much. I do not take deposits until I am ready to start their build, so who knows they may change their minds and I might change mine.. Just do not like holding on to someone's money like that. I know all the others do, but I don't.

I will be riding my bike, will have more time to train for the Senior Games in October. Adding 400 meter free style to the cycling and mountain biking this year. Had to give up the track sprints with the knee replacements. But can do swimming no problem. I used to swim that in the Marine Corps, so will see how it turns out.

The wife thinks I am crazy for doing this at all. She says, your retired, worked your whole life, go play. Not sure I am capable of that yet. But may consider it. lol

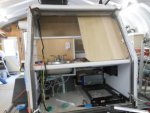
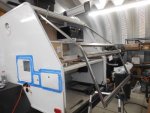
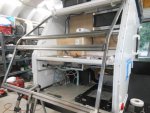
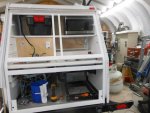
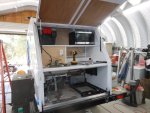
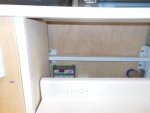
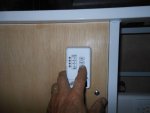
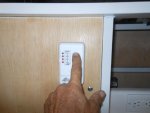
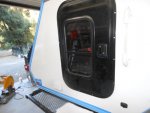
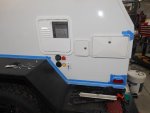
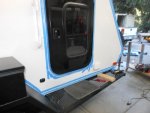
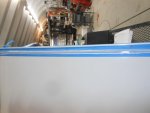
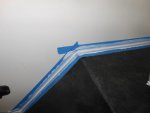
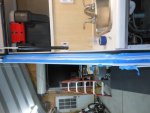
Just finished one sliding door, very tight. A little concerned but I made these different, you have to unscrew the bottom rail to remove them. Will try some graphite and see what happens, may have to take it back off and sand it down some. I had wanted to use 3M emblem tape, but just can not get it to work. Works great on the top, but gets stuck going in and can not get the door straight. Oh well, ideas, got millions of them, wish more worked!!!!!
 

skersfan

Supporting Sponsor
Here is a picture of the back door, the miles of tape and silicone for one of these. I like perfect straight lines so I tape both sides of the silicone bead. Makes it look much cleaner and attracts less dirt when off road. Have had two set backs today, after 7 days of the water pump being on, developed a water leak, under the floor, will have to pull the skid to fix it. Must not have gotten something tight, it does not leak with the pump off, so can only be one hose. Also the propane connect to the tank started leaking. I had used pipe dope on it, but change it out to yellow tape. No leak. Glad it happened here. Trying to finish this puppy up, but the silicone takes hours and hours and hours and hours. I hate it!!!!
 

Attachments

  • Kelly Tear Drop silicone 001.jpg
    Kelly Tear Drop silicone 001.jpg
    69.5 KB · Views: 54
  • Kelly Tear Drop silicone 002.jpg
    Kelly Tear Drop silicone 002.jpg
    46.5 KB · Views: 44
  • Kelly Tear Drop silicone 003.jpg
    Kelly Tear Drop silicone 003.jpg
    30.4 KB · Views: 43
  • Kelly Tear Drop silicone 004.jpg
    Kelly Tear Drop silicone 004.jpg
    54.6 KB · Views: 42
  • Kelly Tear Drop silicone 005.jpg
    Kelly Tear Drop silicone 005.jpg
    45.8 KB · Views: 42
  • Kelly Tear Drop silicone 006.jpg
    Kelly Tear Drop silicone 006.jpg
    54.1 KB · Views: 41
  • Kelly Tear Drop silicone 007.jpg
    Kelly Tear Drop silicone 007.jpg
    46.9 KB · Views: 40
  • Kelly Tear Drop silicone 008.jpg
    Kelly Tear Drop silicone 008.jpg
    48.5 KB · Views: 43
  • Kelly Tear Drop silicone 009.jpg
    Kelly Tear Drop silicone 009.jpg
    38.1 KB · Views: 40
  • Kelly Tear Drop silicone 010.jpg
    Kelly Tear Drop silicone 010.jpg
    65.1 KB · Views: 43

Pikeman

Adventurer
Bob,
While agree that the two leaks may be minor set backs I think it is great that you leave the systems on and test them. I know that most of the fabricators I have come across just trust their work and might do an initial test upon first connection and call it good. Leaving a system on and under pressure for a week to make sure shows the dedication you have to delivering a quality product.
 

Forum statistics

Threads
186,095
Messages
2,881,927
Members
225,874
Latest member
Mitch Bears
Top