2005 Chevy Colorado Build Up

Opie,
Thanks for the reference pictures. I'm guessing my camper won't weigh as much as the compost but with my crew cab truck and the overhang of the camper we'll just have to see what the affect will be.
 
The “empty wallet” mod has been successfully executed.

I’m really happy with the results and that’s all that should matter. In addition to all the work I had planned, my truck also needed new break pads and axel seals.

4.11:1 Yukon Gears

I’ve wanted to do this ever since I put the 265/75 16 tires on.
This is my math.
Stock gears = 3.42
Stock tires = 28.9 inches in diameter
New tires = 31.7 inches in diameter

31.7/28.9 = 1.097
So if my math is correct, with the new tires I was geared 9.7% to high. This lead to a lot of downshifting on small hills and a reduction in fuel economy.

More math.
3.42/4.11 = 28.9/x cross multiply and divide gives me 34.73

So in other words, with the new gears, I could (in theory) put 34.73-inch diameter tires on my truck and have a stock tire size to gear ratio.

31.7/34.73 = .91275554
100% - 91.275554% = 8.7%
So this makes my gearing 8.7% lower then stock. Just on the short drive home I can tell that being geared 8.7% to low is 100% better then being geared 9.7% to high.

Being geared to low also gives me the ability to size up to 33-inch (32.7”) tires in the future and still have a little low end left.

Rhino Lining and rock sliders

I will let the pictures speak for themselves. Color matched on truck and black on sliders.

rocksliders001.jpg

rocksliders002.jpg

The color looks goofy in this picture but the match is good.
rocksliders004.jpg

rocksliders008.jpg


I also had the shop make some spacers for the differential. No more washers.
rocksliders0091.jpg


rocksliders014.jpg
 
Last edited:

02TahoeMD

Explorer
I would have to say that project " Empty Wallet " was a resounding success! Looks good....REAL good. Where did you get your rock sliders from?
 

opie

Explorer
Looks real nice.

I just scored a full set of H3 wheels, all 5, for $300. I was wondering what the BFG in 265 75 looked like on them..now I know. Thats the direction Ill be heading.

Everything else looks good. Real nice. I think Im going to look into dropping my rack much the same way you dropped the front diff. Way to much variance in toe with and without load due to such an angle of the tie rods.
 
02TahoeMD said:
I would have to say that project " Empty Wallet " was a resounding success! Looks good....REAL good. Where did you get your rock sliders from?

Thanks, I got my sliders from a shop called BigRocks Offroad. http://bigrocksoffroad.com/index.html Unfortunately they are going out of business. I think they made a good product.


opie said:
Looks real nice.

I just scored a full set of H3 wheels, all 5, for $300. I was wondering what the BFG in 265 75 looked like on them..now I know. Thats the direction Ill be heading.

I think you will be happy with those rims.
 

02TahoeMD

Explorer
Northern Explorer said:
Thanks, I got my sliders from a shop called BigRocks Offroad. http://bigrocksoffroad.com/index.html Unfortunately they are going out of business.


Typical of my luck. Oh well, I may have my local welding shop make some up for me, I have been there three times already and think they could do the job.

T. Low, you may want to check out Kennesaw Mountain Accessories, they may have something to fit your truck. I have one of their bumpers on my Tahoe, really like it.

Pics in the Cardomain link in my sig....
 
Skid Plate Numeral III

I finally got the last of the three skid plates installed. This is the front differential skid plate. One problematic bolt made this project take about two hours.

Mandy gives her approval
SkidPlate0051.jpg


Showing all three
SkidPlate0101.jpg
 

BCJC

Adventurer
unfortuneatley i believe now it's "made", as he no longer makes these. i've had the full set for a year or so, and and very glad i do. looking good NE, i guess the good thing about a small aftermarket, is it makes the choice easy;) are you still thinking about the skyjacker kit?
 
I think I am now going to pass on the 4" lift. That is one reason I had the shop make me a set of custom differential drop spacers. I didn't want to keep the washer spacers that I made and without getting a 4" lift I would no longer be able to install the differential spacer that comes with the lift. In addition, there were just to many things that I already paid for and took the time to install that are not compatible with the 4" lift. These being; the H3 rims, 2" lift shackles (soon to be add-a-leaf), stock rims (that I now plan on putting a set of 33's on), shocks, and at least one of the skid plates.
 

t0mills

Adventurer
Nice looking truck! You're doing a great job.

I've got a 2002 ZR2, and I can definitely see a few things that GM improved upon when they started making the Colorados.

It looks like they didn't stagger the rear shocks like they did on my truck (your shocks both attach to the rear side of the axle). I'm thinking about relocating mine.

Does your truck have a rear panhard bar?

It's also VERY nice that you were able to make spacers for your differential. CV angles are a big problem for these trucks!

I hope to replace my IFS with a D44 and coil springs one day. I had a friend give me his D44 and suspension setup out of his 2000 1500 Ram. He went to a D60. I know everyone doesn't like the D44's in the Rams because of the Central Axle Disconnect and the unit bearings, but for a light truck and 35's, I don't think it will be an issue. Plus, the axle is already setup for a 4 link, and the mounts are spaced 35" apart, which perfectly lines up with the frame rails on my truck.

Anyway, sorry to get off topic.

Truck looks good!

:sombrero:

-Tim
 
t0mills said:
Nice looking truck! You're doing a great job.

I've got a 2002 ZR2, and I can definitely see a few things that GM improved upon when they started making the Colorados.

It looks like they didn't stagger the rear shocks like they did on my truck (your shocks both attach to the rear side of the axle). I'm thinking about relocating mine.

Does your truck have a rear panhard bar?

It's also VERY nice that you were able to make spacers for your differential. CV angles are a big problem for these trucks!

I hope to replace my IFS with a D44 and coil springs one day. I had a friend give me his D44 and suspension setup out of his 2000 1500 Ram. He went to a D60. I know everyone doesn't like the D44's in the Rams because of the Central Axle Disconnect and the unit bearings, but for a light truck and 35's, I don't think it will be an issue. Plus, the axle is already setup for a 4 link, and the mounts are spaced 35" apart, which perfectly lines up with the frame rails on my truck.

Anyway, sorry to get off topic.

Truck looks good!

:sombrero:

-Tim

Sounds like you have a good plan for your truck. After looking up panhard bar on wikipedia I can say that I don't have one.
 
Last edited:
Anti-Sway Bar Removal

Edit: I ended up putting the anti sway bar back on before my summer of 2010 trip through Labrador. Although it significantly improved off road handling, the combination of adding a camper and knowing that I travel 99% on road (paved and gravel) made replacing it the best choice.

The great weather and the arrival of Overland Journal gave me the motivation to work on my truck. Time to take the anti-sway bar off. I've wanted to do this for a while. BCJC removed his about a month ago with good trail results. I wanted to do the same but in the process take some precise measurements along with some before and after pictures. This is what I did.

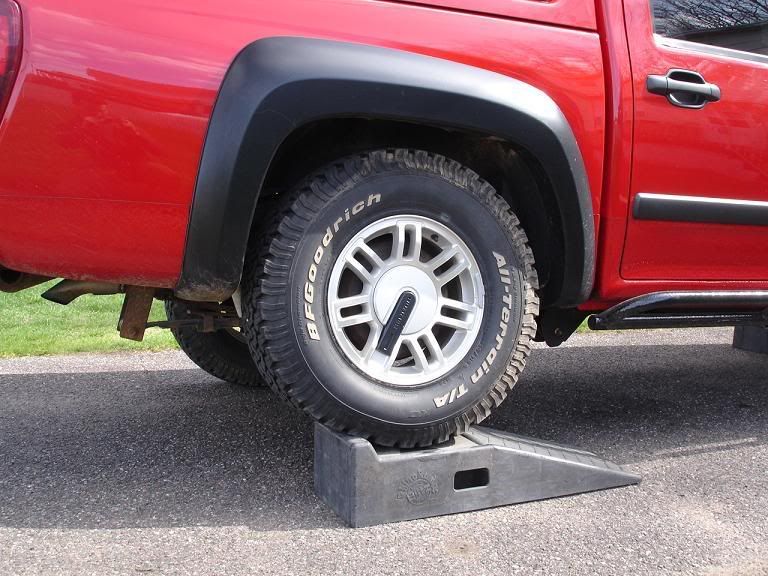
I used a set of ramps that were about 6 inches high. I put one behind my passenger side rear wheel and one behind my driver's side front wheel. I did this so that I could simultaneously look at and measure compression (drivers side) and extension (passenger side) in the front. Basically seeing how level the front of the truck was before and after removal of sway bar. I also wanted to look at something that caught my eye in the back.
uponramp60.jpg


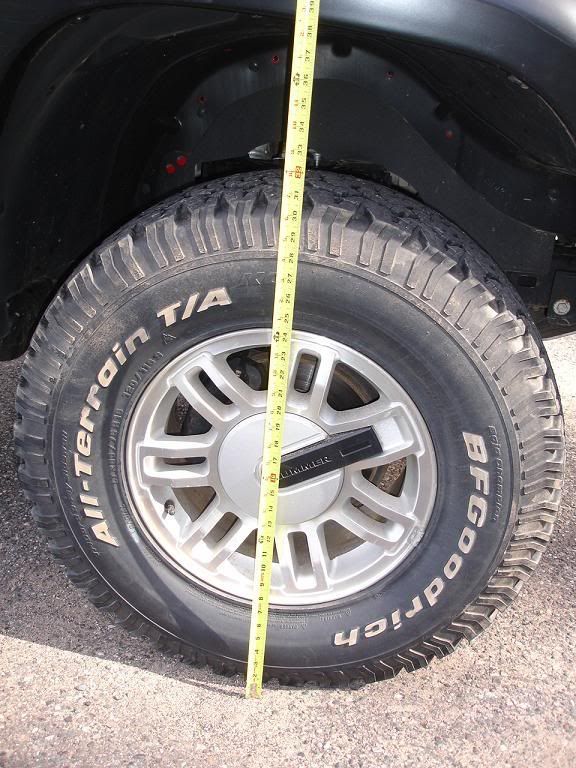
Measurements taken from ground to fender flare at center line of tire.
Measurement60.jpg


Here are the results:
With anti-sway bar
Drivers side (tire up on ramp) 42.25 inches
Passenger side (tire on ground) 38.5 inches
A difference of 3.75 inches

Without anti-sway bar
Driver's side 41.5 inches
Passenger side 39.25 inches
A difference of 2.25 inches

Somebody check my math but I believe this means the trucks front end is sitting 40% more level without the anti-sway bar. (2.25 being 40% less then 3.75)

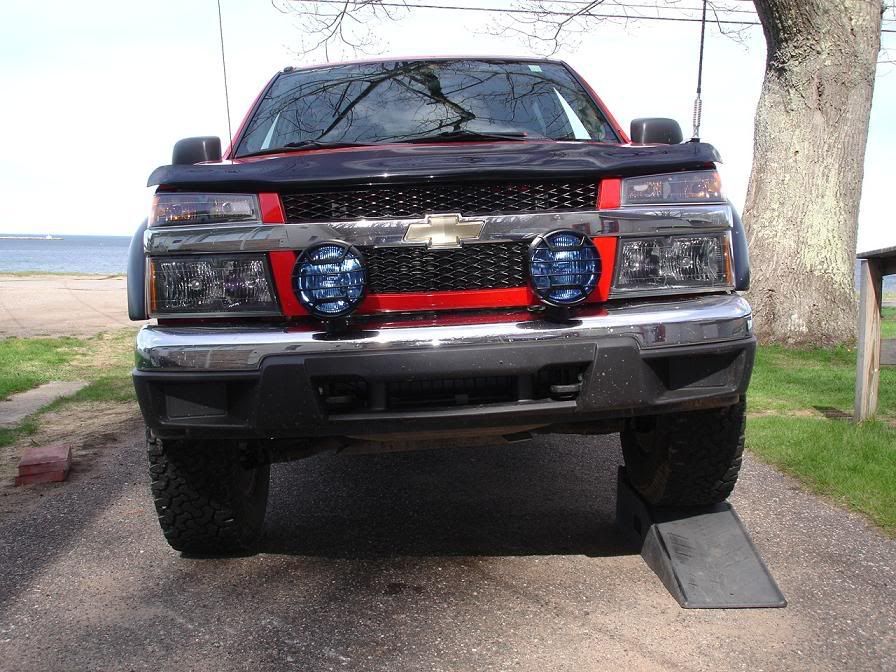
Before anti-sway bar removal
Swaybar009before70.jpg

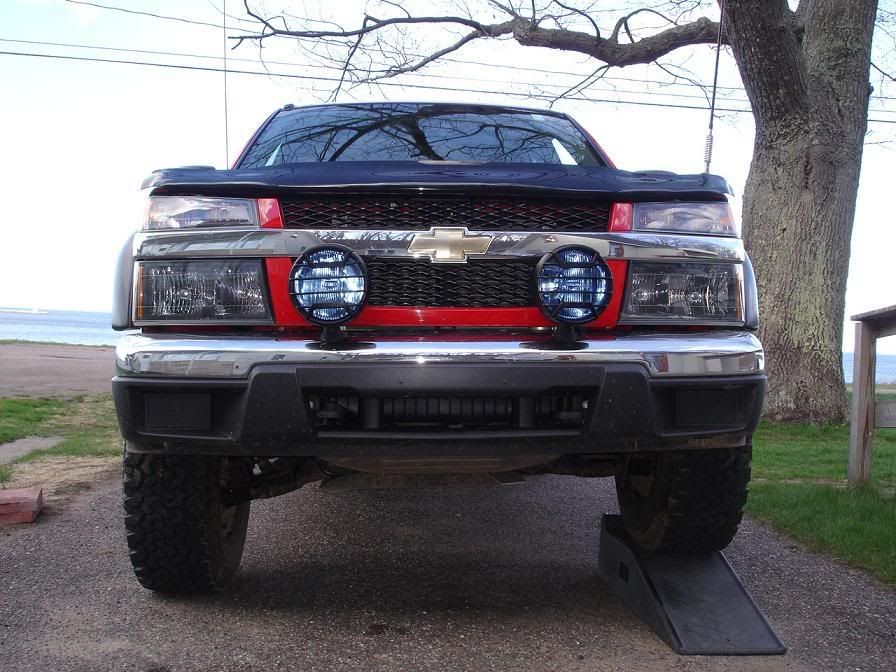
After anti-sway bar removal
Swaybar018after70.jpg

I'll be doing some trail, highway and mall testing in the morning but the "driveway test" makes it look like it was worth the effort.

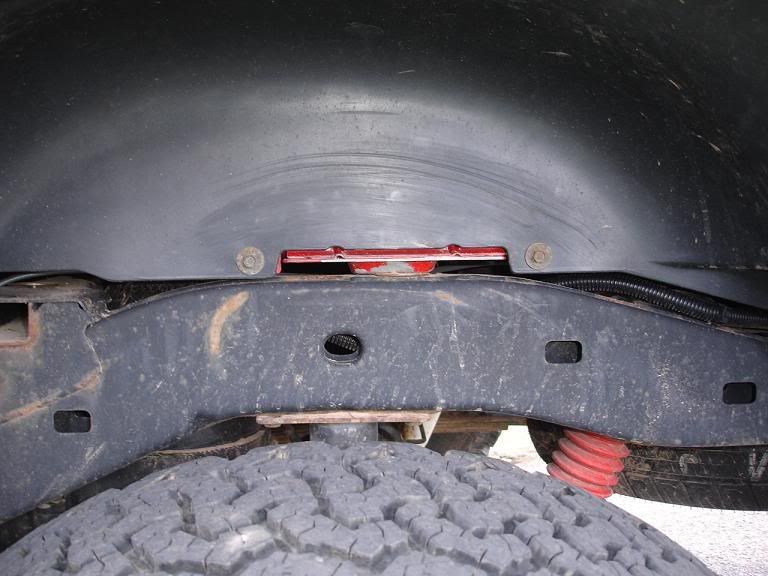
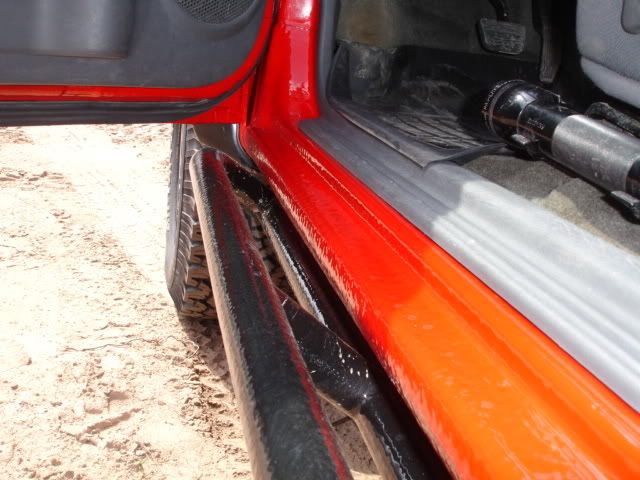
This is what caught my eye in the back.
tirescuff60.jpg

picture taken on drivers side but both sides are the same

Notice the tire scuff on the plastic. I can live with that but the red metal flange sticking out will need to be ground down about .25 to .5 inches. I can tell it has made contact at some point because the paint is rubbed off.

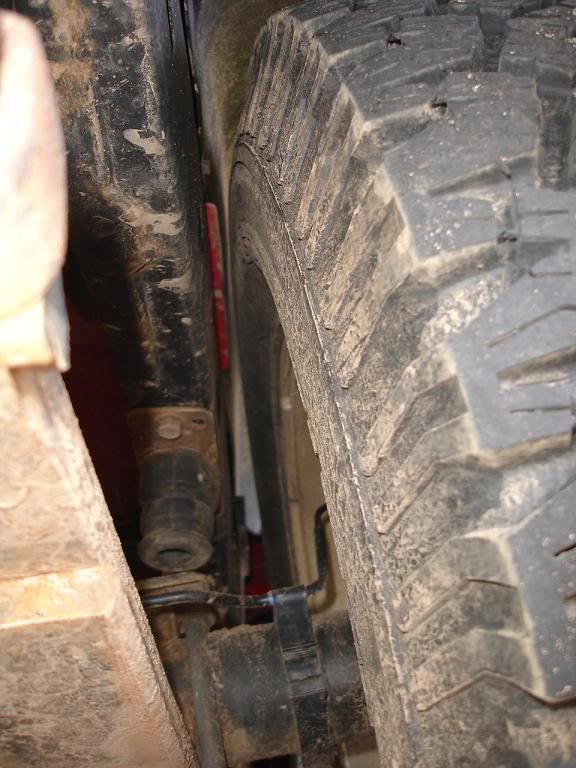
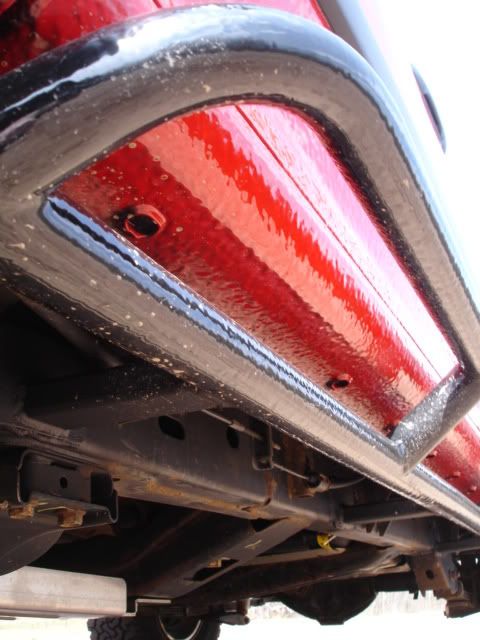
This is what it looks like stuffed from underneath on the passenger side. Notice the leaf spring isn't up to the bump stop yet.
tirestuffgap60.jpg


There is very little room between the tire and the flange. You can just see a sliver of light passing through. I'll save this project for another day.
 
Last edited:

BCJC

Adventurer
right on, i'm sure you'll be pleased. if nothing else, the ride is much smoother on rough backroads. well done with the scientific comparisons too!
 

Forum statistics

Threads
185,888
Messages
2,879,490
Members
225,497
Latest member
WonaWarrior
Top