2017 F-550 Camper Build - Ground Up

PacificNorthWestJeeper

Blissfully Lost
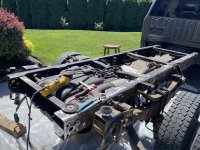
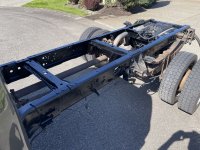
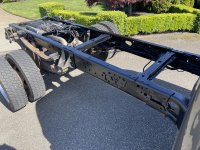
So I have been battling with trying to figure out the cheapest/easiest way to get this flatbed off and sell it so I can start the build...
$60.00 for a pair of 'working' rusty camper jacks and I fab'd up some brackets with scrap steel I had laying around... Boom, off and ready for a new owner to back underneath it. Camper jacks NOT included...
Once it's gone I can clean up the frame and start on the suspension...,
,
IMG_3025.jpg
 

PacificNorthWestJeeper

Blissfully Lost
The REAR brake light wiring is pictured below.
I think I have each wire figured out but if someone has a wiring diagram of the rear of the cab chassis 2017 F550 for verification that would be cool.
Best I could figure out on the internet is:
Orange: Its a constant hot line for a camper battery charging?
Blue: Electronic Trailer Brake Controller?
Yellow: Left Turn Signal?
Brown: Running/Marker Lights?
Blue Grey: No Idea, probably something to do with the trailer brake controller?
Green: Right Turn Signal?
White: Ground?

F550 Brake Wiring.png

.
 

PacificNorthWestJeeper

Blissfully Lost
The parts build up continues.. Powerstop cross drilled and slotted rotors and their X-treme brake pads front and back arrived today.
When I dig into the brakes, I think since I am there, I will change the axle seals and front axle Ujoints since I will be more than half way there any way. Just precautionary since again I have no idea what it has been through the previous 100k before I bought it.
So what is left to get for the truck before it is torn down and rebuilt?
- Glow Plugs, with just over 100k and being the new owner I think it is good insurance to do.
- Carli Radius Arms
- Carli Swaybarlinks & Drop Brackets (front only) - the rear is in my Kelderman kit.
- Stryker track arm bar.
- 20 gallon gray tank
- 60 gallon diesel tank. Not sure if I am going to have a custom one made or go with the Titan tank. I think if I have one made I will be able to utilize the space between the frame rails much better... We will see....
- Lastly, after the suspension install, I will need to measure for 2.0 remote reservoir adjustable King shocks so they can be made.
Next step after this is the 4 point subframe. I am debating if I am going to extend the frame 3-4 feet first before the 4 point subframe build starts. Still batting that around in my head. I would like more floor space in the camper build so still thinking..
.
IMG_3409.jpg
 

PacificNorthWestJeeper

Blissfully Lost
The slow down on this build is now selling the flatbed...
I have literally ran out of room and can't make any moves until the flatbed is gone.
Once gone I am full steam ahead with parts ready to install.... Hopefully soon...
 

PacificNorthWestJeeper

Blissfully Lost
Good question, totally forgot to throw the latest purchases in.
I am building it.
I bought 3 inch round steel bar (6 foot) that I will cut to length & lathe. I bought the below bronze oil impregnated bushing that has a silly high compression rating, they'll never wear/crush.
I will press the bushings (4) into ½ wall tube which will act as the base for welding on the supporting bracketry of the 4 point. I have left over ½ plate from an old project I will use to make the bracketry.
The rest of the 4 point build is pretty straight forward, Ill lay it all out when I get there.
 

Attachments

  • Subframe 2.Jpg
    Subframe 2.Jpg
    1.5 MB · Views: 10
  • Subframe1.jpg
    Subframe1.jpg
    1 MB · Views: 10
  • Subframe3.jpg
    Subframe3.jpg
    1.8 MB · Views: 10
Last edited:

PacificNorthWestJeeper

Blissfully Lost
Big morning, SOLD IT!
Got to admit, that flatbed sitting on 4 camper jacks was rrreeall sketchy, moving back and forth and side to side. I was waiting for a jacks to fold but they held and did the job...
Loaded onto of the buyers own flatbed and off he went, BAM, done...
Not much rust on the frame and it appears to be surface rust.
I need to figure out which wires go to the flatbed and label those for the future.
Next step is to sand off the rust and give it a nice new coat of black paint...
After that it is time to start the suspension and brake overhaul....
More to come, just excited to finally be able to start making some headway...
.FLatbedsold8.jpgFlatbedsold2.jpgFlatbedsold3.jpgFlatbedsold5.jpg
 
Last edited:

PacificNorthWestJeeper

Blissfully Lost
Sanded the rust off today, the nooks and crannies ended up encapsulated with some Eastwood paint. Then a coat of Rustoleum on top of that...
Im not painting the springs or hanger bracketry since it will soon be coming off...
Rolled a tire out today to get an idea of what's to come....
.
.
Frame Paint1.jpgFrame Paint4.jpg
 

Attachments

  • Frame Paint2.jpg
    Frame Paint2.jpg
    1,014.2 KB · Views: 5
  • Frame Paint3.jpg
    Frame Paint3.jpg
    1.2 MB · Views: 4
  • Frame Paint5.jpg
    Frame Paint5.jpg
    1.3 MB · Views: 4
  • Like
Reactions: mog

Forum statistics

Threads
186,101
Messages
2,881,977
Members
225,874
Latest member
Mitch Bears
Top