You are using an out of date browser. It may not display this or other websites correctly.
You should upgrade or use an alternative browser.
You should upgrade or use an alternative browser.
Alaskan Camper '84/'14 Build Thread
- Thread starter ripperj
- Start date
") Looking at maybe a new Alaskan. Hope I never have any of this to contend with
Looking at maybe a new Alaskan. Hope I never have any of this to contend withThanks for the positive vibes
Happyjax- the Alaskan is a beautiful camper and like any camper especially a wood framed one-you must keep up on the maintenance, like the seal around the roof vents. because the Alaskan roof moves up and down there is a rubber wiper that seals the upper and lower section. This rubber gets old and stiff and must be replaced (not that often, think years) it's a simple job that only needs scissors and a screwdriver, but failure to do it results in water getting to the inside of the upper section, causing rot.
The wiper rubber is referred to as the Pireli (rubber brand) seal
Sent from my Passport using Tapatalk 2
Nixalaskan
New member
Thanks for the great progress log. I have been working on my 77 8 ft cabover for over a year now and have taken several trips in it, Alaska and Glacier. We find our bed area to small also ( 3/4 bed size) and I have considered extending it. But after looking at your modification, I am not sure I can take it on. Looks like a huge job, if you are going to keep the roof one piece. Sure would be nice to have an extra foot of bed area though. I am currently trying to get the hydraulics worked out after replacing the manual pump with an electric pump. Look forward to hearing more about your progress. Very nice work.
Cruiser79
Observer
Great build! It looks more like a complete new build than like a rebuild! Impressive to see how precise you are working and that you stay patient...
What is the estimated total weight when your project is completed? Is a wood framed camper much heavier than a alu framed camper?
In the US everyone uses single alu sheets, why isnt anyone using prefab insulated sheets? In europe a lot of Campers are built that way. I like the look of the alu sheets more, but it seems more difficult to me. And over here its hard to find the alu sheets that are used on US campers unfortunately...
Do you have some detail pictures of the corners of the side and front panel from the cabover? I read that there are pirelli sela's, but I've never seen it. And in what way can you secure/lock the panels?
Many aluminum framed campers have wood inside the aluminum tubing for screws to bite into, so while the frame won't rot, not sure what would happen if the wood inside got soggy.
A well built wood camper can be light, has better thermal properties, and for most people is easier to work with.
However, it's easy to over build and end up with a real heavy camper, and a small leak that goes unnoticed can lead to disaster down the road.
I am currently using wood because it's what I had and am familiar with, but I would prefer something totally rot proof, like fiberglass like XP or bigfoot
Sent from my Passport using Tapatalk 2
givemethewillys
Jonathan Chouinard
This is a great thread! You're doing an amazing job, and I really appreciate the photo documentation that you are doing. I love the look of alaskans, but I've always wanted to build my own camper from scratch. Your documentation confirms my belief that it's definitely a doable project for a hobby woodworker with a good imagination. Keep up the great work!!!
One question I had, however, was regarding the cantilever cabover's engineering. How did you reinforce the structure from the original to make a N/S arrangement? It looks like Alaskan used steel braces on your camper to support the load?
One question I had, however, was regarding the cantilever cabover's engineering. How did you reinforce the structure from the original to make a N/S arrangement? It looks like Alaskan used steel braces on your camper to support the load?
Thanks for the kind words. Regarding the extended nose. I'm slightly concerned the whole thing will fall off the first time I use it (sorta kidding)
The original bracket had 3x3" vertical corner angles with 2x2" horizontal and a large triangle brace in the corner between the 3" and 2". I rebuilt the brace to add a two foot longer horizontal piece, and I made new inside corner brackets. The outside brace is thru bolted thru the front and sides and then thru the inside corner brackets. I'll post pics, but the inside corner brackets have flat stock welded to them that helps spread the load along the sides. There is a ton(probably literally) of stress on the front wall of the camper, that's why I ended up making a new lower section there was a bit of rot in the corners, right where all the stress is.
I may end up making some removable struts that go between the front cabover corners to the truck when the camper is in use ,just to help stabilize things.
Sent from my Passport using Tapatalk 2
Scoutman
Explorer
Wow, just read through all this and what a rebuild this has turned out to be. Great job on getting it back together. I understand wanting to roll it outside and light a match to it sometimes.
About caulking after doing the butyl tape trim. I caulked all my trim after I did the roof portion of my rebuild and I don't think I'll do that again. It looked great when I first did it and the thought was to seal up the butly tape and keep it from attracting all the dirt it seems to. The heating/cooling/expansion/contraction of the materials meant that the butyl blew out the caulk in places. I think there's a reason that the OEM's just leave the raw butyl edge showing under the trim. As it oozes out you can always trim it off if it bothers you. Just something to think about.
About caulking after doing the butyl tape trim. I caulked all my trim after I did the roof portion of my rebuild and I don't think I'll do that again. It looked great when I first did it and the thought was to seal up the butly tape and keep it from attracting all the dirt it seems to. The heating/cooling/expansion/contraction of the materials meant that the butyl blew out the caulk in places. I think there's a reason that the OEM's just leave the raw butyl edge showing under the trim. As it oozes out you can always trim it off if it bothers you. Just something to think about.
Scoutman
Explorer
That's real good info about the caulk, it is certainly simpler not doing it. Thanks
Sent from my Passport using Tapatalk 2
Indeed. I won't be caulking it on my overhang repairs I'm currently finishing up.
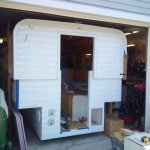
Finally got some work done on the camper. My son and I got the cabover section(the part you sleep on, not the flip up walls) sheet metal on. I was pretty happy to get the front piece on in one piece (wraps around the front on three sides)
It wasn't easy with the siding brake, because you have to work with the 4' end (7'w x 4' long front to back) hanging out of the brake and work under it(the brake only has a 13" throat)
I'll get pics up asap.
Edited
Sent from my Passport
It wasn't easy with the siding brake, because you have to work with the 4' end (7'w x 4' long front to back) hanging out of the brake and work under it(the brake only has a 13" throat)
I'll get pics up asap.
Edited
Sent from my Passport
Last edited:
xxfullsailxx
Observer
hey there-
i was wondering a few things about the aluminum skin and mounting of it... so you ordered the roof as one piece or were there S-locked seams between two or three panels? does alaska campers (or did you) fasten the skin to the frame in any way or is it just "floating" and then secured at the edges? do i see that you tacked it down around the edges with staples or something? do you think a different pattern of skin would be easier to work with as far as the compound bends go? like maybe the 2X6 diamond pattern?
i am building a wood framed top similar to yours and will be ordering aluminum skin in the next couple months hopefully... just looking for some more intel.
i realize it's a little late, but these folks have some RV building materials:
http://www.interstatervmetalandsupply.com/catalog.html
and for anyone else dealing with old wood framed campers, this stuff is handy:
http://www.rotdoctor.com/products/cpes.html
thanks for documenting your build! i know how much work it is, i've been plugging away at mine for a couple years now.
-Darin