Another-nother OVRLND camper build

bgraboyes

Member
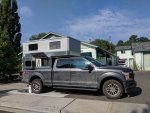
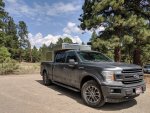
Truck: 2019 F150 SCREW 6.5' Bed 3.5L ecoboost, XLT, FX4 - stock (other than K&N engine filter - ha)

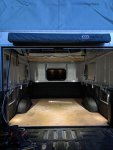
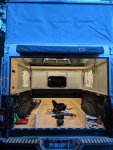
Camper: Camp OVRLND popup

I should have taken more pics along the way but will try to document at least some of what has been done and can probably answer most questions and take more pics if anyone needs help with their own builds. I go a lot of inspiration from @crolison and his 2 ovrlnd builds and wanted to try and pass on some more inspiration/information.
 

Attachments

  • IMG_20200824_091226 copy.jpg
    IMG_20200824_091226 copy.jpg
    1.5 MB · Views: 393
  • IMG_20200824_110204 copy.jpg
    IMG_20200824_110204 copy.jpg
    2 MB · Views: 370

bgraboyes

Member
So the first issue that i had to tackle was dust intrusion. F-150 tailgate is the hardest damn thing to seal in the world. I tried the rockblok, miles of bulb seal and every other option i could think of to keep the tailgate but to no avail. i also decided that it would probably be easier to open and close full barn doors from the inside rather than a tailgate. Eventually got Jay at ovrlnd to construct some barn door extensions, got em installed and then built out a metal frame using 1/2"x1" aluminum tube that i riveted to some 1" aluminum angle. I attached it to the truck with some 1" VHB tape then caulked the heck out of it and put on some more bulb seal. The result has been near complete fix of the dust issue. All of the truck caps type campers I assume will have the same issue on an f150, don't really think it was an OVRLND problem at all, just a very porous f150 bed and tailgate! I can get more pics of this if anyone wants. also please excuse the ugly caulk job, not my forte but it works.
 

Attachments

  • IMG_20201221_161418 copy.jpg
    IMG_20201221_161418 copy.jpg
    1.7 MB · Views: 337
  • IMG_20201229_180458 copy.jpg
    IMG_20201229_180458 copy.jpg
    1.2 MB · Views: 329

bgraboyes

Member
The solar was originally wired to passenger rear side. My build plan was to put the battery in the bed on the driver side so i re-wired the solar to that location, wires actually fit really nicely between the composite floor of the cabover and the aluminum frame
 

Attachments

  • IMG_20201121_180904 copy.jpg
    IMG_20201121_180904 copy.jpg
    684.7 KB · Views: 188
  • IMG_20201121_180912 copy.jpg
    IMG_20201121_180912 copy.jpg
    889.9 KB · Views: 188
  • IMG_20201121_182243 copy.jpg
    IMG_20201121_182243 copy.jpg
    896 KB · Views: 190
  • IMG_20201130_163607 copy.jpg
    IMG_20201130_163607 copy.jpg
    1.5 MB · Views: 193

bgraboyes

Member
Due to the tailgate delete I was going to lose the backup camera. Instead of spending $100 or more on a camera, i just took the tailgate apart, separated the camera wire from the lock mechanism and then re-routed the camera and attached to the center of the license plate w/some velcro and one wire clamp as seen. works pretty well but i need to come up with some way to shield the camera from the license plate lights at night as the glare messes up the image.
 

Attachments

  • IMG_20201123_135500 copy.jpg
    IMG_20201123_135500 copy.jpg
    1.6 MB · Views: 98

bgraboyes

Member
i installed a baseplate of 1/2" plywood. forgot to take pics but i put down 1/2" rigid foam insulation to fill the valleys between the truck bed ridges, glued it to the bottom of the plywood to keep it in place. mostly did this to have a place to screw a few things down to and get a little insulation. I had already measured out where to put my drawer so i put 8 pre-placed tnuts on each side where i would later attach angle brackets to hold the sides in place. Second pic shows drawer frame in place. I made my drawers with the much written about skateboard bearings and 1" square tube. Many people have better write-ups on this but it's a great way to save $2-300 on drawer slides
 

Attachments

  • IMG_20201122_173122 copy.jpg
    IMG_20201122_173122 copy.jpg
    910.7 KB · Views: 434
  • IMG_20201216_170854 copy.jpg
    IMG_20201216_170854 copy.jpg
    1.1 MB · Views: 450

Crowboy

New member
I'm really enjoying watching your build come together. One of the great things about OVRLND and similar campers is that it allows you to customize to your needs. I've got one on order, but now the wait is on.
 

bgraboyes

Member
I'm really enjoying watching your build come together. One of the great things about OVRLND and similar campers is that it allows you to customize to your needs. I've got one on order, but now the wait is on.

it's definitely worth the wait. fun project for sure and lot's of learning along the way.
 
i installed a baseplate of 1/2" plywood. forgot to take pics but i put down 1/2" rigid foam insulation to fill the valleys between the truck bed ridges, glued it to the bottom of the plywood to keep it in place. mostly did this to have a place to screw a few things down to and get a little insulation. I had already measured out where to put my drawer so i put 8 pre-placed tnuts on each side where i would later attach angle brackets to hold the sides in place. Second pic shows drawer frame in place. I made my drawers with the much written about skateboard bearings and 1" square tube. Many people have better write-ups on this but it's a great way to save $2-300 on drawer slides
How tall are the drawers you installed? I will be picking up my OVRLD form Jay later this month, and building a set of drawers would be great for additional storage, but I figured if I did that I would no longer be able to stand up straight in the truck bed.
 

bgraboyes

Member
top of the deck is 10" from the bed. usable drawer space is 8" tall. I still have right about 6'2" of standing room but i think that's dependent on your truck (bed height) and camper bedding height. I got the extra 2" of bedding height in the cabover on my ovrlnd build which gives you an extra 2" of standing room as well. hope that all makes sense. the deck above my drawers rests on the wheel wells to make the build easier.
 
Thanks or the info. I will just have to see how much headroom I have once I get it on the truck late this month. I also got the additional space for bedding, so maybe I will be able to get a set of drawers in there as well.
 

SDDiver5

Expedition Leader
Nice work! I love OVLRND campers. If I ever went that route, I'd def get one from them with full barn doors.
 

bgraboyes

Member
it's been a while and a lot has been done. I am not the best at taking pics at every stage so if anyone has questions, feel free to ask.

solar panel has been up for a while. was a pretty easy instal with some angle brackets w/predrilled 3/8" holes that fit the L-track bolts perfectly. just had to drill into the frame of the solar panel to attache to the brackets.
 

Attachments

  • IMG_20201130_120008.jpg
    IMG_20201130_120008.jpg
    2.9 MB · Views: 124
  • IMG_20201130_120012.jpg
    IMG_20201130_120012.jpg
    4.9 MB · Views: 117

bgraboyes

Member
Installed the propex heater in the passenger front side of the bed. most nerve wracking part of the whole build was drilling the large holes for combustion intake and exhaust. Make sure to check under the truck to ensure you aren't going to hit anything important. i routed the exhaust out to the side so you don't get any rising combustion exhaust into the camper and the intake i routed up between the wheel well and bed. copper line runs from inside all the way back to a quick disconnect
 

Attachments

  • IMG_20201221_092937.jpg
    IMG_20201221_092937.jpg
    2.9 MB · Views: 125
  • IMG_20201221_100951.jpg
    IMG_20201221_100951.jpg
    2.8 MB · Views: 123
  • IMG_20201221_103021.jpg
    IMG_20201221_103021.jpg
    3 MB · Views: 122
  • IMG_20201221_103033.jpg
    IMG_20201221_103033.jpg
    3.3 MB · Views: 117
  • IMG_20201221_103036.jpg
    IMG_20201221_103036.jpg
    3.3 MB · Views: 116

Forum statistics

Threads
185,888
Messages
2,879,475
Members
225,497
Latest member
WonaWarrior

Members online

Top