Another-nother OVRLND camper build

bgraboyes

Member
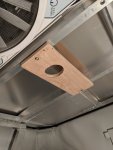
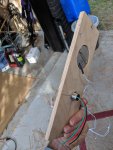
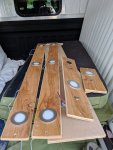
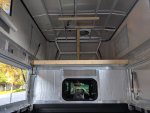
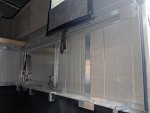
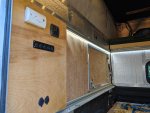
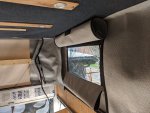
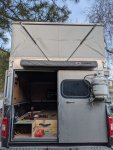
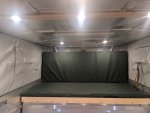
(little out of order) installed some led puck lights using 1/2" birch to make 4" strips that then were attached to rivenuts in the roof frame. The back 6 are over the truck bed on two separate strips that all are controlled by a switch on the electric panel in the driver's rear wall. Over the cabover sleeping platform, there is one light each side with a dimmer touch switch (all off amazon, can find links if anyone wants). also not pictures is two usb ports for charging phones at night.

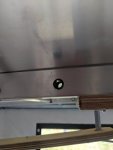
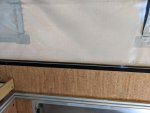
Last picture shows the plastic grommets that I used for running wire through the roof frame.
 

Attachments

  • IMG_20201013_184135 copy.jpg
    IMG_20201013_184135 copy.jpg
    1 MB · Views: 141
  • IMG_20201014_105033 copy.jpg
    IMG_20201014_105033 copy.jpg
    1.3 MB · Views: 128
  • IMG_20201014_105037 copy.jpg
    IMG_20201014_105037 copy.jpg
    998.3 KB · Views: 128
  • IMG_20201014_125632 copy.jpg
    IMG_20201014_125632 copy.jpg
    1.3 MB · Views: 144
  • IMG_20201119_131447 copy.jpg
    IMG_20201119_131447 copy.jpg
    866.9 KB · Views: 147

bgraboyes

Member
insulated the walls and roof with 1" rigid foamboard insulation from lowes. then covered with a cork fabric that i found at joanne fabrics. pretty cool since it's super light keeping build weight down as much as possible and can easily be lifted up to access the walls if i want to add anything behind in the future.

For the door, i couldn't attach it to the edges of the door as it would interfere with the bulb seal so i just glued it to the foam board which was cut to size so it just holds in the frame due to pressure.

above the 8020 track that holds the bed platform, at the top, i put 1" velcro loop to attach a thermal pack (more on that in future posts).

No dedicated pictures but the ceiling was covered with outdoor carpet. would not recommend this honestly as it was super hard to work with and it definitely did not turn out as good as i was hoping. may end up re-doing this in the future if it continues to annoy me as much as it does now.

I'm sure someone will point out that there is a lot of thermal bridging in my insulation. i am ok with that and don't do a ton of super cold weather camping that i'm overly concerned. could be remedied with another layer of some sort of insulation btw the cork fabric and frame, but i'm willing do give my current setup a try and change in the future if this is a huge problem.
 

Attachments

  • IMG_20201001_182706 copy.jpg
    IMG_20201001_182706 copy.jpg
    1.6 MB · Views: 321
  • IMG_20201001_182712 copy.jpg
    IMG_20201001_182712 copy.jpg
    1.3 MB · Views: 309
  • IMG_20210415_150937.jpg
    IMG_20210415_150937.jpg
    1.9 MB · Views: 307
  • IMG_20210415_150940.jpg
    IMG_20210415_150940.jpg
    2.2 MB · Views: 311
  • IMG_20210415_165452.jpg
    IMG_20210415_165452.jpg
    2.7 MB · Views: 316
  • IMG_20210418_202604.jpg
    IMG_20210418_202604.jpg
    2.5 MB · Views: 324
  • IMG_20210323_093226.jpg
    IMG_20210323_093226.jpg
    2.1 MB · Views: 321

bgraboyes

Member
the strap to pull the door closed often gets in the way of latching the door so i took it off and sewed some velcro loop on and then put hook on the door so it stays out of the way. can also be seen in the picture of the door above
 

Attachments

  • IMG_20210418_202611.jpg
    IMG_20210418_202611.jpg
    2.3 MB · Views: 115

bgraboyes

Member
most annoying/time consuming project to date was the thermal pack. my partner was annoyed by the cold drafty air on her head while sleeping so i got to work following the techniques detailed here: https://www.wanderthewest.com/forum/topic/5269-building-an-arctic-cold-weather-pack/

used velcro hook top and bottom to stick to the carpeted headliner up top and the loop that was shown above at the bottom.

not pictured is a piece that covers the front and rear which was the easiest of all and still folds up nicely.

i am not skilled at sewing so there was a lot of trial and error. in total this part must have taken 10-15 hours of work! pretty happy with the final product but need more field testing to see how well it works and what i would change. i can already tell it helps insulate from the sunny and increasingly hot weather in idaho as well. i think it will also help with sound dampening.

i plan to leave this in place at all times as it should help in hot and cold weather. the top still closes just fine but i had to loosen the latches by 1 turn each front and rear.

you can also see a little bit of the (less than perfect) headliner in these pics
 

Attachments

  • IMG_20210415_165452.jpg
    IMG_20210415_165452.jpg
    2.7 MB · Views: 163
  • IMG_20210415_165543.jpg
    IMG_20210415_165543.jpg
    2.7 MB · Views: 161
  • IMG_20210415_171939.jpg
    IMG_20210415_171939.jpg
    2.4 MB · Views: 156

bgraboyes

Member
with just the solar panel, the roof became hard as hell to open. talked to jay about this issue and swung by on our way down to sedona for a bike trip to pick up some lift struts. they were pretty easy to install with the parts jay gave me. attached the ball strut brackets where i knew there was frame with the largest hex head machine screw i could fit. seems to be holding well. these are 35lb struts and as it stands now, i have to pull down a little to get it to close. this is perfect since i can now probably have a kayak or 2 up top and won't be crushed trying to open or close the roof.
 

Attachments

  • IMG_20210412_192408.jpg
    IMG_20210412_192408.jpg
    2.8 MB · Views: 159
  • IMG_20210412_201913.jpg
    IMG_20210412_201913.jpg
    3.1 MB · Views: 146

bgraboyes

Member
out of order as well... got 3" HD36 foam from https://foamandupholstery.com/ and some green cordura fabric from another online shop. Found a local guy who could sew up the covers and they turned out great. one of the cushions has a seam so i can fold out of the way under the lift handle so you can sit on just one pad when the sleeping platform is slid forward. this maximizes headroom so you can pretty much sit up straight. Jay warned against too much weight leaning up against the lift panels in the very front but it's been good so far with just leaning up against it (but now you have been warned).
 

Attachments

  • IMG_20201215_201836.jpg
    IMG_20201215_201836.jpg
    2.6 MB · Views: 202
  • IMG_20201215_201905.jpg
    IMG_20201215_201905.jpg
    2.8 MB · Views: 198

ITTOG

Well-known member
It is coming along well. Looks good.

Would you mind taking some pictures of the frames at each end used to hold the roof up? I am most interested in knowing what kind of hinges they used and how the wood is positioned to lock the frame in position.
 

bgraboyes

Member
Would you mind taking some pictures of the frames at each end used to hold the roof up? I am most interested in knowing what kind of hinges they used and how the wood is positioned to lock the frame in position.

I'm out of town for work now but ill try to remember to do so when i get home. it's a piano hinge between the two trapezoids and top and bottom. The back locks with a butterfly latch and the front locks in place with that wooden push stick you see in the pics above that has a hole that mates up with a hitch-pin when pushed forward.
 

Shapeshifter

Restless Adventurer
I actually read all your posts this time instead of just looking at the pictures ?

The cork pattern fabric is a great idea and looks good too. How did you attach it to the side walls? I was thinking of using the same carpet you have on the roof for all my walls and roof. Would it be easier to wrap each roof insulation panel in carpet first, then tuck it between the frames (thermal bridging be damned)?

About thermal bridging, I used Good Stuff spray-in expanding foam to insulate the sheet metal voids in a cargo van once......
 

bgraboyes

Member
I actually read all your posts this time instead of just looking at the pictures ?

The cork pattern fabric is a great idea and looks good too. How did you attach it to the side walls? I was thinking of using the same carpet you have on the roof for all my walls and roof. Would it be easier to wrap each roof insulation panel in carpet first, then tuck it between the frames (thermal bridging be damned)?

About thermal bridging, I used Good Stuff spray-in expanding foam to insulate the sheet metal voids in a cargo van once......

Well done using reading skillz :p! haha i do the same all the time for sure!

I attached the cork by either sliding it under the 8020 track and tightening it back down combined with something like these...

And it would definitely be easier to do the carpet that way, but i bet you would get some dripping off the frame on an excessively condensation inducing night. i would maybe look into how the another guy, who goes by @curmitm on instagram did his roof with felt. felt sounded like it was easier to work and looked better with since it was at least a little stretchy.
 

ITTOG

Well-known member
I'm out of town for work now but ill try to remember to do so when i get home. it's a piano hinge between the two trapezoids and top and bottom. The back locks with a butterfly latch and the front locks in place with that wooden push stick you see in the pics above that has a hole that mates up with a hitch-pin when pushed forward.
Any chance you are back in town yet? I would greatly appreciate the pics if possible.
 

Fjelljeger49

New member
insulated the walls and roof with 1" rigid foamboard insulation from lowes. then covered with a cork fabric that i found at joanne fabrics. pretty cool since it's super light keeping build weight down as much as possible and can easily be lifted up to access the walls if i want to add anything behind in the future.

For the door, i couldn't attach it to the edges of the door as it would interfere with the bulb seal so i just glued it to the foam board which was cut to size so it just holds in the frame due to pressure.

above the 8020 track that holds the bed platform, at the top, i put 1" velcro loop to attach a thermal pack (more on that in future posts).

No dedicated pictures but the ceiling was covered with outdoor carpet. would not recommend this honestly as it was super hard to work with and it definitely did not turn out as good as i was hoping. may end up re-doing this in the future if it continues to annoy me as much as it does now.

I'm sure someone will point out that there is a lot of thermal bridging in my insulation. i am ok with that and don't do a ton of super cold weather camping that i'm overly concerned. could be remedied with another layer of some sort of insulation btw the cork fabric and frame, but i'm willing do give my current setup a try and change in the future if this is a huge problem.
Why the cork board? Just aesthetic appeal? Is it thick enough you could use pushpins on it for notes, pictures, etc?
 

bgraboyes

Member
Why the cork board? Just aesthetic appeal? Is it thick enough you could use pushpins on it for notes, pictures, etc?
It was definitely for aesthetics. It was also easy to work with on the doors since the frame where it closes would interfere with any other covering. Not positive i would do it again though. Hasn’t bee in the toughest material and not holding up super well overall. Might replace a lot of it in a redo I’m planning now.
 

dstefan

Well-known member
most annoying/time consuming project to date was the thermal pack. my partner was annoyed by the cold drafty air on her head while sleeping so i got to work following the techniques detailed here: https://www.wanderthewest.com/forum/topic/5269-building-an-arctic-cold-weather-pack/

used velcro hook top and bottom to stick to the carpeted headliner up top and the loop that was shown above at the bottom.

not pictured is a piece that covers the front and rear which was the easiest of all and still folds up nicely.

i am not skilled at sewing so there was a lot of trial and error. in total this part must have taken 10-15 hours of work! pretty happy with the final product but need more field testing to see how well it works and what i would change. i can already tell it helps insulate from the sunny and increasingly hot weather in idaho as well. i think it will also help with sound dampening.

i plan to leave this in place at all times as it should help in hot and cold weather. the top still closes just fine but i had to loosen the latches by 1 turn each front and rear.

you can also see a little bit of the (less than perfect) headliner in these pics
So, how did the plan to leave it up work?

I know Jay says not to, but I keep wondering. I have Jay’s version, and have wondered if I added Velcro on the bottom whether it would work.

Does the top of the thermal material mate to the loop that Jay has installed that rests on the top rail bulb seal when the lid is down, or did you attach to your headliner and not to Jay’s velcro loop?

How do the front rear pieces deal with the lift mechanism? do they fit inside it when closed?

Thanks!
 

Forum statistics

Threads
185,888
Messages
2,879,480
Members
225,497
Latest member
WonaWarrior
Top