CDN M101 Trailer Project #TheOutSideInn

Everything has now arrived! Hopefully I can get to some of it this weekend!
a97dc9ef23c796bd8a44878c88aaa64b.jpg


Sent from handheld smoke signal device
 
So I didn't get as much done this weekend as I had hoped, but I still made some progress on correcting the lazy work of the PO

As you can see in the first pic attached the PO installed a bunch of different latched on the one side of the tub/lid.... The problems with this setup are
1- they are made of steel and are already rusting
2- they have a removable pin that can be taken out in a matter of seconds if someone really wanted to get in
3- they are far too small for the job at hand
4- they were installed with a mix match of hardware and that just drives me nuts!

The second image shows that he didn't even bother to line up the lid and tub when installing the hardware

The third image isa comparison between the hinge taken off and the one it will be replaced with (fixed pin, stainless and about twice as thick)

I decided that I would use Nut-Serts to mount the new hardware, figured it would gives clear look and make the install easier.... Plus I just wanted to try these thing out! (Shown in the 4th pic, next to the holes I need to fill from the old hardware)

..... But then I found out that the bolts I picked up are 1/4" too long to work... So I moved on to the draw latches for the opposite side of the lid....

Ran into problems on that side too, but was working against the clock as the sun was setting so I called it a day after mounting the top half of the draw latch.

Again I used Nut-Serts to mount the latches, I also attached a pic of the tools used to fit them... All you have to do is slip the 1/2" nut over the bolt, thread the Nut-Sert all the way up the bolt, insert into the hole, turn the Allen key clockwise until it's tight, back off all the way and your done!
 

Attachments

  • ImageUploadedByTapatalkHD1418616122.214291.jpg
    ImageUploadedByTapatalkHD1418616122.214291.jpg
    525.5 KB · Views: 50
  • ImageUploadedByTapatalkHD1418616137.201382.jpg
    ImageUploadedByTapatalkHD1418616137.201382.jpg
    522 KB · Views: 50
  • ImageUploadedByTapatalkHD1418616156.081396.jpg
    ImageUploadedByTapatalkHD1418616156.081396.jpg
    531.4 KB · Views: 46
  • ImageUploadedByTapatalkHD1418616172.176879.jpg
    ImageUploadedByTapatalkHD1418616172.176879.jpg
    533.8 KB · Views: 51
  • ImageUploadedByTapatalkHD1418616194.332955.jpg
    ImageUploadedByTapatalkHD1418616194.332955.jpg
    522.2 KB · Views: 50
  • ImageUploadedByTapatalkHD1418616211.246930.jpg
    ImageUploadedByTapatalkHD1418616211.246930.jpg
    524.1 KB · Views: 48
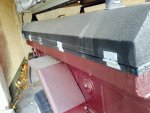
So I really hate this pintle hitch setup! It allows the trailer to jump around too much under normal driving conditions even with weight in it and is just an absolute Kangaroo when there is little or no weight.

As such it's the next thing I am going to check off on my "it works, but I am going to make it better" list.

What the goal to achieve is a hitch that can:
-pivot in all three axis
-has zero slop
-Is easy to separate from the tow unit
-Unique enough design that it makes the trailer difficult to steal while disconnected from the towing vehicle
-ability to be towed by any rig with a 2" hitch receiver
-lengthen the setup enough to use tire swing out while connected to the trailer

But above all else is that it's safe, secure, simple

The easy way to achieve the list above would be to spend $250-300 on a "Max Coupler" made by Adventure trailers:

8374cc3ab6e5a982bd4582e386c43203.jpg


But that would mean waiting a week or two, not being creative, and $250-300 poorer.

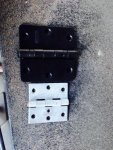
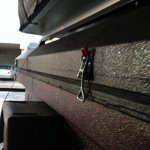
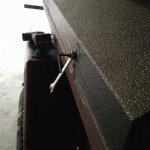
Instead I went over to a trusty Automotive and Agricultural store I am sure most of us has spent a good amount of time in, and walked around until I found all the right parts to take the general idea I had in my mind to physical parts that can be bolted, pinned and welded together to make a 3-axis hitch.

With the parts I picked up I have been able to hit every item on my wish list! Even extending the hitch by approx 48"!!!

Just some assembly required, more to come later tonight/weekend
 
I managed to get the paddle latched installed on the rear tailgate, which served three functions

1- covered up a hole left behind when the previous owner moved the tail lights from the back of the tub to the side of the tub when he put the tailgate in
2- got rid of the idiotic pin system the PO had to hold the tailgate shut, it's was such a pain in the ***** to use as it only fit if you stood on you left foot, held your breath and sung a Michael Jackson song.....
3- probably the most important of them all it allowed me to add a lock to the rear which now means the entire tub can be locked up to keep the honest people out!

Some pics:
0d49a2c8e13c22989bf22e224275c111.jpg

0df19da6271f790464ca9bcacfc20851.jpg


The other side is a repeat of this side and for now it all got coated in a quick spray bomb of black until I decide how I want to finish/redo the exterior
e61929d7ca3231fa63ee3c1950814826.jpg

(Can hardly tell they are there now it's been painted!)


Sent from my iPad using Tapatalk
 
Everything is done and tacked together, just waiting for a buddy to have some free time to finish the final welds as I just don't think my little 110 flux core welder has enough heat to get proper penetration

But enough blabbering here are some pics!
Normal flat towing position
100180164819d40ff96ade0c63d59b19.jpg

Max articulation up and down
ea5cdd64ca9962f3219416ffb9ce1b2d.jpg

2a6d2f0a28c6d83cab8842012e6706dc.jpg


No interference when the unit is flexed on both axis:
72e8e5021f83d2d8c7cbabd296476700.jpg


And if you missed it, again the trailer gets is "roll" at the OEM pintle hitch mounting location by cutting off the ring and welding it to the extension (48") in the pictures above like so
c1240e6ef58d4bea40d082a35e87d20a.jpg


Sent from my iPad using Tapatalk
 
I am starting to think that I am going to put this puppy up for sale, I just moved out to Vancouver Island and its going to cost alot more to take this trailer off Island for trip then I ever expected that it would.

I think I'll be bringing it to the NW Overland Expo this June (if I don't have it sold by then) if anyone is interested in taking it home with them.

I havent come up with an asking price yet, but I am open to offers at the moment.

ps- the hitch i was building never got put on since it would involve destorying the OEM pintle and I just wasn't ready to do that if I was going to be selling it.
 
So I decided against selling the trailer, going to continue on building it up like originally planned.

Since I don't have a garage I will be heading over to a local shop sometime soon to help build and provide guidance on the tongue extension that I want done.


Next I am trying to track down a tongue box, I'll like it to be aluminum or plastic, does anyone have some suggestions on what they have and how well it works? would love some input on a good place to pick something like that up as well.


More to come soon

Cheers,
Mike
 

Rkycacher

New member
Glad to hear you kept the trailer. It makes a really fun project, and I have heard is even better when you get to use it!

Like a lot of others on this forum. I opted to buy a tongue box from Harbor Freight. I want to say it ran a little over $100 with a coupon. However, I am not sure if they will ship to Canada. It is the perfect width for a M101CDN, and the perfect depth for me (I kept the parking break and hitch as original).

image.jpg

image.jpg
 
Picked up a few bits to continue on with the build
94947b238b1708d3d1fd6ac7f2c7c66a.jpg

On the left will be the fuse panel for a small amount of accessories the will be built into the trailer/tongue box. To the right is the wiring harness junction box for the trailer 7 pin connector..... Going for a cleaner install this time around when it comes to the wiring ... Plus with the tongue extension it will need some reworking regardless.
4b75ac381a0b5c8c46983ace2e0b97b8.jpg


Sent from my iPad using Tapatalk
 

Forum statistics

Threads
185,895
Messages
2,879,531
Members
225,497
Latest member
WonaWarrior
Top