Designing a small high-clearance receiver rack

tundratrader

New member
Here is what I did. Sorry the pics are so crappy. I guess I should have done a little write up. I started with square tubing and went from there. It is mostly 1/4 angle. I can almost put my tailgate down with this rig. I just drove from Homer to Oregon and back it is still nice and tight in the receiver.

img2187yf.jpg


cruisercan2.jpg


Zach
 

762X39

Explorer
I built a rack in 2000 when they weren't very common.I used 2 inch tube (1/4 wall),1 inch angle,expanded metal (the flat stuff not with the sharp edges) and chain links cut in half for the tie down points.I had it galvanized and it turned out great.Sorry about the picture but I used it as a step for the back of my mog when it wasn't being used on my other truck.
 

Attachments

  • 1919#2 (Medium).jpg
    1919#2 (Medium).jpg
    40.4 KB · Views: 56

The Adam Blaster

Expedition Leader
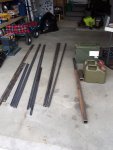
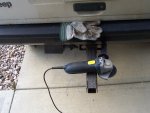
I bought my steel a couple weeks ago, a little before I went on vacation, so it's just sitting on the floor of my garage. I also managed to bring my 14" Milwaukee chop saw back from where it was stored at my rental property back in Ontario.
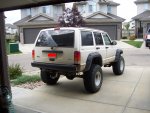
I also have the XJ in the shop getting new gears, so I needed a measurement and asked in the Jeep forum:
http://www.expeditionportal.com/forum/showthread.php?p=697541&posted=1#post697541

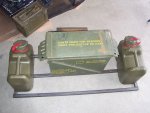
I just took some measurements of the ammo and jerry cans.
Jerry - 7D x 13L x 12H
Ammo - 8.5D x 19L x 14.5H

The dimensions are a bit generous as I would rather err on the large side.
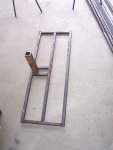
Now I'm thinking about going in a different direction with the layout.

I am thinking about mounting the 2 jerry cans side by side the long way so they will take up a bit more than 26" in overall length. (Or width depending on how you envision the setup.) I think I'm going to angle the large ammo can below the jerry cans so that the base is tight against the main upright tube, and then the top angles out away from the Jeep. This should accomplish a couple things - keep the departure angle pretty good, make it a bit easier for me to see the contents of the ammo can, and allow the jerry cans to sit a bit lower, sort of tucked in behind the top half of the ammo can.

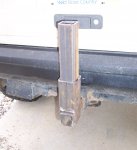
I'll be getting my Jeep back early this week, mid-week at the latest.
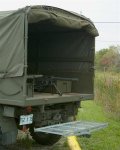
I think I'll wait until I get it back before I start cutting up the steel, I'm going to need to know how it mocks up against the lift gate, how high it is, how much it sticks out behind etc.

I also realized I'm going to need more steel - I want some strapping material to make enclosures for the jerry cans, and some angle, possibly 1 or 2 inch, not sure on that yet. I'm going to incorporate some hinges for the jerry can enclosures as well and manage some way of locking them onto the rack. Keep the opportunists out of my gas as much as possible. ;)
 

The Adam Blaster

Expedition Leader
I built a rack in 2000 when they weren't very common.I used 2 inch tube (1/4 wall),1 inch angle,expanded metal (the flat stuff not with the sharp edges) and chain links cut in half for the tie down points.I had it galvanized and it turned out great.Sorry about the picture but I used it as a step for the back of my mog when it wasn't being used on my other truck.

I already have a rack very similar to this style.
It works great for carrying a lot of stuff, but it totally kills the departure angle, that's why I'm building this new rack.

How much did it cost to galvanize your rack?
I just repainted mine, didn't bother getting the rust off first though... lol

I think when I'm finally done with this new rack I'm going to get it line-exed or coated with something equivalent. Hopefully with that coating it will be a bit quieter, and I won't have to worry too much about it rusting.
 

762X39

Explorer
I have stuff galvanized all the time.You need a minimum of about 200lbs at a time to make it worthwhile.I combined my order with a welding shops order so it ended up costing nothing that time. The minimum charge then was $120 for 200lbs and about 5 cents a pound over that.:coffee:
 

The Adam Blaster

Expedition Leader
I just noticed your location.
I would imagine there's at least one or two places in your town that could do that sort of work...
:xxrotflma


I haven't looked into getting the galvanizing done, but I am not too sure how much it will cost to get this line-exed either... Everything seems expensive out here though. :(
 

The Adam Blaster

Expedition Leader
Thanks Mr. D.

I'll try to grab some pics of the materials I have, along with the items that I'll be attaching to the rack. Give you guys some more visuals for what I'm trying to do.
 

rusty_tlc

Explorer
I just noticed your location.
I would imagine there's at least one or two places in your town that could do that sort of work...
:xxrotflma


I haven't looked into getting the galvanizing done, but I am not too sure how much it will cost to get this line-exed either... Everything seems expensive out here though. :(
Base on my experience building RAID array chassis during the early 90's galvanizing is very expensive. Many of the shops in CA had gone out of business because they couldn't meet EPA requirements and still provide the service at a price anyone would pay.

We ended up using a coating that did the same thing, formed an oxidation layer to protect the metal underneath.
 

The Adam Blaster

Expedition Leader
Well, I do tend to over think things and take a long time making up my mind, but when I actually get down to work, I usually move pretty quickly. :)
And today, I changed my mind on the design yet again. lol
I needed my Jeep present to realize trying to angle the ammo can wasn't going to work.

I started with about $180 worth of steel and my ammo and jerry cans, all told I have about 100 feet of various metal. I have some 2" angle, 1" angle, 1" square tube, 1.5" square tube, 2" square tube which is of course the size that inserts into standard receiver tube on a hitch, and I have a small piece of 2.5" tube that will make the detachable part of the rack.
I realize I definitely have way more metal than what I'll need, but I may build a 2nd rack for a friend, and I would much rather have too much than not enough, especially on a holiday weekend.

EDIT: I forgot, I also have some flat stock, I think it's 1.5" wide and 3/16 thick.
 

Attachments

  • Raw mats.JPG
    Raw mats.JPG
    493.8 KB · Views: 16
Last edited:

The Adam Blaster

Expedition Leader
The chop saw I have, I bought close to 7 years ago, and it still had the original abrasive blade on it, so for a $5 replacement blade, I swapped it out. Safety first!! ;)
One of the problems I run into having only one good hand and arm is changing a blade like this. Anyone that has used one of these types of saws knows that you have to depress a little button to hold the blade in place while you turn the wrench to loosen, or tighten the bolt that holds the blade in place.
Well, you can imagine that it's a bit tricky with just one hand, so I adapt and use what I have around me. :D
 

Attachments

  • Adapt.JPG
    Adapt.JPG
    633.3 KB · Views: 16
Last edited:

The Adam Blaster

Expedition Leader
After I changed the blade on the chop saw, I decided to go and use my angle grinder. lol
I cut up the small chunk of 2.5" tube that will make the rack removable, and in the 2nd pic you can see what I'm planning for the support structure.
The "flaps" that wrap down the sides of the 2" tube, I'll be cleaning them up quite a bit, and cutting some angles into the flaps for some more surface area that the welds can use, rather than just straight lines.
 

Attachments

  • Cuts.JPG
    Cuts.JPG
    601.8 KB · Views: 19
  • Support.JPG
    Support.JPG
    371.2 KB · Views: 24
Last edited:

The Adam Blaster

Expedition Leader
After that, I cut up the 1" tube that will make up the frame of the platform.
Below is the pic of how everything will get welded together, it's upside down as to how it will actually sit in place in receiver.
 

Attachments

  • Frame.JPG
    Frame.JPG
    457.7 KB · Views: 14
Last edited:

The Adam Blaster

Expedition Leader
And finally, this is how the ammo and jerry cans will be positioned.
I left the clamping latches in the open position to illustrate the amount of space on either side of it I need without pinching my fingers when I open the can. The spouts on the jerrys will be pointing towards the Jeep, I'm going to make them slide into the rack from the back. I will make the cages lockable, probably with a piece of flat stock that is hinged.
 

Attachments

  • Ammo jerrys.JPG
    Ammo jerrys.JPG
    485.6 KB · Views: 30
Last edited:

Forum statistics

Threads
186,384
Messages
2,885,277
Members
226,303
Latest member
guapstyle
Top