Guess who's back!?! Atl-atl's K5 Blazer + Four Wheel Camper "The Crawlin Cabin" documentation thread!

Atl-atl

Adventurer
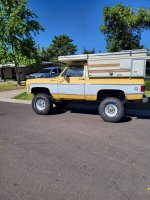
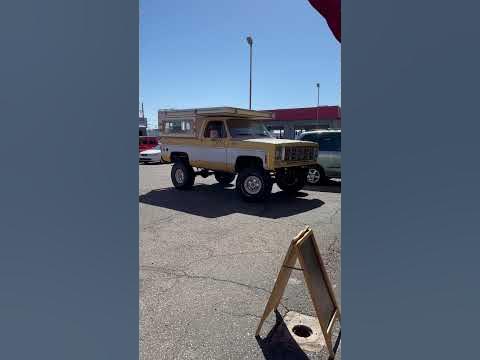
Well the truck is finally running and driving great!! Ive had it back for about a week now and have put a ton of miles on it already. I hate to admit it but most of the issues were my own fault. Basically a bunch of the wiring was incorrect, as laid out in my previous post. The biggest issues being the mislabeled O2 sensors and injector harness. Turns out the injector harness is not part of the Fitech kit, its something that I sourced on my own. Typically this Fitech harness is installed on a stock intake manifold and injectors/harness...so yeah. The fact that the stock replacement harness was not labeled, front to back OR side to side, is ridiculous. Once that was figured out, the wiring was reinstalled correctly and new plugs were put in to replace the fouled ones(for the third time) everything came together. This was all figured out by the shop, not myself. They also did a good bit of tuning on the Fitech system. The truck is much happier being told its a 6.0 liter with 30lb injectors. Apparently having to input "incorrect" data is common with Fitech and its simply a matter of knowing how to adjust things to make it run well. Anyway, Im just happy its finally driving like it should! The shop also rerouted my PCV system, moved my brake booster vacuum line to a bigger port, changed a couple HVAC fittings and some other small stuff. Sometimes it pays to have experienced eyes give things a once-over. As soon as I got the truck back I swapped out the stock AC condenser for a modern one to work with the new compressor. I just need to make an appointment to get new lines made and have the system filled.

Im ecstatic.

Dont mind the wacky stock temp gauge, its not currently hooked up so I think its getting a random incorrect signal from the printed circuit on the back of the cluster. According to the Fitech handheld it runs at a steady 195 while cruising, 205 at idle(its hot here in Phoenix) and the fans kick on as they should. I need to get a variety of driving videos. Its so loud and its so powerful hahaha. Its insanely fast compared to the stock motor. The only thing slowing it down is the NV4500, not the easiest trans to shift quickly, especially with a 2 foot long shifter!
 

orion240sx

New member
The biggest issues being the mislabeled O2 sensors ...

I ran into this with my LS (4.8) swap in my FJ60 Landcruiser, and it caused quite a headache for a day or 2 when I first got it running/driving...!!

Was my own fault - Mine weren't mislabeled, as I did the entire harness myself...they just went to the wrong side when I dropped the harness down over the bellhousing. Oops.

Chased my tail for a couple days, finally realized that it ran perfect when in closed loop and terrible when in open loop. Posted a note on my build thread over on 'Mud, and a guy mentioned he had a similar issue, identical to yours. Mislabeled harness.

I swapped them L to R, and it's been perfect ever since.

Anyway, posting here to add a data point, and to say good work so far!

- Brian
 
Last edited:

Atl-atl

Adventurer
I ran into this with my LS (4.8) swap in my FJ60 Landcruiser, and it caused quite a headache for a day or 2 when I first got it running/driving...!!

Was my own fault - Mine weren't mislabeled, as I did the entire harness myself...they just went to the wrong side when I dropped the harness down over the bellhousing. Oops.

Chased my tail for a couple days, finally realized that it ran perfect when in closed loop and terrible when in open loop. Posted a note on my build thread over on 'Mud, and a guy mentioned he had a similar issue, identical to yours. Mislabeled harness.

I swapped them L to R, and it's been perfect ever since.

Anyway, posting here to add a data point, and to say good work so far!

- Brian
Thanks, thats exactly how mine was behaving. Wish I could say I figured it out in my own ha!
 

Atl-atl

Adventurer
I'm not sure where they are, but some friends just sent me a pic of a Blazer that I think is yours? They said it's "parked next to us".

Todd Z.
No way, thats parked in front of my house in Phoenix!! Does your friend live on that street? We just bought the house a month ago and all our neighbors have been super friendly and welcoming!
 
Last edited:

Atl-atl

Adventurer
Ok since the truck is running and driving I decided to start tackling some projects that Ive been putting off for years. Also hopefully to get things done in time for Overland Expo West which is coming up in a few weeks. I still need to pull the t-case and reseal it but Im still mad enough about it leaking in the first place that Im just letting is drip on the ground for a little while longer. :rotfl:

First up is the rear bumper. Ive been meaning to replace the crooked, chrome stock bumper since the day I bought this truck for the first time back in 2020. Ive been itching to really put the new welder to work and last week I did just that. I had previously purchased a latch and hinge setup from 4XInnovations for this project and was glad I kept it because it worked perfectly. I used 1/4" plate for the frame plates and 3/16" everywhere else. I think it turned out great!
IMG_0884.jpeg

The tire carrier mount is 1/4" wall 2x3 and the base of the swing is 1/4" wall 2x4. The extra structure on the swing is intended to mount jerry cans and a folding table. Its WAY overkill 1/4" wall 2x2 but I had it laying around so I just used it. The swing wound up weighing more than the bumper hahaha. The extra receiver on the swing is for a bike rack. I have a similar setup on my tacoma and it works perfectly so I had to do it again.
IMG_0878.jpeg

The 4XInnovations hinge and latch are super beefy and use spring loaded pins to hold it in a variety of open and closed positions.
IMG_0823.jpeg
IMG_0824.jpeg
IMG_0827.jpeg
IMG_0837.jpeg

I added some internal bracing for the receiver and welded all around it. I dont think Ill every tow anything, the truck isnt wired for a trailer, but Ill use it as a recovery point. Everything is welded on both sides. The "outside" of the bumper is welded and then ground smooth so it looks nice. My welds arent pretty enough to leave alone hahaha. The "inside" is fully welded and the hitch and frame plates are welded on both sides as well. There are currently 4, 1/2" holes per frame plate for mounting. 2 of them are existing holes in the frame that I was able to reuse. 2 are new. I cut off the bottom ~2" of the frame horns and boxed the frame in with the bumper for extra strength. I also have the option to use the 2 mounting holes on each frame horn if I decide to bump up to 6 mounting holes per side.
IMG_0790.jpeg

Anyone familiar with a K5 Blazer frame will see where I cut off the bottom portion of the horn.
IMG_0737.jpeg

I added 1/4" plate to shore it up once I decided on the shape of the bumper.
IMG_0742.jpeg

Then I started boxing everything in.
IMG_0743.jpeg
 

Atl-atl

Adventurer
This was the point I decided to add a small taper to the corners. I think it turned out pretty slick without being too fancy or modern looking.
IMG_0747.jpeg
IMG_0753.jpeg

Frame is boxed in now.
IMG_0751.jpeg
IMG_0755.jpeg
IMG_0758.jpeg

Deciding how I wanted to mount the swing turned out to be pretty easy. Time consuming to get it right the first time and make the mount for the hinge beefy enough but Im happy with it.

IMG_0764.jpeg
IMG_0768.jpeg
IMG_0771.jpeg
IMG_0773.jpeg
IMG_0809.jpeg
 

Atl-atl

Adventurer
Initially the back of the bumper was completely open. When the tire swing was "out" it was flexing the bumper pretty badly so I decided to add a brace directly underneath the hinge, where Ive drawn a yellow line here. Forgot to take a pic.
IMG_0802.jpeg

And then I boxed in that end of the bumper. Only issue here is that 2 of my mounting points are inside of that area. I decided to weld nuts onto the back side of the frame plate. In theory this will work fine. If I ever have an issue and can no longer use those bolts Ill just add mounting holes elsewhere. The flex is basically gone when you yank on the tire carrier. In fact, you can see the frame flex but not the bumper so Im calling it good.
IMG_0877.jpeg

I went with a 6" depth so the top of the bumper will act as a step to get into the camper. I dropped it all off at powdercoat last Friday and its supposed to be done this Friday. They are doing a slight texture so there is grip when stepping on the bumper.
IMG_0892.jpeg

All done. Now I just wait for the call from the powder coater.
IMG_0883.jpeg
 

toddz69

Explorer
No way, thats parked in front of my house in Phoenix!! Does your friend live on that street? We just bought the house a month ago and all our neighbors have been super friendly and welcoming!
I think they were staying in an AirBNB as they live in OR. He's a racing buddy and sent it to a number of us and I said, "I think I know that rig". We're not too far way - probably a few miles - 15th Ave. and Glendale area.

Todd Z.
 

Atl-atl

Adventurer
I think they were staying in an AirBNB as they live in OR. He's a racing buddy and sent it to a number of us and I said, "I think I know that rig". We're not too far way - probably a few miles - 15th Ave. and Glendale area.

Todd Z.
Ahh funny, our neighbors have a casita thats on airbnb. What a small world.
 

Atl-atl

Adventurer
And the bumper is ON!!

Im pretty proud of this one. First time building something this substantial from scratch. I think it turned out really well. Ill be sure to get some feedback in a couple weeks at Overland Expo though. For now, its great to have a spare on the truck again and be able to bring my bikes with me now.

I drilled and tapped holes to mount the license plate. I dont have a light on the plate, not sure if thats ever going to be an issue. I doubt Ill be driving this thing at night.
IMG_1027.jpeg
IMG_1020.jpeg

I installed a little uhmw poly skid. The latch was supposed to come with one but it wasnt in the box so I just made my own. Countersunk the holes and it works perfectly. The latch did come with a little rubber bumper that goes between the swing and the round "bar" part of the latch to keep it from rattling, not that it would, the latch is so beefy and strong but maybe over time it will break in. It also came with a sweet bike handlebar looking rubber grip.
IMG_1019.jpeg
IMG_1018.jpeg
IMG_1021.jpeg

I also chopped off the previous owners tabs that hold the stairs in place and welded them onto the new bumper before it went to powder coat. Worked great. The stairs are a little short but Ill probably just carry some leveling blocks with me for if/when I need them.
Screen Shot 2024-05-05 at 8.06.33 PM.png
IMG_1035.jpeg

I will be adding a jerry can holder to the left side of the swing, just havent found one I want yet. I might just copy the one Ive got on my tacoma and have it powder coated.
IMG_1023.jpeg

With the swing open at 90 degrees there is 2.5 inches of clearance to the tail light. Theoretically I could fit a 40 back there. Maybe a 40" BFG haha. For now Ill be staying on the stock 6 lug axles but some day hopefully soon Ill jump to tons and at least 37s. Its nice to know there is room.
IMG_1034.jpeg
IMG_1039.jpeg
 

Forum statistics

Threads
186,031
Messages
2,881,136
Members
225,705
Latest member
Smudge12
Top