Offroad-Adventure-Travel.com Suburban Build

Colorado Ron

Explorer
Nullifier said:
Man those step by step pics of the front bumper build take me back tot eh 10 days I had in the shop fabbing my front bumper for the yota. Looks like great work. Did you tie in the corner of the bumper to the frame as well or is it just supported by the main mounts at the end of the chassis rails.


Im waiting till the exo cage is done, then Ill tie the ends to the frame.
 

86cj

Explorer
Great front bumper work...I know the time it takes grinding.:bowdown:


I have had a chevy 98 dually since new so you have my kudos on a good choice of rig. I have had great luck with reliability. It could turn out to have been chevys best years..... I admit I wish it was a "Bubbasub" at times..

Idler arm is the sure weak link for now. Some people miss it on regular grease jobs but I don't and I still have short life 20-30,000 mi. The steering geometry just feels bad when your on the brakes, you can feel it stress the parts.

I run little 265's in the front and have had no trouble with shafts, bearings or ball joints..I have wanted a dana 60 up front for 10 years but my IFS does its job every day.

I seem to remember something about Hummer using a cast iron front diff that works on the 3/4 and one ton front IFS.
 

Colorado Ron

Explorer
86cj said:
I seem to remember something about Hummer using a cast iron front diff that works on the 3/4 and one ton front IFS.


Now that would be interesting! Ill have to check into that. Any links or more info?
 

1976K5Chalet

Observer
Where is that 6.5L going??? Hint - Hint....the chalet is planed to recieve one of those in her frame off down here in fruita...


DW
 

ntsqd

Heretic Car Camper
86cj said:
I seem to remember something about Hummer using a cast iron front diff that works on the 3/4 and one ton front IFS.
News to me. Every HMMV diff I've seen was an aluminum hsg and used Jeep Model 20 Ring & Pinions. Just checked with my HMMV friend, builder of the Chainlink. He has never heard of a cast iron cased diff. I won't says that he's the end-all, be-all knowledge source, but he has messed around with their parts rather extensively.
 

Colorado Ron

Explorer
1976K5Chalet said:
Where is that 6.5L going??? Hint - Hint....the chalet is planed to recieve one of those in her frame off down here in fruita...


DW


If your interested in purchasing it, let me know. I can sell you just the motor or motor, tranny, and tcase.Plus you can come here it run and drive it before hand. Depending on what someone purchases will be the deciding factor on my conversion.

I could do a cummins conversion and keep the 4l80 and tcase. Or if I sell it all Ill put a Cummins, NV5600 and tcase.
 
Last edited:

Czechsix

Watching you from a ridge
Colorado Ron said:
Thats enough for tonite.

Soon to come:

--HO injector install
--Onboard computer with touchscreen
--A pillar guage pod
--2m and cb install
and much more

What you guys think so far?

Looks good so far. I'll be interested in seeing how you tie your exo and rack in, and all the other little bits and pieces. I've got the black Subbins (Suburban + Cummins) posted in the domestic vehicles section, and I've been slowly building it up. Today I'm going to start working on front lighting and trail lighting.
 

Colorado Ron

Explorer
Double Swing out rear bumper.

OK--finally time for an update! Been working away on this suburban and heres whats been done so far:
GO HERE to see buildup in detail: http://www.offroad-adventure-travel.com/suburban.html


Back Bumper was created with a double swing out. Made sure it matched the front.
2052097118_fdfb8e0275.jpg


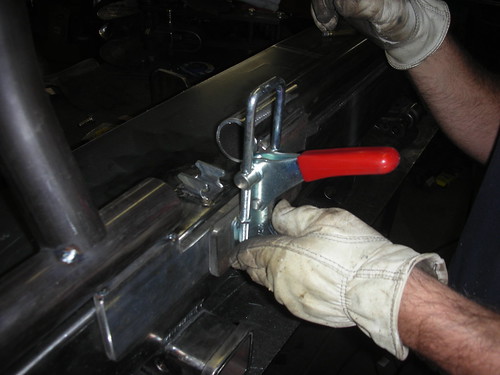
Had it latch in the middle using one latch:
2052097946_ed37a046ff.jpg


Inch and 3/4 spindles were used and went all the way thru:
2051287525_2429cc666a.jpg


Stainless steel spring loaded locks were put into place. We made it so it would have two locking positions. One to clear the tailgate, and one is completely open at a 90 degree:
2104386211_75946050bc.jpg


A loop was used as the foundation for 2 can holders that we bought from Adventure Trailer:
2104381577_341f92409b.jpg

2134107212_e7faf567e4.jpg


The ends were tapered so that there was a good departure angle all the way around!:
2052086654_fa696e9432.jpg


The Spare tire holder has a brace go from the mounting point straight to the spindle making it extra strong! Heres the completed bumper, minus som painting:
2163179585_e7f3462c1d.jpg


hope everyone likes it thus far. Exo cage info next!
 

p1michaud

Expedition Leader
Fabrication and protection!

Colorado Ron said:
OK--finally time for an update! Been working away on this suburban and heres whats been done so far...

Wow, just got up to speed on this thread. You have some mad fab skills. Love the front and rear bumpers, sliders and exo cage. Very cool custom work and I'm sure you won't have to worry about the larger size of this vehicle now with all the armor. I really like the rear bumper, cool design and swing outs.

Cheers :beer:,
P
 

Colorado Ron

Explorer
EXO-Cage!!!

Thanks guys! Glad you are enjoying the build.

Now time for the Exo Cage!

As usual, you can get the detail writeup here: http://www.offroad-adventure-travel.com/suburban-exo-cage.html

And all the pics of the project here: http://www.flickr.com/photos/7682973@N04/sets/72157603538850557/


We started by adding a grill guard which would also double as a mounting point for our exo cage.
2104376921_a797cc0442.jpg


2105156380_aba55efae8.jpg


2134087794_ff6a162541.jpg


Once that was done, we started building the cage. Ill start with pics from front to back:
Fender Protection:
2134116536_52fb1e9232.jpg


Heres the support after the doors. Its attached from the roof support to the sliders we previously built.
2133339913_aba6c6bb29.jpg


And the rear quarter. The one thing we havent done, that I plan to add is a 3/8 plate that covers the entire quarter panel and is weled to the exocage. More to come on that.
2133349557_b6d121859b.jpg
 

Colorado Ron

Explorer
Eco Cage continued

So we tied the exo cage to the front grill guard:
2133355123_49c491f6e0.jpg


As mentioned before we also tied it to the sliders and rear lower quarter protection.

Now the roof cross braces. We built an "x" over where the doors are for extra strength since we dont have cage were the doors are obviously.
2133374915_b0c4417247.jpg


So this pic shows a total of four cross braces and the "X" being finished:
2134149024_5c9f02aba2.jpg


And all done and out in the snow:

2163972482_6965e3b61c.jpg


2163173287_64a4eac203.jpg


2163176763_8c8587f34c.jpg


We are building the roof rack as we speak. So more on that soon! PS--Its gonna looks sweeeeeeeeet!!!!!!!
 

Forum statistics

Threads
186,344
Messages
2,884,788
Members
226,200
Latest member
eclipse179
Top