You are using an out of date browser. It may not display this or other websites correctly.
You should upgrade or use an alternative browser.
You should upgrade or use an alternative browser.
Project Fauxverlander 200 Series Land Cruiser Build Thread
- Thread starter cruiseroutfit
- Start date
cruiseroutfit
Supporting Sponsor: Cruiser Outfitters
Did you reincorporate the headlight washing system and the parking sensors?
My 200 does not have the HL washers but ARB does offer a compatible bumper. I did incorporate the park sensors in the front corners and will add them to the rear as well.
thanks - that was a big question along with relocation of the Cruse control radar/camera on the 2013.
This may be a bit early but do you know if you can remove the tire carrier and gas can swing outs from the ARB Modular bumper? I was toying with the idea getting both the blanking plates and the tire carrier and switching them out when needed (if its a 1-2 hours of work its doable) but if you have to drop the bumper that makes it a no go..
thanks
60Dan
Explorer
Kurt, great thread, as usual!
I really like the detailed analysis you've provided for each of your decisions/mods. It's great to hear an expert's views on this stuff as it helps others with their own purchasing decisions. Please keep the posts coming!
What this guy said!
As I mentioned to you in a PM the needs vs wants and weighing up the options of different manufacturers makes for a great read.
Don't forget about me when project Death Star is getting ready to hit the classifieds!
cruiseroutfit
Supporting Sponsor: Cruiser Outfitters
thanks - that was a big question along with relocation of the Cruse control radar/camera on the 2013.
ARB offers a "Camera relocation kit" for the ARB Winchbar so I'm assuming compatibility is a non-issue.
This may be a bit early but do you know if you can remove the tire carrier and gas can swing outs from the ARB Modular bumper? I was toying with the idea getting both the blanking plates and the tire carrier and switching them out when needed (if its a 1-2 hours of work its doable) but if you have to drop the bumper that makes it a no go..
Not going to be an easy conversion back and forth. For 1, assembling the dual sheet carrier swings is a bit of a chore, not bad to do once but I think you would bugger seals and bearings trying to do it twice. 2, the cover panels are generally installed before the bumper is mounted on the vehicle from the front side of the bumper. 80/100 are for sure this way, I'll have to double check on the 200 as it's been a minute. If so, you wouldn't be able to bolt the cover panels on. Unfortunately I can't see it working for a 1-2 hour swap.
cruiseroutfit
Supporting Sponsor: Cruiser Outfitters
Stage 3 continued, baby steps:
Time has been scarce this winter as I've been busy with work, play and other projects (finally making some headway on the Old Lady's 66' FJ45 build) but we had a few minutes of down time last week during the holidays and more importantly, the 200 wasn't buried in snow. This thing has needed brakes since day one, in fact I commented on the warped rotors to the seller (husband) and his reply was that his wife hadn't mentioned a thing about it. I laughed and said "they never do". They were not horrible but when braking at 60+ mph hour speeds there was definite shimmy that needed to go away. I had conceded to using stock OEM rotors and our aftermarket AISIN pads (same as OEM other than box color and price) but I started investigating higher performance options even before I had ordered the first part for the build. Performance 360 kept popping up on my radar and we had been impressed by a set we recently installed a customers FZJ80, so why not give them a go?
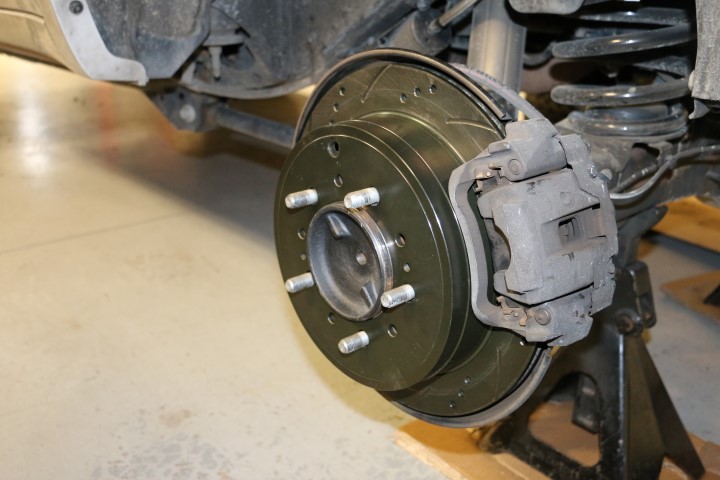
I chatted with the gents at Performance 360 and things snowballed, the next thing I know we had a full stock order worked out, all of their front and rear LC applications. We ordered most in the native zinc/silver coloring but I did snag a front and rear set of drilled and slotted rotors with a black coating for the 200. While the front wheels were of off to swap rotors, it was also perfect time to install Spidertrax 1.25" wheel spacers. I hadn't included these in my original build parts list but following the suspension and wheel/tire install, I felt the front end needed a tad more width. Many have reservations about wheel spacers and a number of diatribes have been offered about them one way or the other. I've been running them for a long time on my 100 and other rigs previous to that, I've got customers who have been running them for 10+ years. My diatribe, a quality spacer, properly installed and periodically maintained is a non-issue. Your results may vary so take it for what it's worth. Rotor's on later model Land Cruisers are super cake to do, like 2 bolts on the caliper, slip the old rotor off, the new rotor on and you're done. We knocked out the fronts rotors and spacers and went back to work on paying projects.

Front Performance 360 drilled/slotted rotor & Spidertrax spacer
This afternoon offered a bit of shop time to finish up rotor upgrades, we swapped the rear, inspected and adjusted the park brake and snugged it all back together. The rear is also a slip-fit rotor but the caliper assembly has a couple of additional bolts you have to deal with but nothing major. The brakes weren't the only shudder I wanted to resolve, both side mirrors had an annoying shake at highway speeds. Toyota is well aware of this and offers a repair "kit" to fix the issue. The kit consists of 3 new screws that incorporate a lock-washer and flat washer rather than the original integrated flat washer. It's a 5 minute job to swap them out and as the bottom mirror trim is likely to break when you access the screws, they include that too. If your 200 Series mirrors are wiggly, check out the Mud thread that includes a copy of Toyota's Technical Service Bulletin (TSB) and the needed part numbers for repair.
Rear Performance 360 drilled/slotted rotor
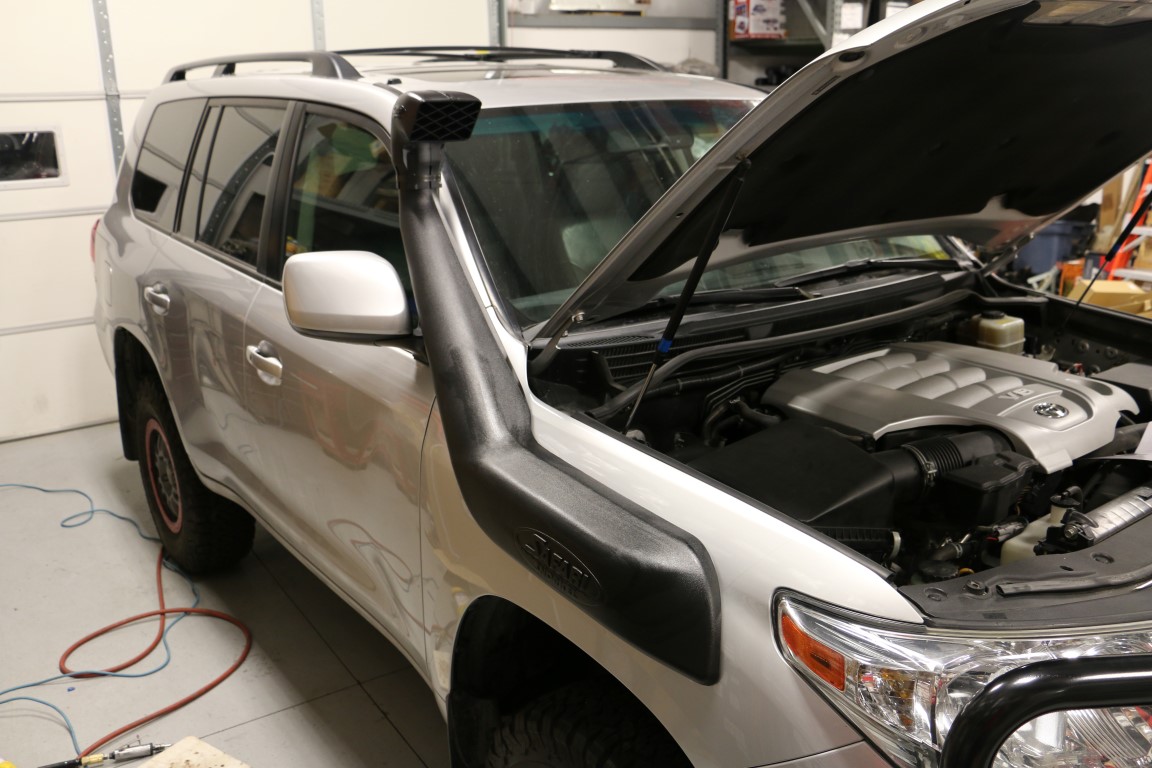
So, what next? Drawers would be nice to get tackled but I wasn't feeling that energetic, the rear bumper would have to wait until I had more time. Snorkel it was. The 200 Safari Snorkel is very straightforward, the instructions are complete and they've made some pretty nice changes to the kit comp. Now, allow me a minute to preach if you will. There are a bunch of knock-off snorkels hitting the market that are nothing short of a direct copy of the Safari Snorkel. We know them well, as we move a fair number of snorkels each year we get suited by companies trying to sell us kits and through that process we can learn a bit about their R&D (or lack thereof), their customer service, tech support, spare parts availability, etc. I fully know that Safari Snorkel's cost 2-3x that of a no-name Alibaba solution but I also know I can call them if something doesn't fit, I can get a spare part if something fails in the future and I know their plastic is going to last 20+ years in the sun, in the snow and even on the rocks. Rant off, picture time!
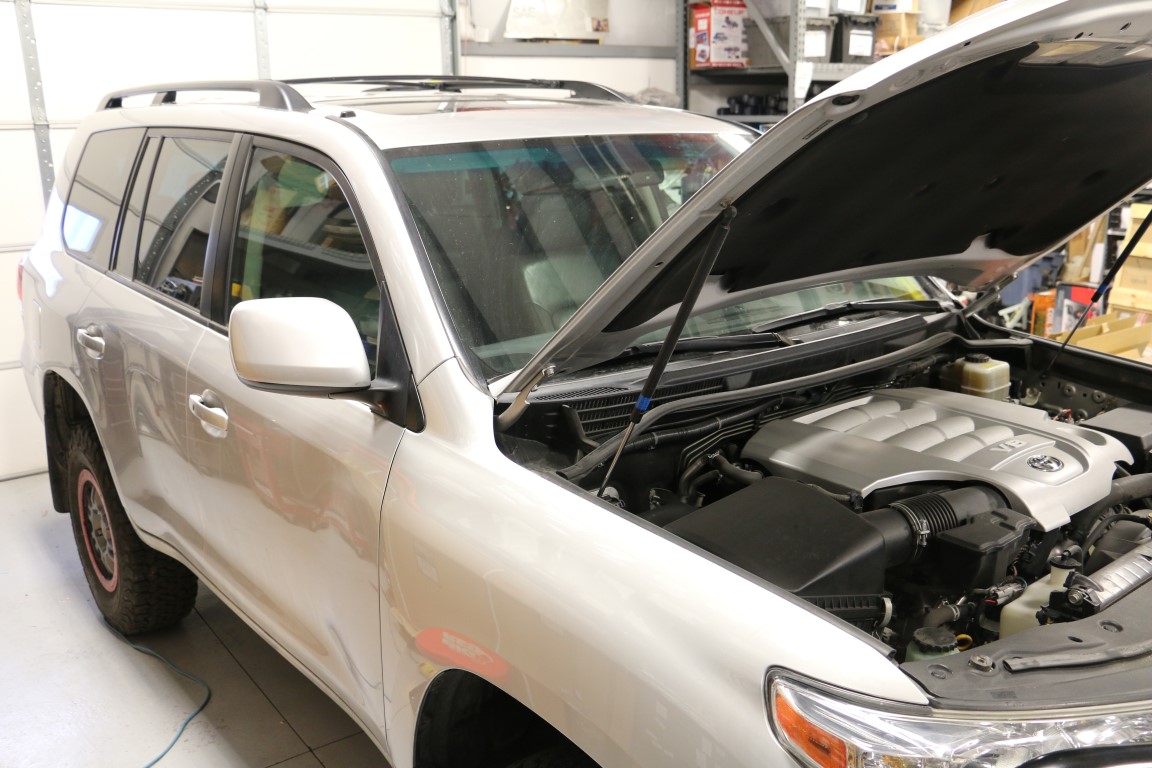
Before

Template attached, holes marked
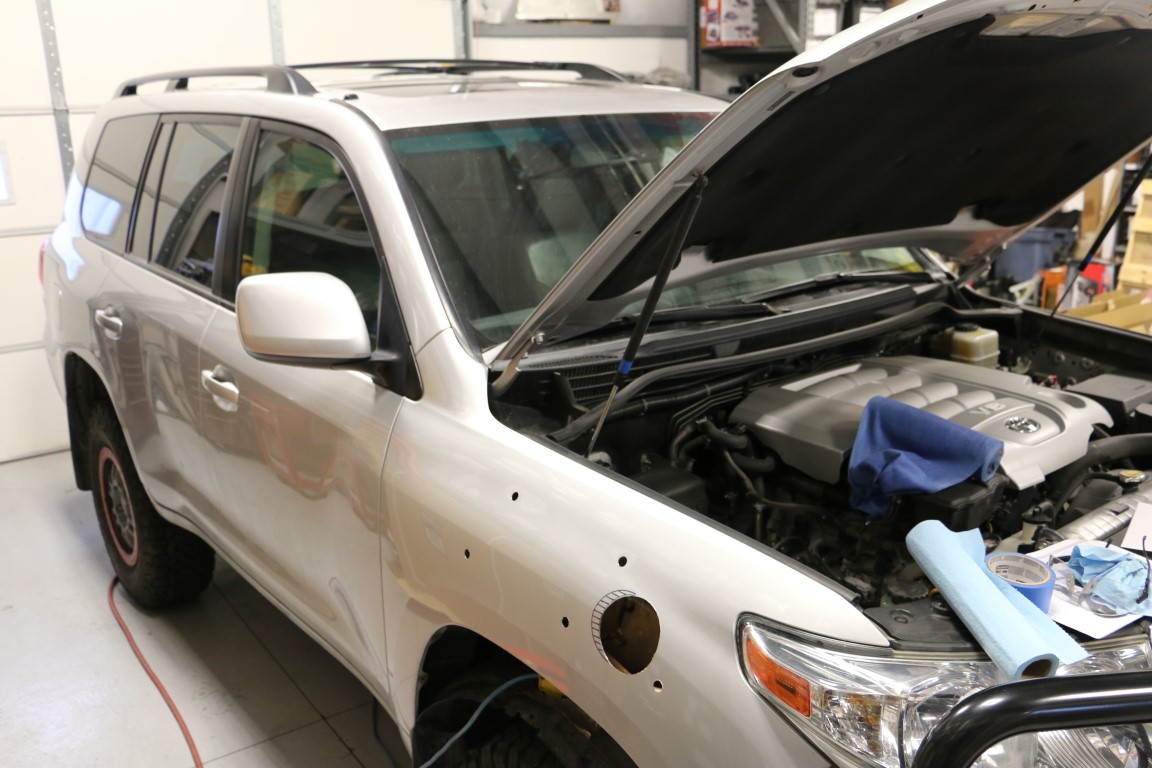
Holes
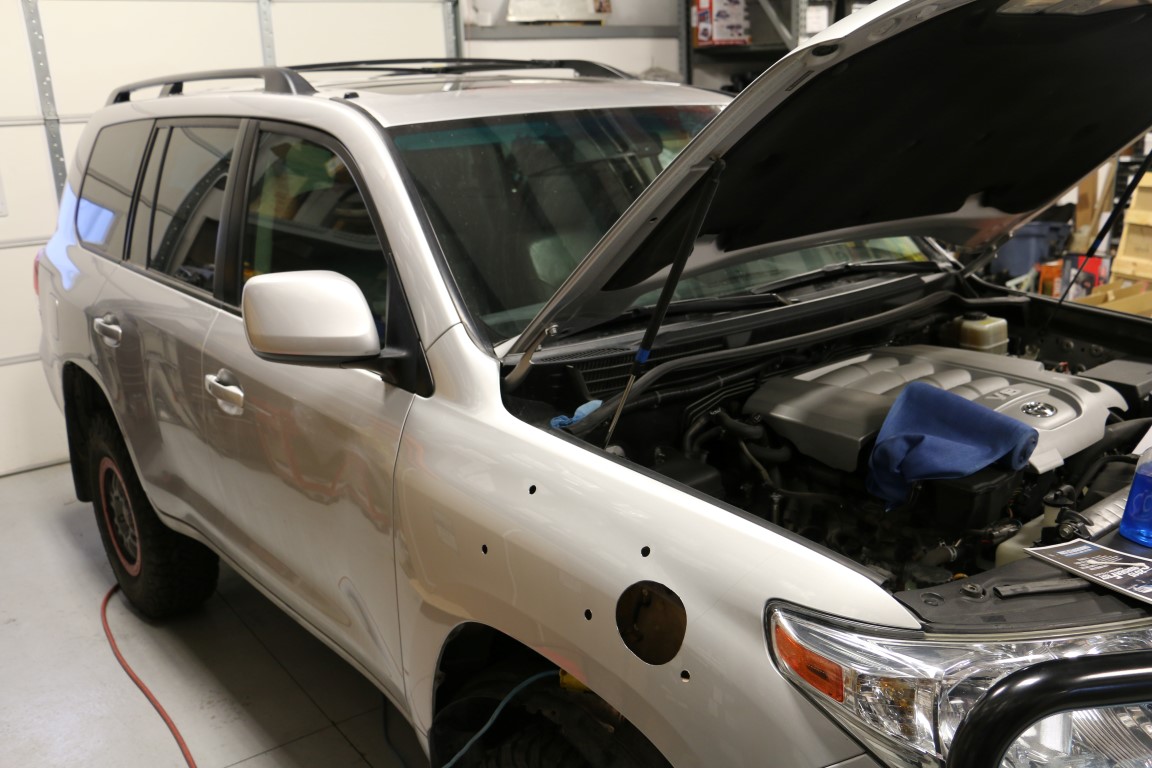
Bigger Holes
Finished!
Some detail shots of the process.
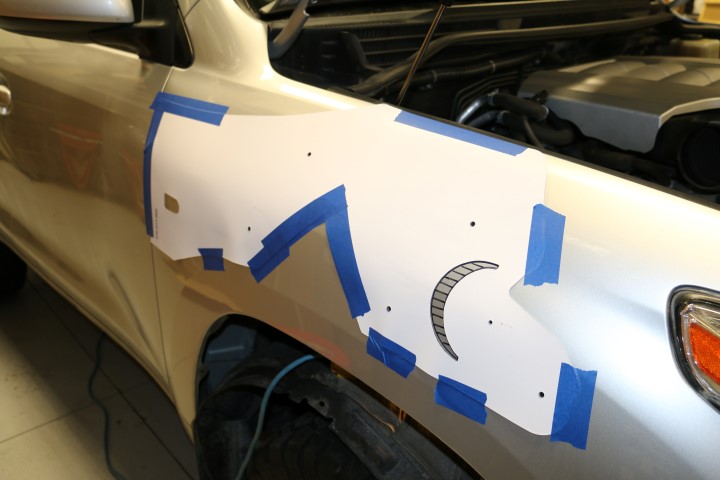
Closeup of the template and fender marking
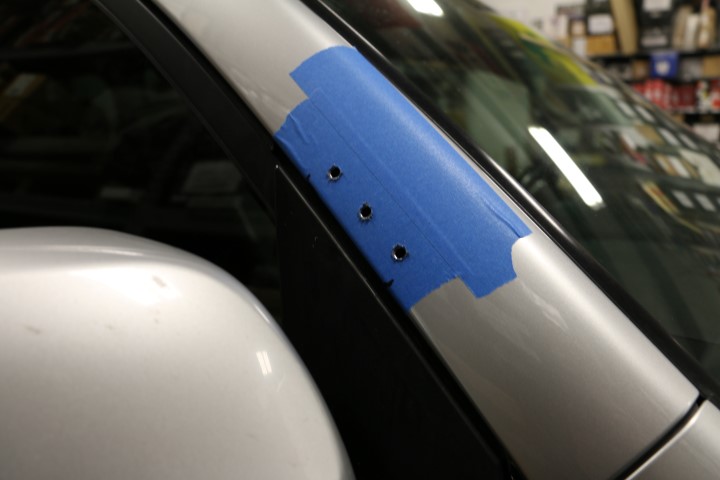
A-Piller marking and drilling using a step-drill
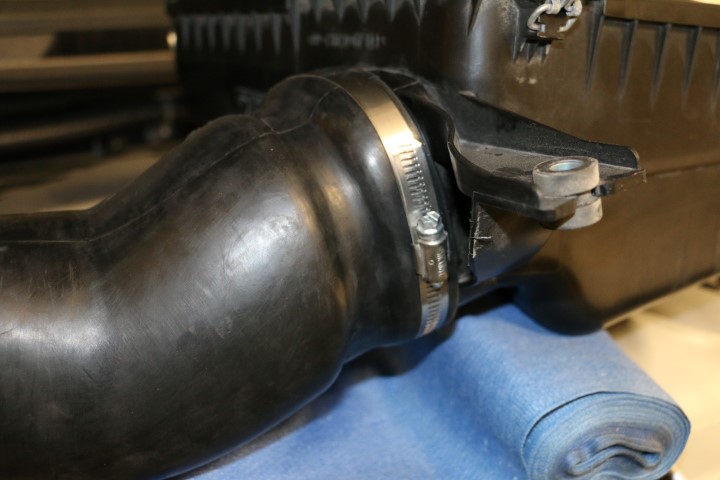
The hose mounting between the factory airbox and snorkel body was giving us some fits so we ended up warming it up to make the rubber more pliable. That did the trick and it slipped tightly onto the factory airbox and did the needed contorting to adapt to the snorkel body.
The snorkel is just part one of the waterproofing process, I'll be using the ARB Differential Breather kit (part# 170112) to tie the gear boxes up to the breather manifold which will be mounted up high in the engine bay. Some other considerations on the snorkel install can be found in a Tacoma Magazine article I wrote here.
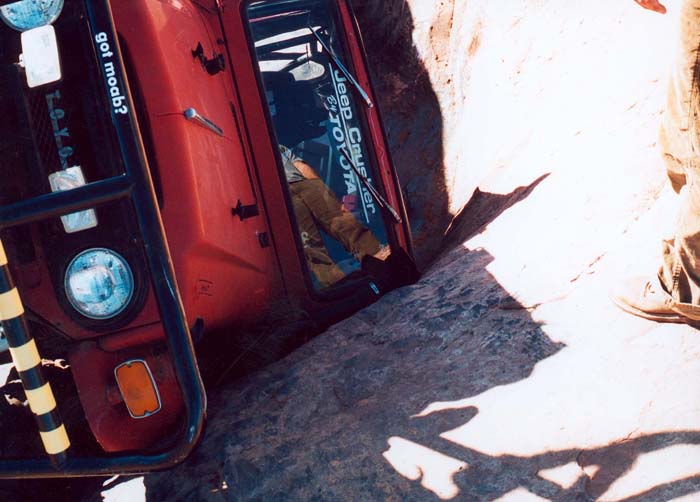
One last pic to echo my earlier genuine Safari Snorkel comments. My buddy Greg laid his FJ40 on it's side in a Moab hot tub in the late 90's. He was sure the snorkel was going to be cracked. Nope, flexed right back into shape. 15 years later and that snorkel still looks and functions great on Greg's daily driver FJ40, Safari Snorkel for the win.
Time has been scarce this winter as I've been busy with work, play and other projects (finally making some headway on the Old Lady's 66' FJ45 build) but we had a few minutes of down time last week during the holidays and more importantly, the 200 wasn't buried in snow. This thing has needed brakes since day one, in fact I commented on the warped rotors to the seller (husband) and his reply was that his wife hadn't mentioned a thing about it. I laughed and said "they never do". They were not horrible but when braking at 60+ mph hour speeds there was definite shimmy that needed to go away. I had conceded to using stock OEM rotors and our aftermarket AISIN pads (same as OEM other than box color and price) but I started investigating higher performance options even before I had ordered the first part for the build. Performance 360 kept popping up on my radar and we had been impressed by a set we recently installed a customers FZJ80, so why not give them a go?
I chatted with the gents at Performance 360 and things snowballed, the next thing I know we had a full stock order worked out, all of their front and rear LC applications. We ordered most in the native zinc/silver coloring but I did snag a front and rear set of drilled and slotted rotors with a black coating for the 200. While the front wheels were of off to swap rotors, it was also perfect time to install Spidertrax 1.25" wheel spacers. I hadn't included these in my original build parts list but following the suspension and wheel/tire install, I felt the front end needed a tad more width. Many have reservations about wheel spacers and a number of diatribes have been offered about them one way or the other. I've been running them for a long time on my 100 and other rigs previous to that, I've got customers who have been running them for 10+ years. My diatribe, a quality spacer, properly installed and periodically maintained is a non-issue. Your results may vary so take it for what it's worth. Rotor's on later model Land Cruisers are super cake to do, like 2 bolts on the caliper, slip the old rotor off, the new rotor on and you're done. We knocked out the fronts rotors and spacers and went back to work on paying projects.
Front Performance 360 drilled/slotted rotor & Spidertrax spacer
This afternoon offered a bit of shop time to finish up rotor upgrades, we swapped the rear, inspected and adjusted the park brake and snugged it all back together. The rear is also a slip-fit rotor but the caliper assembly has a couple of additional bolts you have to deal with but nothing major. The brakes weren't the only shudder I wanted to resolve, both side mirrors had an annoying shake at highway speeds. Toyota is well aware of this and offers a repair "kit" to fix the issue. The kit consists of 3 new screws that incorporate a lock-washer and flat washer rather than the original integrated flat washer. It's a 5 minute job to swap them out and as the bottom mirror trim is likely to break when you access the screws, they include that too. If your 200 Series mirrors are wiggly, check out the Mud thread that includes a copy of Toyota's Technical Service Bulletin (TSB) and the needed part numbers for repair.
Rear Performance 360 drilled/slotted rotor
So, what next? Drawers would be nice to get tackled but I wasn't feeling that energetic, the rear bumper would have to wait until I had more time. Snorkel it was. The 200 Safari Snorkel is very straightforward, the instructions are complete and they've made some pretty nice changes to the kit comp. Now, allow me a minute to preach if you will. There are a bunch of knock-off snorkels hitting the market that are nothing short of a direct copy of the Safari Snorkel. We know them well, as we move a fair number of snorkels each year we get suited by companies trying to sell us kits and through that process we can learn a bit about their R&D (or lack thereof), their customer service, tech support, spare parts availability, etc. I fully know that Safari Snorkel's cost 2-3x that of a no-name Alibaba solution but I also know I can call them if something doesn't fit, I can get a spare part if something fails in the future and I know their plastic is going to last 20+ years in the sun, in the snow and even on the rocks. Rant off, picture time!
Before
Template attached, holes marked
Holes
Bigger Holes
Finished!
Some detail shots of the process.
Closeup of the template and fender marking
A-Piller marking and drilling using a step-drill
The hose mounting between the factory airbox and snorkel body was giving us some fits so we ended up warming it up to make the rubber more pliable. That did the trick and it slipped tightly onto the factory airbox and did the needed contorting to adapt to the snorkel body.
The snorkel is just part one of the waterproofing process, I'll be using the ARB Differential Breather kit (part# 170112) to tie the gear boxes up to the breather manifold which will be mounted up high in the engine bay. Some other considerations on the snorkel install can be found in a Tacoma Magazine article I wrote here.
One last pic to echo my earlier genuine Safari Snorkel comments. My buddy Greg laid his FJ40 on it's side in a Moab hot tub in the late 90's. He was sure the snorkel was going to be cracked. Nope, flexed right back into shape. 15 years later and that snorkel still looks and functions great on Greg's daily driver FJ40, Safari Snorkel for the win.
washington taco
Explorer
Fantastic build thread! You've got me thinking Land Cruiser over a GX 460 now!!
JduRunner
Observer
Kurt,
I was curious on the choice for SPC upper control arms. In the 4Runner community they have had a nasty reputation for bushings not lasting very long (several revisions to correct) and even more frightening is the failures of the welds connecting the arms to the bushing sleeves. Has this not been a problem with the Land Cruiser models? A few of these instances have been on trucks that aren't wheeled very hard or happened during street driving.

I was curious on the choice for SPC upper control arms. In the 4Runner community they have had a nasty reputation for bushings not lasting very long (several revisions to correct) and even more frightening is the failures of the welds connecting the arms to the bushing sleeves. Has this not been a problem with the Land Cruiser models? A few of these instances have been on trucks that aren't wheeled very hard or happened during street driving.
toylandcruiser
Expedition Leader
Land cruiser. Best 4x4xfar
Sadly I don't think I was able to find the perfect size but the 285/75R17 BFG AT KO2 All Terrain tire was close enough. I'd have preferred it to be 1/2" larger OD and perhaps 1/2" wider too.
Is that size a typo? I didn't think that size was offered as a BFG AT.
texascrane
Adventurer
Kurt,
I was curious on the choice for SPC upper control arms. In the 4Runner community they have had a nasty reputation for bushings not lasting very long (several revisions to correct) and even more frightening is the failures of the welds connecting the arms to the bushing sleeves. Has this not been a problem with the Land Cruiser models? A few of these instances have been on trucks that aren't wheeled very hard or happened during street driving.
View attachment 322074
I've got the SPC UCA's on my 100-series. I'm aware of the issues with the 4runners but I've never heard of any failures on the land cruiser UCAs.
cruiseroutfit
Supporting Sponsor: Cruiser Outfitters
Kurt,
I was curious on the choice for SPC upper control arms. In the 4Runner community they have had a nasty reputation for bushings not lasting very long (several revisions to correct) and even more frightening is the failures of the welds connecting the arms to the bushing sleeves. Has this not been a problem with the Land Cruiser models? A few of these instances have been on trucks that aren't wheeled very hard or happened during street driving.
View attachment 322074
SPC has updated their bushings over the years and their current production stuff is quite robust. That cracked weld is troubling, I've not seen that to be an issue on any of the LC applications and these are getting quite abused by users out there. Now, SPC has several production facilities for these both in the U.S. and abroad. I'll have to peak at where the different arms are made.
JduRunner
Observer
SPC has updated their bushings over the years and their current production stuff is quite robust. That cracked weld is troubling, I've not seen that to be an issue on any of the LC applications and these are getting quite abused by users out there. Now, SPC has several production facilities for these both in the U.S. and abroad. I'll have to peak at where the different arms are made.
I'd be curious to know about the production facilities and where the different models are produced! Thank you for answering my question!