You are using an out of date browser. It may not display this or other websites correctly.
You should upgrade or use an alternative browser.
You should upgrade or use an alternative browser.
Project T100: "Baja Explorer Ver. 2"
- Thread starter G100
- Start date
Regcabguy
Oil eater.
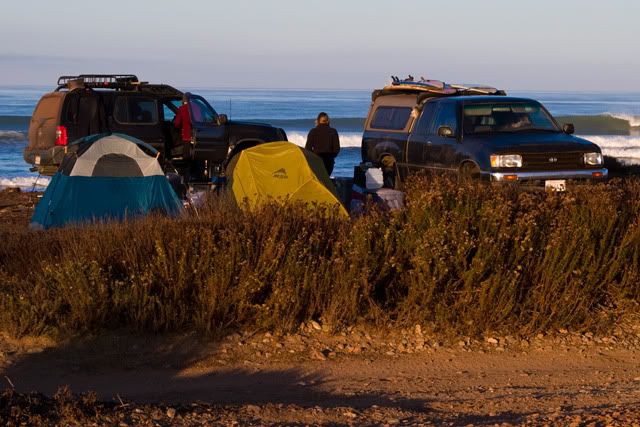
Nice work and writeup. Longboards entered into the equation present a whole different set of issues. Looks like you've solved it. I've got a lot at Casas. Beware of camping south of there anymore. Many,many people have been robbed in that area. Decades ago,I used to camp along that stretch when the only other traffic was a couple of fishermen in a stepside Chebby offering to sell lobsters to us. Keep surfing! P.S Love the avatar.So here are some pics from "Baja Mission Numero Uno"
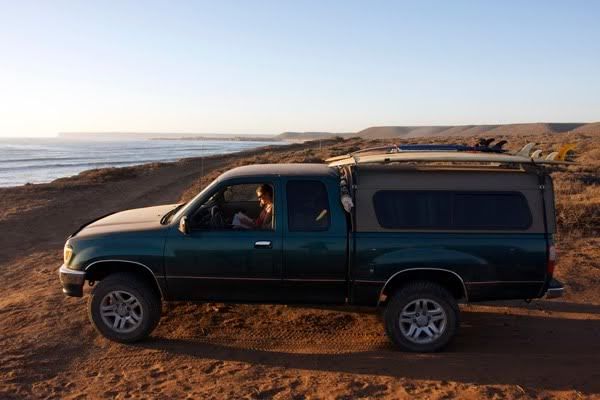
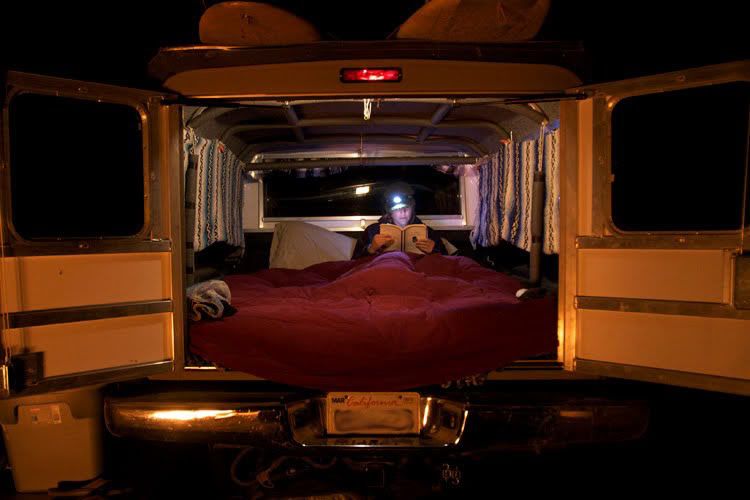
I had to go down and test out the truck since I got the camper shell. We just went down for a few days and got some waves. I built some temporary surf racks, unfortunately they ended up scratching the heck out of my shell . . . not using them again. The truck handled great, we drove in some real soft, deep sand and it drove through it perfectly, something I used to get stuck in with my last truck. I made a mattress (post some pics of it later) for the back that has 1.5" of memory foam on top of 2" of firm evlon foam. . . ahh, my wife and I slept like babies, plus this bed is around 6" wider then my last truck, so nice. All in all the trip went great.:costumed-smiley-007
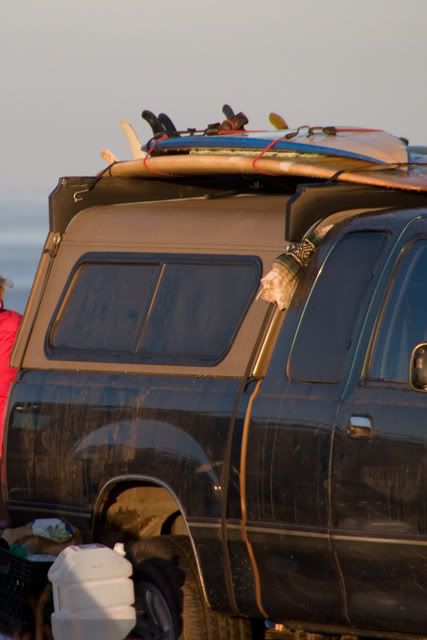
Here is a close up of the racks, I thought I would be using them for a while until I make my roof rack, so I spent a little time making them nice, well that was a big waste of time. They are made of 2x4s that I cut to the contour of the shell, then I put a big eye bolts on the sides pointing down. I covered the sides with some scraps of black formica that I had, as sort of a water proofer. I cut up one of those cheap blue foam sleeping pads and glued it on the bottom used as the padding between the shell and the racks, obviously that didn't hold up. I then cut up a water noodle pool toy to use as the padding for the top that the boards sit on. I covered this with strips of that black gorrilla tape. The racks were then held on to the shell with ratching tie down straps that went from the frame up to the eye bolts. I then just used some bungees and some little eye screws to hold the boards down. I must say they worked very well . . . if you don't mind some scratches on your roof. You may also notice my truck boot mexican style: a rolled up mexican wool blanket . . . worked great, way better then I had expected, stayed in the whole time and did its job, But a truck boot is next on my list of things to make.
G100
Adventurer
Hey MotoDave,
Did you crank up your torsion bars when you put on your 33s, and if so, hows the ride difference? I am a little weary of cranking them up cause I feel like my ride is stiff enough, wouldn't want to go much stiffer. Just checked out your trip to pilot rock, looks like fun trail, I might have to try it out when it gets a little drier.
Did you crank up your torsion bars when you put on your 33s, and if so, hows the ride difference? I am a little weary of cranking them up cause I feel like my ride is stiff enough, wouldn't want to go much stiffer. Just checked out your trip to pilot rock, looks like fun trail, I might have to try it out when it gets a little drier.
")
Overland Hadley
on a journey
Nice camper!
G100
Adventurer
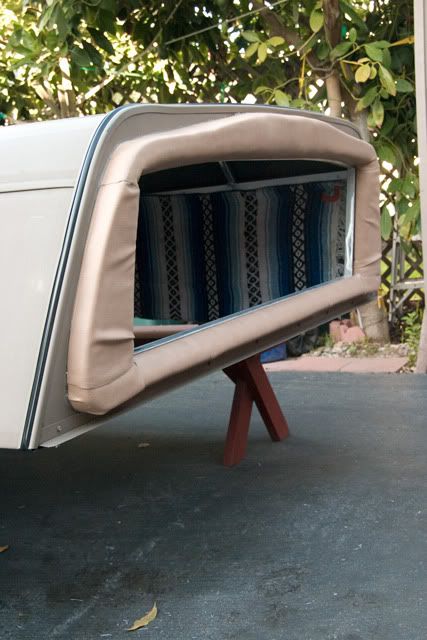
The Camper Shell Boot
Alright, so here is what i did to seal out the elements between my truck and my shell. I was researching this before I even got my shell, trying to figure out what I was going to do. I didn't want to put an acordian type boot because I feel they are a little cheezy, and they don't really block out road noise. I want something that when the rear window is down, it is not noisy and almost feels like the whole truck is one big room. I was thinking about a compression style boot but not like your traditional one. In my search I found on a thread, I forget where, it was posted by someone who worked for Four Wheel Campers and it was exactly like what I was imagining in my head. This is what I found.
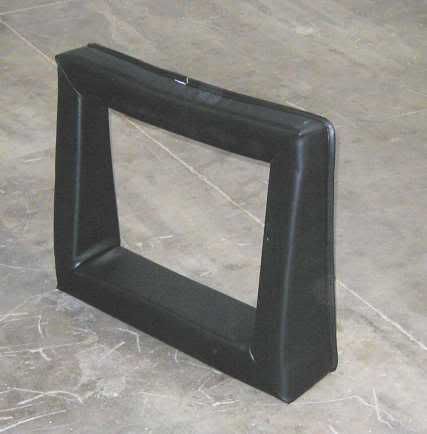
I wanted something just like this only a lot longer. I emailed the guy to see if they could custom make me one, he told me to contact someone else or something I don't remember. So I figured I was going to have to make it myself.
So Here is what I did:
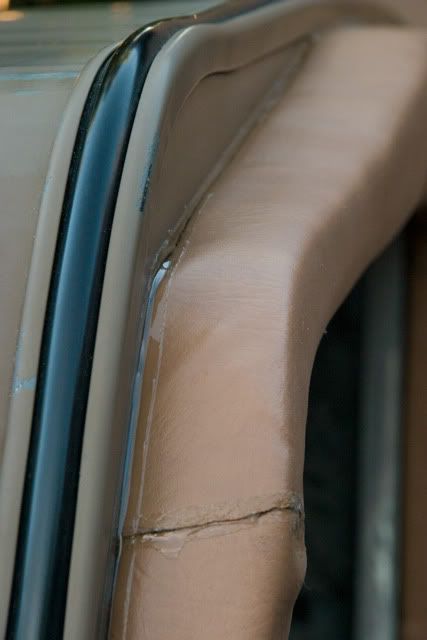
The first thing that needed to be done was some welding on the back wall of the shell. I need to make some "tabs" to be able to screw through to be able to hold the boot in place. I also needed to put a arched cross member on the top part of the window to match the arch in the truck window and more importantly so that the top corners of the boot are a little wider (if I didn't do this, the corners would have been less than 1" wide).
Here is a pic after the parts were welded in:
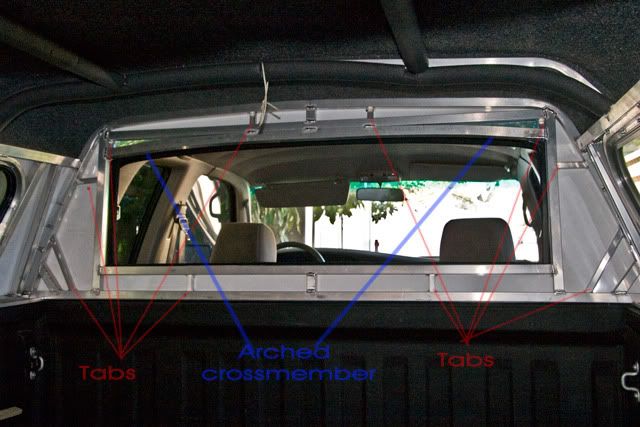
The "tabs" are just pieces of aluminium c-channel around 1/16" thick.
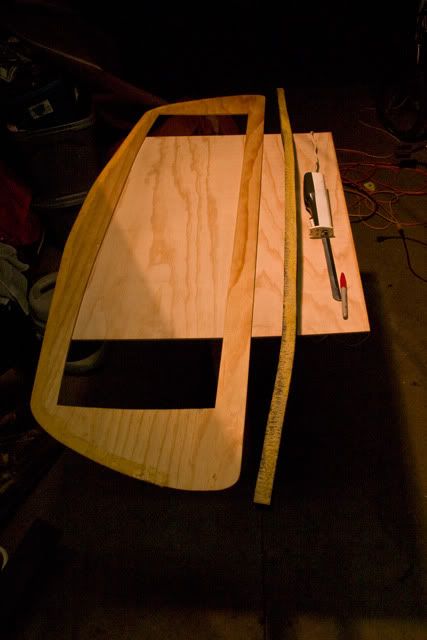
Next I made a backer board for the boot out of 1/4" plywood. This will be the piece screwed onto the back wall of the shell. I water-proofed it with a homemade recipe I found on a boating forum. All it consisted of was heavily diluting marine polyester resin with acetone, I put about four coats of this on, it seemed to work well.
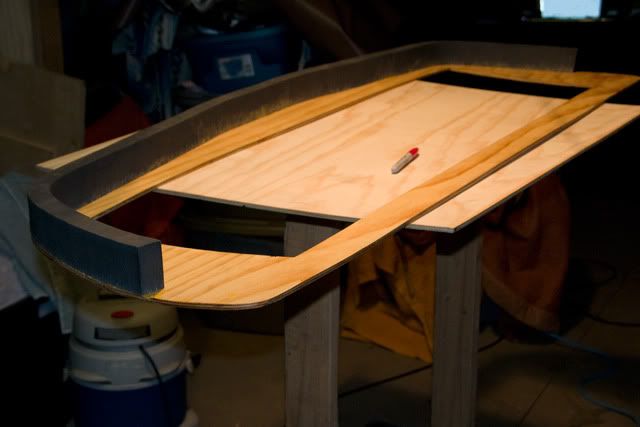
Here is a picture of the backer board getting ready to attach some foam.
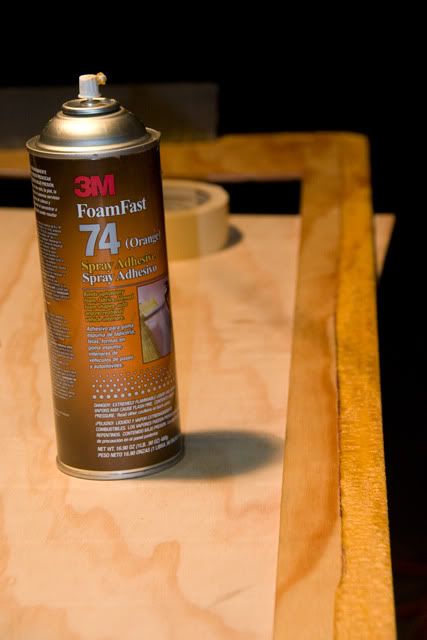
For the foam that I attached to the plywood, I started by doing the outer edge with 1" thick closed cell foam cut into 2" strips. I got it from foamonline.com which I just happen to live about 20 miles away so they guy there helped me figure things out a little. I attached these pieces with some 3M 74 spray adhesive, which worked great, pretty expen$ive though.
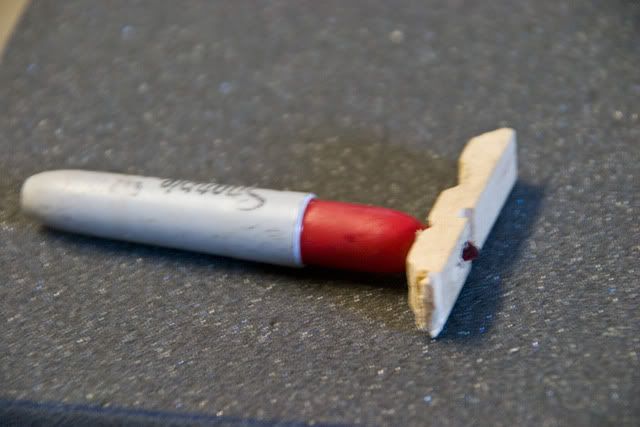
After I got my outer shell of closed cell foam glued on, I put it on my shell with some clamps to make sure it was in the right place, then screwed it in place from the inside of the shell. I then marked the contures that need to be cut with a nifty little tool I made out of half a clothes pin and a sharpie.
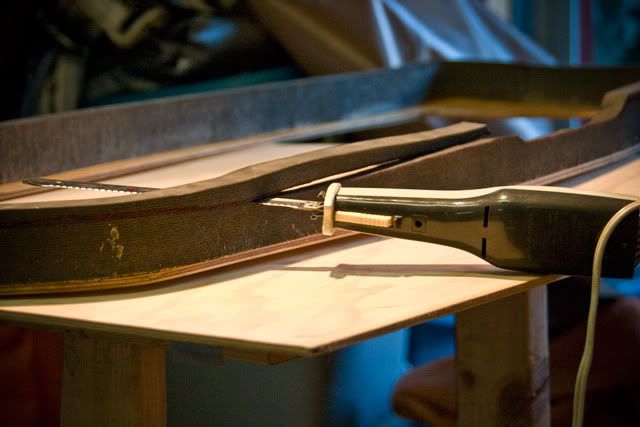
I cut the closed cell foam with a old turkey carver, it worked perfect I can't imagine anything else working any better it cuts like a hot knife through butter.
Alright, so here is what i did to seal out the elements between my truck and my shell. I was researching this before I even got my shell, trying to figure out what I was going to do. I didn't want to put an acordian type boot because I feel they are a little cheezy, and they don't really block out road noise. I want something that when the rear window is down, it is not noisy and almost feels like the whole truck is one big room. I was thinking about a compression style boot but not like your traditional one. In my search I found on a thread, I forget where, it was posted by someone who worked for Four Wheel Campers and it was exactly like what I was imagining in my head. This is what I found.
I wanted something just like this only a lot longer. I emailed the guy to see if they could custom make me one, he told me to contact someone else or something I don't remember. So I figured I was going to have to make it myself.
So Here is what I did:
The first thing that needed to be done was some welding on the back wall of the shell. I need to make some "tabs" to be able to screw through to be able to hold the boot in place. I also needed to put a arched cross member on the top part of the window to match the arch in the truck window and more importantly so that the top corners of the boot are a little wider (if I didn't do this, the corners would have been less than 1" wide).
Here is a pic after the parts were welded in:
The "tabs" are just pieces of aluminium c-channel around 1/16" thick.
Next I made a backer board for the boot out of 1/4" plywood. This will be the piece screwed onto the back wall of the shell. I water-proofed it with a homemade recipe I found on a boating forum. All it consisted of was heavily diluting marine polyester resin with acetone, I put about four coats of this on, it seemed to work well.
Here is a picture of the backer board getting ready to attach some foam.
For the foam that I attached to the plywood, I started by doing the outer edge with 1" thick closed cell foam cut into 2" strips. I got it from foamonline.com which I just happen to live about 20 miles away so they guy there helped me figure things out a little. I attached these pieces with some 3M 74 spray adhesive, which worked great, pretty expen$ive though.
After I got my outer shell of closed cell foam glued on, I put it on my shell with some clamps to make sure it was in the right place, then screwed it in place from the inside of the shell. I then marked the contures that need to be cut with a nifty little tool I made out of half a clothes pin and a sharpie.
I cut the closed cell foam with a old turkey carver, it worked perfect I can't imagine anything else working any better it cuts like a hot knife through butter.
G100
Adventurer
The Camper Shell Boot (cont.)
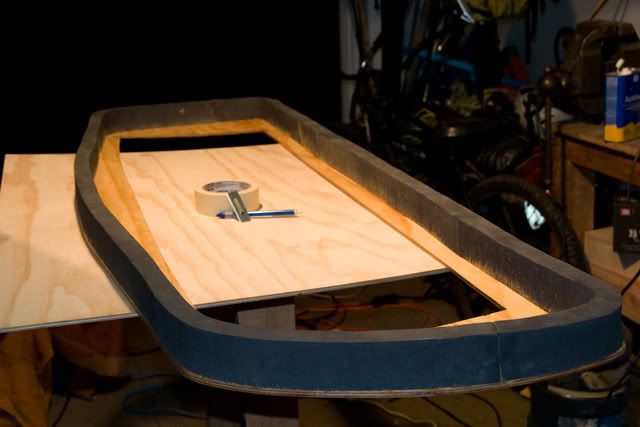
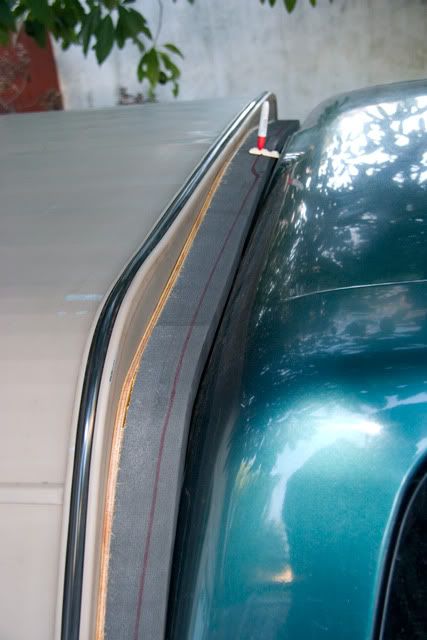
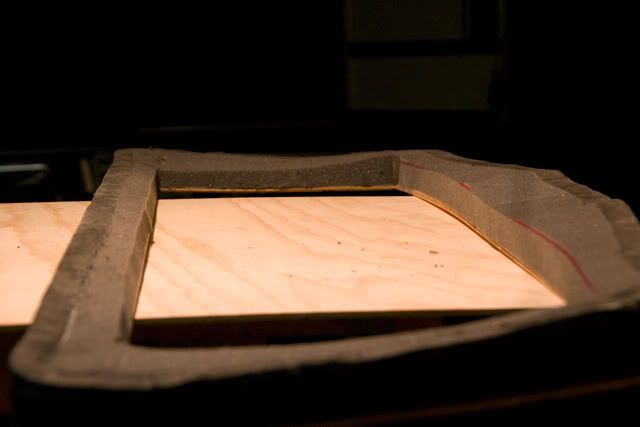
Here it is with the contour cuts:
You'll notice I put a pitch on the top so that water will run down and off the sides.
Once I got the outer shell of the boot fitting nicely against the back of the truck, it did take some adjustments, I started fitting the filler foam in. The filler foam is the "supreem" type of foam from foam on-line. The guy there told me it was moisture and mildew resistant so i got it. I ran out of the 3M 74, so I glued the rest down with 3M 77.
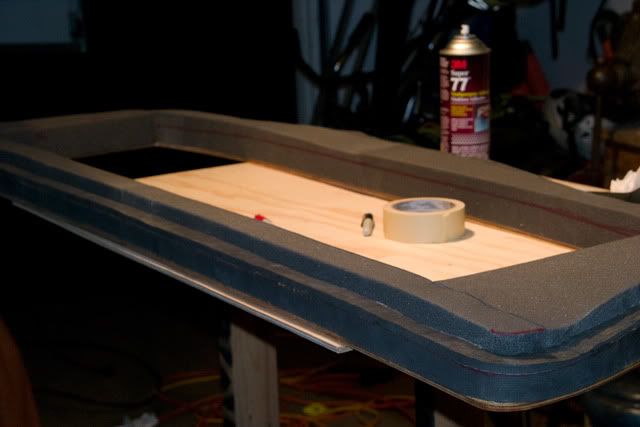
Once all the filler pieces were glued on I had to trim them to the contour of the truck aswell.
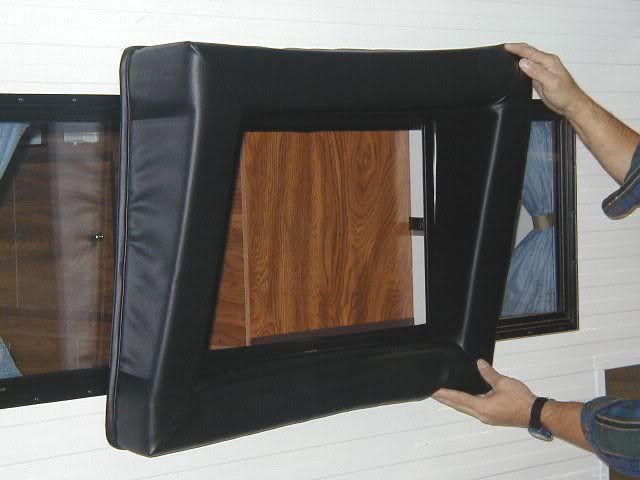
Now that the inside of the boot is built the fun part of covering it begins. I got some marine grade UV resistant vinyl material at a fabric store. I was planning on getting black but they didn't have it, so I got the color closest to the color of the shell. Covering this wasn't easy, it took me a couple nights to finish it. I wanted to use the least amount of pieces possible so there wouldn't be too many seams. I started on the bottom and overlaped my seams as I worked my way up so that the seams were pointing down. I ended up doing it in 6 pieces.
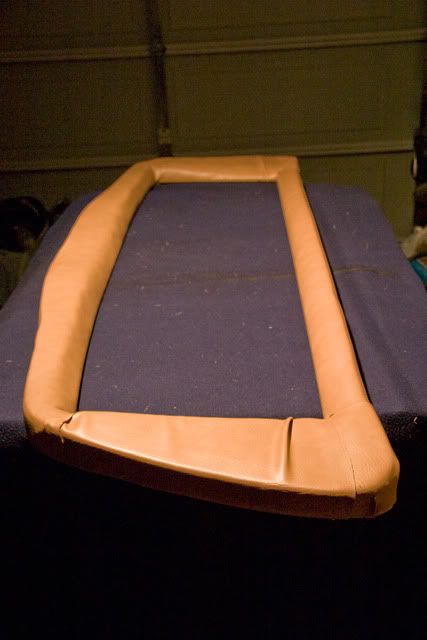
I used a staple gun to fasten it into the plywood.
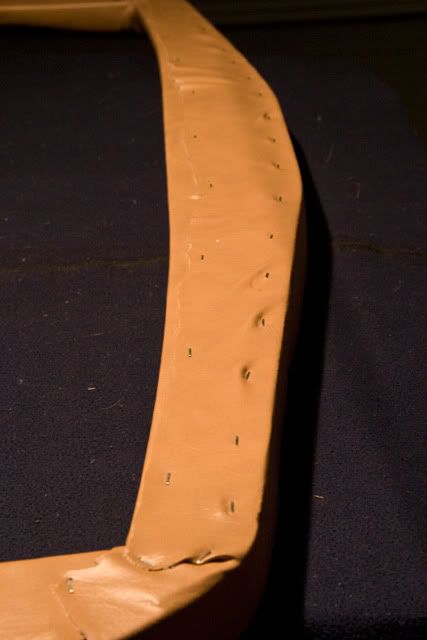
I glued all the seams with a clear marine adhesive made by GOOP, it is a lot like silicone but more perminate and is supposed to be UV resistant.

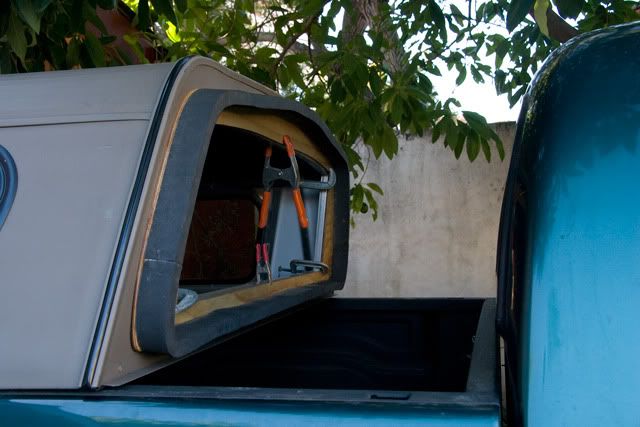
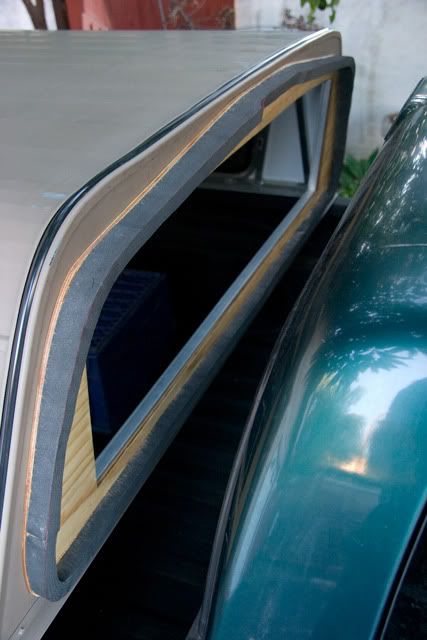
And here it is attached to the shell:
I ran a bead of the GOOP marine adhesive along the seam between the shell and the boot aswell to make that seam water-proof. I will later put a bead of some regular silicone on the other seam to make the connection completely water-proof
I will post pictures of it all put together as soon as possible. The boot made re-installing the shell a bit tougher, having to compress the boot against the truck while getting all the bolt holes aligned properly. Once it was all put together I ran a super small thin bead of some normal silicone to seal the boot to the truck, this way I can still remove the shell if i need to. Oh and for you who are wondering I took a hose to it and didn't get a single drip.
Here it is with the contour cuts:
You'll notice I put a pitch on the top so that water will run down and off the sides.
Once I got the outer shell of the boot fitting nicely against the back of the truck, it did take some adjustments, I started fitting the filler foam in. The filler foam is the "supreem" type of foam from foam on-line. The guy there told me it was moisture and mildew resistant so i got it. I ran out of the 3M 74, so I glued the rest down with 3M 77.
Once all the filler pieces were glued on I had to trim them to the contour of the truck aswell.
Now that the inside of the boot is built the fun part of covering it begins. I got some marine grade UV resistant vinyl material at a fabric store. I was planning on getting black but they didn't have it, so I got the color closest to the color of the shell. Covering this wasn't easy, it took me a couple nights to finish it. I wanted to use the least amount of pieces possible so there wouldn't be too many seams. I started on the bottom and overlaped my seams as I worked my way up so that the seams were pointing down. I ended up doing it in 6 pieces.
I used a staple gun to fasten it into the plywood.
I glued all the seams with a clear marine adhesive made by GOOP, it is a lot like silicone but more perminate and is supposed to be UV resistant.
And here it is attached to the shell:
I ran a bead of the GOOP marine adhesive along the seam between the shell and the boot aswell to make that seam water-proof. I will later put a bead of some regular silicone on the other seam to make the connection completely water-proof
I will post pictures of it all put together as soon as possible. The boot made re-installing the shell a bit tougher, having to compress the boot against the truck while getting all the bolt holes aligned properly. Once it was all put together I ran a super small thin bead of some normal silicone to seal the boot to the truck, this way I can still remove the shell if i need to. Oh and for you who are wondering I took a hose to it and didn't get a single drip.
Haggis
Appalachian Ridgerunner
Very imaginative solution and well executed.
You've givem me something else to consider as I have been thinking of some sort of similar seal for my DC Tundra. I hadn't quite worked out how to mate the large rear window with the slider in the front of my cab. Again, nice job!
You've givem me something else to consider as I have been thinking of some sort of similar seal for my DC Tundra. I hadn't quite worked out how to mate the large rear window with the slider in the front of my cab. Again, nice job!
AlwaysExplr87
Member
Dude your ingenuity and imagination are very impressive. I love this build and the fact your using your brain instead of your wallet. I'm probably going to steal the boot idea and eventually that rear window will find its way into my taco. Keep us updated on how well the boot works.
MotoDave
Explorer
Hey MotoDave,
Did you crank up your torsion bars when you put on your 33s, and if so, hows the ride difference? I am a little weary of cranking them up cause I feel like my ride is stiff enough, wouldn't want to go much stiffer. Just checked out your trip to pilot rock, looks like fun trail, I might have to try it out when it gets a little drier.
Sorry for not getting back to you earlier. I didn't crank the torsion bars at all when I put on the 33x10.5" tires.
I think you're local to me, if you want to you're welcome to test fit the tires on your truck some time.
G100
Adventurer
Sorry for not getting back to you earlier. I didn't crank the torsion bars at all when I put on the 33x10.5" tires.
I think you're local to me, if you want to you're welcome to test fit the tires on your truck some time.
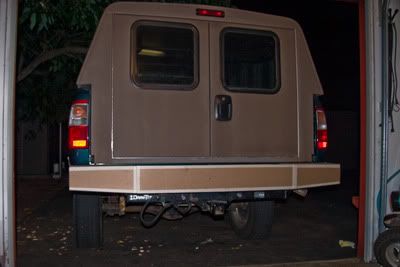
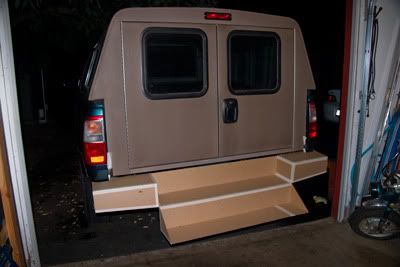
MotoDave thanks for the offer, thats very cool of you, maybe I'll take you up on it some day, but from what everyone is reporting, it sounds like I don't have much to worry about fitting 285/75 R16s. Unfortunatly unless I find a really good deal on Craigslist (I check everyday), I think tires are going to have to wait until the budget replenishes after I finish my next modification, its a big one and is going to take a long time, the rear bumper and roof rack. Although I really want tries, I need to get my truck a little more travel and camping friendly cause I'm planning on a three week trip in baja this summer. I'm starting with the rear bumper first which will lead right into the roof rack cause the vertical rack supports are going to bolt into the bumper. The rack will be similar in style to my dakota's. In fact I have already started working on the bumper, here is a sneak peak of my design.
jim65wagon
Well-known member
For the window slider, window seal and the potential of the rear bumper...I salute you, sir! Awesome job!
Overland Hadley
on a journey
:lurk:
Forum statistics
Members online
- TwinStick
- alanymarce
- sc94fzj
- Skinhyfish
- tloof55
- andrew.sullins
- supdies
- freedomproject
- Lhenecke
- Modeler
- Mtnladie
- ChasingOurTrunks
- Red90
- cug
- zip
- spacecowboy7777
- TouringSedan
- andrew.e.galloway
- 3IMOH
- One shot
- mark5280
- squarefoot
- Scooooooooop
- SDDiver5
- squid14
- 1965 Land Cruiser
- LivinAnAdvntr
- austastar
- kybray44
- mschnitger
- Nailhead
- Pacific Northwest yetti
- npstone
- BlueLantern
- Gargermel
- YukonMontanaTannerTrapper
- svmaple
- TacoSauce11
- syn0s
- RealTruck
- FJRanger
- Power Wagon Okie
- moorejames
- tecate
- Elkfitness
- destructomatt
- woodjacob23
- adventureeye
- Ultimark
- Jack Mac
Total: 519 (members: 62, guests: 457)