Simple kind of van, a 2006 e150 build thread.

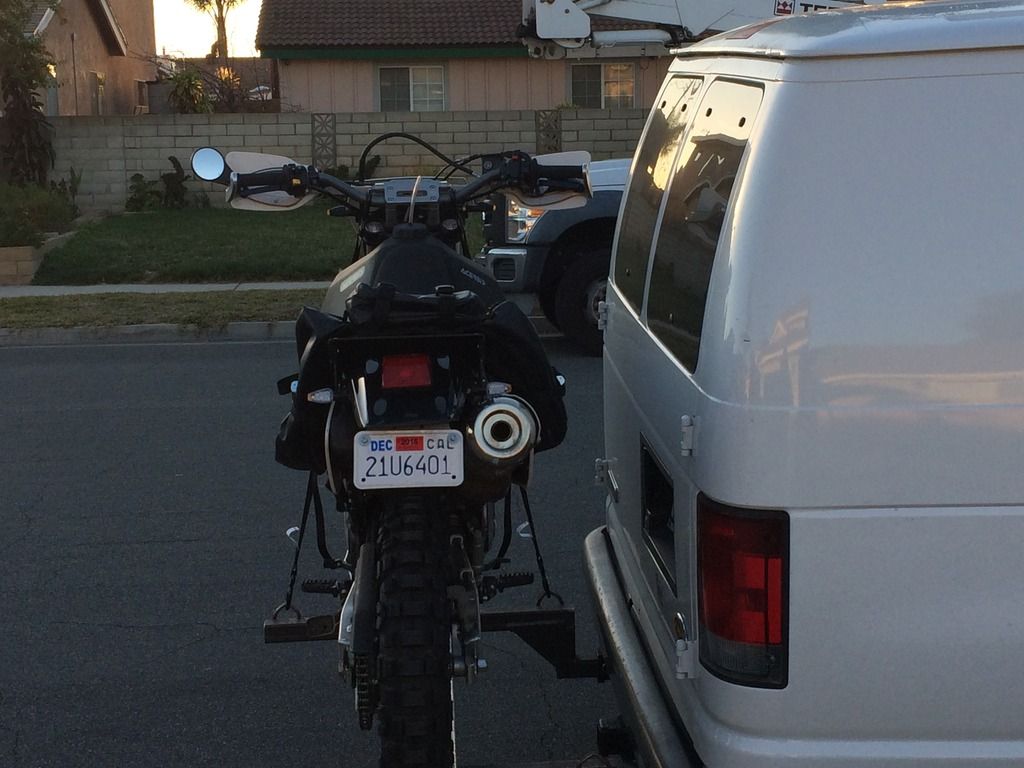
haven't made much forward progress on the van, did finally get a ramp to load the bike onto the hitch hauler its a bit long, so i have to cut it shorter, but i wanted to beta test putting the bike on so i could hopefully go ride this weekend......

looks almost like i knew what i was doing when i built it. i have to get another set of ratchet straps, and the thingy i got for stopping the forks from being squished is too long, i gotta get the short model. otherwise, this thing looks to me like it'll do the business.

D31AFC49-0757-4D62-9922-E363CEA9D078_zps5uvhsju6.jpg


E34CBE58-BC4A-41E2-8C61-1F13A6774A6A_zpsvj5j3qaw.jpg
 

Corneilius

Adventurer
Cool bed design, I plan on something very similar. Plastic endcaps for that square tube are cheap and really give it a finished look. Should be able to get some online if no one local to you has them.
 
Cool bed design, I plan on something very similar. Plastic endcaps for that square tube are cheap and really give it a finished look. Should be able to get some online if no one local to you has them.

yeah, thats in the plan for all the "furniture" inside the van, cap the ends with the plugs. my local metal supply has em, just don't know how many i need until its all finished.

plan for the rest of the interior is metal framed with wood drawers/shelves/doors. its just a lot easier for me to frame out in metal.
 
got a bunch more interior fabrication done this week, the main structures of everything are constructed, as well as finish welded. this week i have to buff off the welds with the flapper wheel, and put all the tabs that the ply wood will be screwed to.

heres the pics.

cabinet behind the driver seat will house the cooler in the bottom, and be a "pantry" up top. the door for the pantry will flip down and form a sort of counter space.

bed is the driver side rear, will have 2 drawers under the forward portion, and access under the back rear for tools, straps etc.

passenger side box will have the battery in the front lower compartment with a water tank/jug above that. the rest will all be storage.

15935CCB-D2D5-4BF5-A98E-3E3ECEAFF8BE_zpsn1doqa6z.jpg


E6C63DE8-A6CE-4452-A02E-6759ABC07678_zpsrjfsay6j.jpg


CD17AA58-5FE8-4EC2-A876-CC8A4699B621_zps2meevwug.jpg


3BA42A32-EEAA-4654-B389-B535E532374E_zpswnqixfat.jpg


02EF6191-1FB0-4C6A-A652-C7EACEF00BB7_zpsnkcxt6j5.jpg


B48856D7-79FE-4424-86FD-50FAFB7E530D_zpsyskqdmd4.jpg
 
Last edited:
Looking good, what are the plans to skin it? Maybe i glazed over it.

Frame will be exposed, still have to add all the tabs to screw in the Baltic birch panels. Color of the bars will be industrial grey powdercoat. Some of the panels will be covered in carpet/hull liner, some will be polyurethane on the birch. Tops of things will be Formica, inside of the pantry will be Formica as a table surface.
 
not much progress this week as of yet, bought a bunch of weld tabs, buffed off some welds with the flapper wheel, but I'm swamped at the shop and can't make space during the evenings for doing my stuff, so i have to take it as i can.

i did order a bunch of things for the electrical side of things, to set up a dual battery system as well as the fuse panel and switch panel.

heres a list:

6 gang fuse panel : http://www.amazon.com/gp/product/B000THQ0CQ?psc=1&redirect=true&ref_=oh_aui_detailpage_o01_s00

ANL fuse holders: https://www.amazon.com/gp/product/B001FXL4Q0/ref=oh_aui_detailpage_o01_s00?ie=UTF8&psc=1

80 amp ANL fuses: https://www.amazon.com/gp/product/B00DX64LZI/ref=oh_aui_detailpage_o01_s00?ie=UTF8&psc=1

6 gang switch panel with circuit breakers: https://www.amazon.com/gp/product/B00SLPWWX4/ref=oh_aui_detailpage_o02_s00?ie=UTF8&psc=1

Battery isolation relay: https://www.amazon.com/gp/product/B001FQL43U/ref=oh_aui_detailpage_o00_s00?ie=UTF8&psc=1

I'm going to be following this EXPO write up here for making the dual battery setup: http://www.expeditionportal.com/forum/threads/77503-How-to-make-a-cheap-isolated-dual-battery-setup-for-50

i did not buy terminals and cable/wire as i should have most of that stuff already, or will get from some of my local suppliers.
 
i missed taking some photos of the finish welding, and welding all the tabs to hold the wood panels in place, there was a lot of them, like 60+ but I'm past that part now, and no going back, but were getting down to "crunch" time, as i have a couple desert trip coming up soon, and id like to sleep in my van vs a tent (back hates the floor anymore)


getting into to the wood portion of the rear bed and cabinet buildout.

bought (4) 5'x5' baltic birch "1/2" which is really 12mm.

F58EEF79-1B7C-4E0A-9D56-1D1FE28A3A00_zpsfvwwoedv.jpg


my idea was to cut slats to 2 1/2" wide by 27" long to use as bed slats, so we got to cutting, and made 31 of these ********'s 31 of them equals roughly the length of the bed at 78"

677420D8-6642-4F08-A1C1-926D34525BAB_zps9nkuxr2p.jpg


but when pressure applied, the wood delaminated.
4F8D609D-B328-40BF-A84E-12F7785FA20B_zpsp9tnxw6c.jpg


so they go here, which sucks, cuz it was like an hour of saw work, plus the $$ for the wood, but no sense keeping it, i won't use it for anything.

CA657966-4BE8-4215-A597-8BAE9321A5A1_zpsscn9tvzw.jpg


so i busted out the original idea (thanks ikea)

0386BD1E-69AC-44E1-940F-8851930677BC_zpsrlqg5v7i.jpg


laid them all out and laid on them, sat, and pushed on them, no breaking, so they'll work swimmingly. don't even have to cut them to length, they're close enough.

D8B070FB-7303-4E79-A57C-C3F901BF6B17_zpsxtvovgvd.jpg


then we got to work cutting the rest of the panels, all the boards to fit in the recesses of the square tubing.

E1620FBD-ABAB-43D7-9C91-D9CF188BC331_zpswrlpbsyt.jpg
 

Forum statistics

Threads
185,902
Messages
2,879,575
Members
225,581
Latest member
vertical.dan
Top