Switch's 2022 Tacoma Access Cab Build

Switch

Observer
Continued...

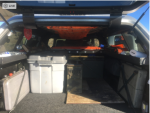
4th ammo can and camp chairs over wheelwells
1672454412438.png

Sleeping bags inside plastic box that we use as a foot locker outside the truck
1672454487771.png

Folding table goes across the top of the ammo cans. Then the 1st cooler (the refrigerator)
1672454459765.png

2nd cooler (the freezer): we start with 10 Kg of dry ice so everything is super frozen. Each morning we move dinner from the "freezer" to the "fridge" so we don't waste the low entropy.

1672454733981.png

Last is the propane we use for the stove.

1672454807783.png

Last is the rubberized mat we use below the tailgate
1672455254372.png

1672455350530.png

It takes about 10 minutes to pack everything up.
 

Attachments

  • 1672454300772.png
    1672454300772.png
    868.7 KB · Views: 7
  • 1672454399189.png
    1672454399189.png
    858.3 KB · Views: 6
Last edited:

Switch

Observer
I've been working on a 9-switch panel to control each exterior light separately using the square cubby that was collecting toothpicks and loose change.

1672539895647.png


I can fit nine 16mm switches in that location. But there is no room for labels. So I'm using
this location for exterior lights only. One for each light on the truck (arranged geometrically):

Top center: Front LED light bar
Top corners: Left and right cornering lights on the bumper
Sides: Left and right side lights on the A Pillar
Rear corners: Left and right side lights on the ARE cap
Rear center: reverse light in bumper
Center: Rock lights


1672541598158.png


I designed this using FreeCAD software and printed with my Prusa mk3s 3D printer:

1672539952412.png

I tied this panel into my existing dashboard switches that controlled sets of lights. Here's a video testing the dashboard integration.

As I press each dash switch:
Front lights: Light bar in bumper and left and right cornering lights
Side lights: 2 on A-pillar and two on truck cap
Rock lights
Reverse lights

Each switch indicates the light (or set of lights) that have been powered on.


My build for this project is over on TacomaWorld.
 
Last edited:

Switch

Observer
When I started adding electrical accessories to my truck, I didn't have a "master plan" and in hindsight that was a mistake. I could have saved some time and materials if I had mapped out what I wanted and built to that plan. The problem is that may "needs" evolved over time (which is just to say I didn't plan ahead).

From my last build, I knew I would need a fuse/relay block in the engine bay. So I did that. But then I realized that many of my cab accessories could be powered from a fuse block located inside the cab rather than using up precious engine bay fuse/relay positions. So I added a fuse block inside the cab. As I looked to accessories in the truck bed and on the bumper, I realized I needed a fuse block in the taillight also.

I've posted about these various projects separately but I think I should try to summarize my entire electrical setup as it stands to date:

I have three fuse / relay locations:
1: Engine bay fuse /relay block
LED light bar in bumper​
Cornering lights​
A pillar lights​
Rock lights​
2: Cab fuse block
Power to switch panels​
Compressor​
USB plugs​
3: Taillight fuse block with three external waterproof relays.
Side lights on ARE truck cap​
Rear lights in bumper​
Lights inside ARE truck cap​
USB plugs​
12V cigarette plug​
DC/AC converter​

1673055556496.png

Note that the above is just a schematic to give you a general idea of what control wires go from one place to another. An important point are diodes (triangles in the drawing) on the circuits from switches that control multiple lights. For example the wires from the Dash Switch Panel for the Front Lights and Side Lights each have diodes to each relay they power to prevent back flow of power from switches that control individual lights.
 
Last edited:

Switch

Observer
Here's how the 45° flush mounted Baja Designed S1 cornering lights look installed. I had my doubts about these until I used last Friday night driving to my friends cabin. They illuminate the corners with light right where the LED Lightbar starts to fall off. Combined with the LED light bar, the front is illuminated a full l180° now.

1674440063171.png

1674440140671.png
1674440161078.png
1674440196630.png

For more information about cornering lights see
and
 
Last edited:

Switch

Observer
Thanks!

Here is a video showing the front LED light bar being turned on and then the cornering lights.


And pics of how the cornering lights widen the field of view.
View attachment 763769
View attachment 763770

Here's a demo video of my 360 degree lights


The side lights are deliberately less bright to be used when parked to provide lighting for the immediate vicinity. The front, cornering, and reverse lights are for driving conditions.
 

Switch

Observer
Today I installed a Redline Tuning 21-27015-02 Hood QuickLIFT.

I have to open my hood every time I rack/un rack my canoe, which is every weekend in the summer. This way my wife can work the front tie down while I'm standing on the rock sliders un strapping the canoe from the roof rack.

1681091265343.png

The installation was relatively straightforward except the pop rivets were unbelievably difficult to tighten.
1681091300022.png


1681091398373.png

It was good to learn that the struts did not interfere with my custom fuse/relay block

1681091372386.png


Then I used a small bungee to secure the hood rod so it wouldn't rattle anymore:
1681091463930.png
 
Last edited:

Switch

Observer
Last week we explored parts of Anza Borrego, Mojave, and ended up passing though Carrizo Plain on our return home. The wild flowers were good this year.
1681096788437.png

1681096806067.png
1681096823075.png
1681094209427.png

1681096836572.png

1681096852198.png

A couple of notes about our camping setup:

Sometimes we need to use our truck as a wind break. It helps to place the coolers and other gear along the side of the truck. And at night, I tuck the coolers under the frame /rock sliders to secure them from critters.

1681092370899.png


A small collapsible table with a 2'x4' plywood board to add surface area, a 2.5 gallon propane tank (which usually lasts a week or more), a Stansport 3 burner propane stove, an ABS board (to keep the table clean near the stove), a collapsible charcoal grill, a piece of rubber lined carpet (in case I drop something I'm cooking), water, charcoal in a waterproof canister, and (critter proof) ammo cans with dry food and cookware make up the kitchen. Also shown is extra fuel positioned as wind break and a multi purpose 18"x48" plywood board which has served as Domino playing surface/score board, end table by the fireside, sand ladder, and back board for a make-shift gurney.

1681092410135.png

I usually setup the kitchen so it is in direct sunlight in the morning. This helps me keep warm when I make breakfast.
 
Last edited:

Switch

Observer
Here's a project I've been putting off ever since I got my Brute Force HC Rear Bumper. With the mud flaps and part of the fender well plastic removed, mud gets pumped up between the bed and side body panel and also pumping mud and water on all of the wire conduit and other components that would normally be protected by those mud flaps. This makes for a chore to clean with a power washer

On the passenger side this area look like this:
1681451362775.png

On the Driver's side the gap between the bed and body does not have that cubby insert so it accepts even more mud and water.

My solution was to make a piece of 3/8" ABS plastic sheet to fill the space between the frame and body to keep mud and water from spraying between the bed and body.

1681451083465.png

I used the exiting body mount bolts to secure it in place
1681451205598.png


So it is basically a mud flap mounted horizontally.
 
Last edited:

Switch

Observer
Now that most of my performance and electrical upgrades are complete, I've turned my attention to storage inside the cab.

Glove Box:
I purchased this glove box divider:

$18 JKCOVER Compatible with Toyota Tacoma Glove Box Dividers Organizer 2016 2017 2018 2019 2020 2021 2022 2023 Accessories,Insert Box ABS Secondary Storage
JKCover glove box organizer


but quickly discovered that I can't put the factory manuals on the bottom shelf. And if I put them on the top shelf, there's no place to put the box of Kleenex™
:mad:
that we keep in the glove box.

So back to TAP Plastics...

We made this divider that is wide enough for the Toyota manuals on the lower shelf plus our bird book. And wide enough for a box of Kleenex on the top shelf.
1681622007565.png


1681622105923.png

5349817

Center Console:
For the center console I used Husky 6x6 containers to keep my stuff organized.
1681624026458.png

Here is the thread I started on what people put in their center console.

Then I added a custom hidden storage tray that mounts inside the arm rest list:
1681623353512.png

I designed this using FreeCAD software and printed with my Prusa mk3s 3D printer:

1681623386659.png
1681623416100.png

Then I realized I could mount commonly used items below the hidden storage tray:
1681625609184.png

I also added a light for the center console that uses a tilt switch for on/off:
1681624384019.png

Here's my build thread for this project

Maps:
I designed this map holder for my Navigator (and wife) because local area maps and guides were always accumulating on our adventures and ending up on the top of the dashboard because there was no place to put them.

1681622900620.png

1681622892065.png

For more about this project, you can check out my Custom Map holder build thread.
 
Last edited:

Switch

Observer
Here is my install of the Redline Tuning 21-27015-02 Hood QuickLIFT.
1683523123828.png

I have to open my hood every time I rack/un rack my canoe, which is every weekend in the summer. This way my wife can work the front tie down while I'm standing on the rock sliders un strapping the canoe from the roof rack.

The installation was relatively straightforward except the pop rivets were unbelievably difficult to tighten.
1683523179734.png

It was good to learn that the struts did not interfere with my custom fuse/relay block
1683523219703.png

Then I used a small bungee to secure the hood rod so it wouldn't rattle anymore:
1683523254035.png

I wish I'd done this mod the day after I got my truck,
 

Switch

Observer
More work under the hood. I got tired of positioning my shop light under the hood and added an LED strip light. I needed a place to mount the switch so I designed and printed this with my FreeCAD software and Prusa MK3S 3D printer.
1684027317201.png


The mount snaps in to existing holes in the body and fits a waterproof Apiele switch.
1684027165954.png

1684027521520.png

I used some left over LED strip lights I had from the ARE truck cap install I did.

1684027609773.png
1684027639422.png

Like my Redline Tuning 21-27015-02 Hood QuickLIFT, I wish I had done this from the get go. In fact, I've seen so many "what mod should I do first?" threads over the years. I need to reply on those. This is such a time saver...

I happened to have everything I needed to do this project on hand. But if you don't I'd recommend
this kit from Matt Gecko.
 
Last edited:

Switch

Observer
Here is how I mounted my NOCO Boost Lithium Jump start battery to my Desert Does It Multi Mount Panel.

I had tried using Velcro™ but that didn't work
1684462325156.png


The magnetic strips worked great, but the Desert Does It Multi Mount Panel is made out of aluminum.
1684462357742.png


So then I used bungie but it was a real PITA to undo and re-do
1684462388656.png

So I designed this clip using FreeCAD software and printed it using my Prusa MK3S 3D printer.

1684462422605.png

I bolted two clips into the multi mount panel with stainless steel hardare.

1684462467167.png


1684462521599.png


I keep it charged using this 12v to 5V converter.

1684462582003.png


Which is wired into my cab fuse block.

1684462639425.png


So now it sits right within reach from the driver's seat or when I open the driver side door. It snaps right out when I need it. But it lives in that location where I can keep it charged. The built in LED lights and added on magnetic mount make it my go-to portable light, in addition to the jump start capability.

1684462521599-png.779040
 
Last edited:

Forum statistics

Threads
185,888
Messages
2,879,475
Members
225,497
Latest member
WonaWarrior
Top