Switch's 2022 Tacoma Access Cab Build

Switch

Observer
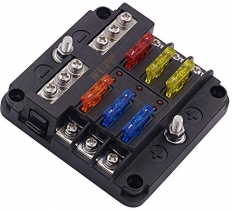
4: Wire harness for bed power and switches.
  • We sleep in the truck bed so I wanted always on power for lights, an AC inverter, and USB charging ports.
  • Since I already have the above power in the bed, I plan to put a relay in the bed for the rear lights when I get the new rear bumper. So I need a wire from the cab to the bed to control the rear lights.
  • Then I realized if I can control a relay in the back of the truck from a switch in the cab, I could also control the relays in the front of the truck from switches in the rear. And this would solve the problem where we wake up in the middle of the night due to some noise and can't see a goddam thing outside the truck cap. So I'm putting switches in the bed to control all of the lights that can be controlled from the cab.
So I made a wire harness with a 10 AWG wire at the core and 6 18 AWG wires for controlling relays.

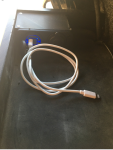
Here's the wire harness being run though a copper pipe to apply the expandable braided cable sleeve.
View attachment 742182

And here's the harness with the expandable braided cable sleeve - its about 18 feet long.
View attachment 742183

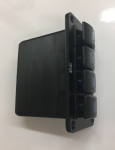
And here's the harness after adding split conduit tubing
View attachment 742181

Next on my list:
  1. Get that rear shock fixed.
  2. Wire up the LED light bar in the front bumper
  3. Finish wire harness for front rock lights
  4. Install bed lights, USB ports, and inverter
  5. Install switch panel in the bed
  6. Install side lights
  7. Install grab handles on Yakima rack
  8. Install compressor for on board air
edit [9/13/22]
I completed two items from the above list today.
2: LED Light Bar (shown off in photo below)
3: Finish wire harness for front rock lights
View attachment 742504
Tomorrow that rear shock gets fixed.

Rear shock fixed and just enough time to attend to an important part of nest building that is long overdue.

Since we use the truck bed as our sleeping platform, we have a pair of Big Agnes Sleeping pads that we also use for backpacking. They fit almost perfectly between the wheel wells. This is how we stored the sleeping pads on my last Taco and was really convenient.

The ARE Z-Series with the Yakima Rack Rails uses M6 bolts so I got M6 Eye-nuts to attach to the end of the bolts. I ran shock cord though like a shoe lace.

IMG_2895.JPG

This allows us to store our sleeping pads partially deflated and away from any sharp edges of other stuff in the bed (like fishing gear). It also saves a bunch of time since we don't need to completely air down the sleeping pads day after day. Reinflation takes seconds instead of minutes...
IMG_2896.JPG

At night when the sleeping pads are in use, the overhead webbing is handy for hanging eyeglasses, hats , and other wearables that we can easily access in the morning.
 

AggroCrag

Meat Popsicle
I really dig the practical/simple build you have going on. Function instead of form is a rare sight around the overland community.
 

Switch

Observer
Rear shock fixed and just enough time to attend to an important part of nest building that is long overdue.

Since we use the truck bed as our sleeping platform, we have a pair of Big Agnes Sleeping pads that we also use for backpacking. They fit almost perfectly between the wheel wells. This is how we stored the sleeping pads on my last Taco and was really convenient.

The ARE Z-Series with the Yakima Rack Rails uses M6 bolts so I got M6 Eye-nuts to attach to the end of the bolts. I ran shock cord though like a shoe lace.

View attachment 742870

This allows us to store our sleeping pads partially deflated and away from any sharp edges of other stuff in the bed (like fishing gear). It also saves a bunch of time since we don't need to completely air down the sleeping pads day after day. Reinflation takes seconds instead of minutes...
View attachment 742871

At night when the sleeping pads are in use, the overhead webbing is handy for hanging eyeglasses, hats , and other wearables that we can easily access in the morning.


Continuing the nest building...

I installed LED strip lights above both side windows of the ARE Z-Series camper shell
1664852060869.png
1664852092354.png


1664852243656.png
and I added a 12V Cigarette plug and USB power to both sides of the bed shelves
1664852185015.png

I added exterior lights to both sides.
1664852312008.png
1664852342437.png
I had these lights left over from a project I never started on my old Taco.
I found the wires to the lights fit the 6M holes for the Yakima rack perfectly. These are the holes that just hold the cosmetic plastic strip in place.
1664852760974.pngMy god I never realized how hairy my arms are. Pay no attention to that please!

Inside the wires looks like this:
1664852857120.png

Its' only about 6" from the rear of the cap so I'm not too worried about securing it to the ceiling (yet).

Plenty of side light now:
1664853215951.png

Both sides lights are controlled from a switch in the cab but each side light is also controlled separately from switches in the driver's side and passenger's side switch panels respectively. I did this by using diodes to prevent back current from the side switch panels from triggering the relays on the opposite side of the truck. This way I can power both sides from one switch in the cab but each side separately from each side of the bed.

Here the side lights are combined with the rock lights.
1664853174694.png
 
Last edited:

Switch

Observer
Continuing the nest building...

LED lights mounted above both side windows of the ARE Z-Series camper shell
View attachment 745645
View attachment 745646


View attachment 745651
and addition of 12V Cigarette plug and USB power to the sides of the bed shelves
View attachment 745649

Exterior lights added to both sides
View attachment 745653
View attachment 745654
I had these lights left over from a project I never started on my old Taco.
I found the wires to the lights fit the 6M holes for the Yakima rack perfectly. These are the holes that just hold the cosmetic plastic strip in place.
View attachment 745655My god I never realized how hairy my arms are. Pay no attention to that please!

Inside the wires looks like this:
View attachment 745656

its' only about 6" from the rear of the cap so I'm not too worried about securing it to the ceiling (yet).

Plenty of side light now:
View attachment 745658

Here the side lights are combined with the rock lights
View attachment 745657
To power all of this stuff and provide switches, I ran a 10AWG wire from the front Aux fuse block to a new aux fuse block located behind the driver side taillight.

In addition to the 10AWG wire, I ran multiple wires to power lower amperage switches and relays. Here I'm wrapping that wire harness with multiple layers of sheathing. The copper pipe is just used to make it easier to add sheathing to the wound wire harness by running the wire though the pipe and the sheathing over the outside.

1664857237171.png


The fuse block housing was designed using FreeCAD software and 3D printed using a Prusa MK3S 3D printer:
upload_2022-9-21_22-37-58.jpg


I started by looking at prefabricated project boxes but none fit my exact dimensions and all would have required extensive cutting for all of the holes I need. In the end is was easier to pre-fab what I wanted in cardboard and then print the fuse box with all of the holes right where I wanted them.

1681579099837.png

1681579393857.png


This fuse block housing was designed for a


$17 WUPP 12 Volt Fuse Block, Waterproof Boat Fuse Panel with LED Warning Indicator Damp-Proof Cover - 6 Circuits with Negative Bus Fuse Box for Car Marine RV Truck DC 12-24V, Fuses Included
WUPP 12 Volt Fuse Block that I got on Amazon
. It is slightly more compact than the Blue Sea fuse block that I used in the cab.


Here the fuse block housing is installed behind the driver's side taillight. I'm using existing holes for the bolts that hold this in place.

10AWG wire from front Aux fuse block
1665638410506.png

And starting to run wires from a switch panel in the bed to the new fuse block:

The 18AWG wires shown above go to a switch panel installed in the bed.

Here most of the wires are installed:
1664854976802.png

Once every thing is installed I add a dust proof (but not water proof) cover.

1664855136076.png
 
Last edited:

Switch

Observer
To power all of this stuff and provide switches, I ran a 10AWG wire from the front Aux fuse block to a new aux fuse block located behind the driver side taillight.

View attachment 745659


The fuse block housing was designed using FreeCAD software and 3D printed using a Prusa MK3S 3D printer:
upload_2022-9-21_22-37-58.jpg


I started by looking at prefabricated project boxes but none fit my exact dimensions and all would have required extensive cutting for all of the holes I need. In the end is was easier to pre-fab what I wanted in cardboard and then print the fuse box with all of the holes right where I wanted them.

upload_2022-9-21_22-37-0.jpg


This fuse block housing was designed for a


$17 WUPP 12 Volt Fuse Block, Waterproof Boat Fuse Panel with LED Warning Indicator Damp-Proof Cover - 6 Circuits with Negative Bus Fuse Box for Car Marine RV Truck DC 12-24V, Fuses Included
WUPP 12 Volt Fuse Block that I got on Amazon
. It is slightly more compact than the Blue Sea fuse block that I used in the cab.

upload_2022-9-21_22-41-44.jpg


Here the fuse block housing is installed behind the driver's side taillight. I'm using existing holes for the bolts that hold this in place.


10AWG wire from front Aux fuse block
upload_2022-9-21_22-43-34.jpg


There are little details like lining sharp metal edges with rubber edge trim
1664855638272.png


And starting to run wires from a switch panel in the bed to the new fuse block:

upload_2022-9-21_22-44-38.jpg


The 18AWG wires shown above go to a switch panel installed in the bed.

Once every thing is installed I add a dust proof (but not water proof) cover.

View attachment 745660

For the switch panels, I designed and printed a housing for it that fits in that cut out in the bed near the tailgate.
1666591313955.png


1666591343108.png


The new switch panel is from FXC.


$19 FXC Rocker Switch Aluminum Panel 4 Gang Toggle Switches Dash 5 Pin ON/Off 2 LED Backlit for Boat Car Marine Blue
FXC Rocker Switch Aluminum Panel 4 Gang
I bought on Amazon.


Here is the hole in the bed near the tailgate that I'm using
1664855382496.png

There's the step in the meddle where everything is a mess...

1664855786113.png

And then the pay off when the wires are concealed and everything works on the first or second or third try...

Here is the finished switch panel on the passenger side.
1664855433549.png

The switch panel on each side of the bed control the lights on that side on separate fuses so the circuits are redundant. Each side also has a switch that powers the rock lights and rear bumper lights (yet to be installed) which are common to both sides.

Meanwhile the 12Volt Cigarette plug and USB ports are now mounted on the shelf directly above the switch panel in the photo above.

Another 3D printed box - this time to mount a 12V cigarette adaptor and USB Charging port
1664855884017.png


1664855990484.png

The 12V adaptor is used for an inverter to power an electric blanket for my wife. On the driver's side I use it to power a Dry Guy ski boot dryer to keep my ski boots warm and dry in between ski trips.


1664855559677.png
 

Attachments

  • 1664856020452.png
    1664856020452.png
    624 KB · Views: 9
Last edited:

Switch

Observer
I designed and printed a housing for it that fits in that cut out in the bed near the tailgate.
1668129398333.png


1668129427386.png


The new switch panel is from FXC.


$19 FXC Rocker Switch Aluminum Panel 4 Gang Toggle Switches Dash 5 Pin ON/Off 2 LED Backlit for Boat Car Marine Blue
FXC Rocker Switch Aluminum Panel 4 Gang
I bought on Amazon.


Here is the hole in the bed near the tailgate that I'm using
1668129521199.png

There's the step in the meddle where everything is a mess...

View attachment 745665

And then the pay off when the wires are concealed and everything works on the first or second or third try...

Here is the finished switch panel on the passenger side.
View attachment 745662

The switch panel on each side of the bed control the lights on that side on separate fuses so the circuits are redundant. Each side also has a switch that powers the rock lights and rear bumper lights (yet to be installed) which are common to both sides.

Meanwhile the 12Volt Cigarette plug and USB ports are now mounted on the shelf directly above the switch panel in the photo above.

Another 3D printed box - this time to mount a 12V cigarette adaptor and USB Charging port
View attachment 745666


View attachment 745667

The 12V adaptor is used for an inverter to power an electric blanket for my wife. On the driver's side I use it to power a Dry Guy ski boot dryer to keep my ski boots warm and dry in between ski trips.


View attachment 745663
I also did a temporary job installing the on boar air (OBA) compressor.
Originally I planned to use the Seat Jacker and compressor mount from Desert Does IT but I found that I didn't like the way the compressor mount blocked access to the under side of the seat from the side and didn't solve the problem of where to store the air compressor hose. So I installed the Seat Jacker to make room for the compressor and ordered a piece of ABS plastic to mount the compressor.

What I didn't account for was the thickness of the ABS plastic sheet so the compressor didn't fit on top of the ABS sheet as planned. Then I realized I only need to keep the compressor in place relative to the seat so I used some scrap steel I had on hand.

Here's the compressor on the ABS plastic sheet with the steel straps I decided to use instead
1664858788501.png

The compressor sits on the carpet and isn't that loud on account of the cushioning.

1666751856979.png


The compressor switch is easily reached under the side of the seat and the compressor hose is tucked in front of the compressor under the seat. I'll probably circle back on this an do a cleaner install but I'd call it good enough for now.
 

Attachments

  • 1668129457847.png
    1668129457847.png
    275.9 KB · Views: 3
  • 1668129488671.png
    1668129488671.png
    275.9 KB · Views: 4
Last edited:

Switch

Observer
Today I added "The Weather Station":

1665273596702.png
Which is just a digital fish tank thermometer. The wire runs down the space between the bed and the body.

I also installed my 50W solar panel that I had on my last Tacoma.
1665286732031.png

This uses a low profile panel that is on a 1/8" aluminum sheet
1665273896842.png

I use self adhesive magnetic tape on the back.
1665273873405.png

1665273946158.png

So it is very easy to add/remove when needed.

On my last Tacoma, I mounted the charge controller on top of the OEM fuse box lid.

1665274651734.png

This time I mounted in on top of the battery. I also added a sheet of ABS plastic over the aluminum plate that holds down the battery. That aluminum plate made the positive battery terminal dangerous to work on.
1665274702729.png
I think this is a nice improvement over my last Taco
 
Last edited:

Switch

Observer
Today I added "The Weather Station":

View attachment 746398
Which is just a digital fish tank thermometer. The wire runs down the space between the bed and the body.

I also installed my 50W solar panel that I had on my last Tacoma.
View attachment 746428

This uses a low profile panel that is on a 1/8" aluminum sheet
View attachment 746402

I use self adhesive magnetic tape on the back.
View attachment 746401

View attachment 746403

So it is very easy to add/remove when needed.

On my last Tacoma, I mounted the charge controller on top of the OEM fuse box lid.

View attachment 746405

This time I mounted in on top of the battery. I also added a sheet of ABS plastic over the aluminum plate that holds down the battery. That aluminum plate made the positive battery terminal dangerous to work on.
View attachment 746406
I think this is a nice improvement over my last Taco

We took advantage in the recent drop in the price of gasoline to do a road trip out to Bodie Ghost Town and the Eastern Sierras.

1666158272914.png

1666159157947.png
So we finally got a chance to test out all of the new lights and bed improvements

1666157129146.png

I still need to add lights in the rear but the side lights etc. were all a huge improvement over our last Taco.

In California, burn bans this time of year are a real drag so we used the DIY propane fire pit I made years ago.
 
Last edited:

samuelclarke

Life is either a daring adventure or nothing.
Tidy Tacoma build ?

Interesting you can fit 255/85r16 with only minimal rubbing. My Hilux back in Australia is on 235/85r16 and use to rub on stock suspension. Ran 255/85r16 on my Defender and really like the size.
 

Switch

Observer
Continuing the nest building...

I installed LED strip lights above both side windows of the ARE Z-Series camper shell
View attachment 745645
View attachment 745646


View attachment 745651
and I added a 12V Cigarette plug and USB power to both sides of the bed shelves
View attachment 745649

I added exterior lights to both sides.
View attachment 745653
View attachment 745654
I had these lights left over from a project I never started on my old Taco.
I found the wires to the lights fit the 6M holes for the Yakima rack perfectly. These are the holes that just hold the cosmetic plastic strip in place.
View attachment 745655My god I never realized how hairy my arms are. Pay no attention to that please!

Inside the wires looks like this:
View attachment 745656

Its' only about 6" from the rear of the cap so I'm not too worried about securing it to the ceiling (yet).

Plenty of side light now:
View attachment 745658

Both sides lights are controlled from a switch in the cab but each side light is also controlled separately from switches in the driver's side and passenger's side switch panels respectively. I did this by using diodes to prevent back current from the side switch panels from triggering the relays on the opposite side of the truck. This way I can power both sides from one switch in the cab but each side separately from each side of the bed.

Here the side lights are combined with the rock lights.
View attachment 745657
Continuing nest building...

Hi-Lift jack needs a place to sleep on the truck. I looked at lots of options. Actually, I think I looked at every option. Every photo. Every product. Every DIY project...

1667170026720.png

I already decided the rear bumper would not have a swing out, so that was one very popular Hi-Lift location I'd already written off. Mounts that use the bed rails are very popular but I didn't want to crowd the sleeping area under the shelves I had installed. Other options include mounts on the hood (Jeepers love this). And mounts on the front bumper (more Jeepers). Mounts on the roof rack are also common. Ultimately, I didn't want the Hi-Lift mounted on the outside of the truck or anywhere that would require lifting the damned thing more than necessary. It's not the weight that bothers me, it is the awkwardness. It takes two hands to move a Hi-Lift jack. I'm not 8 feet tall. I rant...

I ended up mounting in the bed on the driver side shelf. I just needed some HDPE Starboard plastic and stainless steel hardware that I already had left over from some other project.

1667151377204.png

I just needed to run the bolts up through the bottom of the shelf

1667168494044.png

Test fitting:
1667151499094.png

Space on the shelf is now used for recovery gear. I was wondering where I'd put that stuff and keep it accessible...
1667168561520.png

With the unplanned benefit that when the jack is on top, nothing can be removed except the gloves).
1667168618916.png

1667168838900.png

I still have some big projects to complete:
  • Re-gear and relocate cab body mounts to run 35" tires
  • High clearance rear bumper.
But it is nice to get some of these smaller jobs checked off the list.
 
Last edited:

Switch

Observer
Three more items checked off the list:

1: upgraded springs on the Fox 2.5" remote reservoir coil overs to handle the added weight of the bumper and winch. The Fox 880-02-418 Coilover shocks have 600 lbs springs which worked great until I added the bumper and winch. The front dropped about an inch. The fix was to replace the springs with Eibach 700 lbs springs.
2: 5.29 gears
3: Relocate cab body mounts
35" tires finally fit!

1667269303546.png
Just got back from Shaffer's Off-road: If you live in the San Francisco Bay area: Mike Shaffer's crew was my go-o shop for my 2006 Tacoma. They moved from Alameda to Union City and the new shop is awesome!

Last on my list of big projects is:
That get's done on 11/11/22.
 
Last edited:

bkg

Explorer
Continuing nest building...


Space on the shelf is now used for recovery gear. I was wondering where I'd put that stuff and keep it accessible...
View attachment 749678

With the unplanned benefit that when the jack is on top, nothing can be removed except the gloves).

shelves are cool. Just be careful those heavy items don't become projectiles in an accident and/or rough conditions.
 

Switch

Observer
Here's how I pack my gear for extended trips where I need extra fuel and water.
1672452987957.png

The gas cans fit the shape of the wheel well.
1672453155697.png

Then 45 liters of water
1672453159030.png

Portable fire pit with propane & fire logs.
1672453270752.png

Multi-purpose plywood (mostly used as a game board but was once used as a stretcher).
1672453336359.png

Propane stove
1672453571654.png

Kitchen table
1672453641915.png

Ammo cans with dry goods and kitchenware. Note in this configuration the ammo cans snap in place like Legos and need nothing to keep them from moving around.
1672453678061.png
 
Last edited:
  • Like
Reactions: WVI

Forum statistics

Threads
185,888
Messages
2,879,475
Members
225,497
Latest member
WonaWarrior

Members online

Top