You are using an out of date browser. It may not display this or other websites correctly.
You should upgrade or use an alternative browser.
You should upgrade or use an alternative browser.
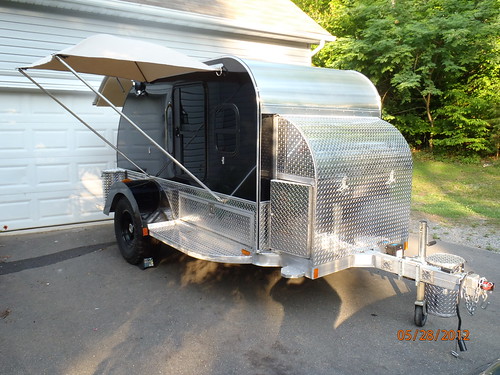
The CrowsWing - Offroad Teardrop Trailer
- Thread starter jim65wagon
- Start date
jim65wagon
Well-known member
The rear propane storage locker is mounted on the rear running board nearest the oven
The 10lb propane tank fits snugly

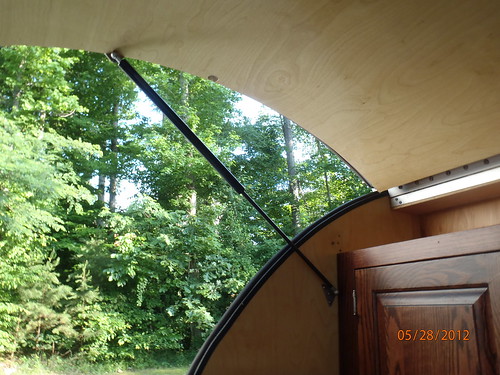
The hatch struts gave us fits. We made three tries to get them right and we ended up with 2 150lb struts mounted thusly to get the hatch to stay open
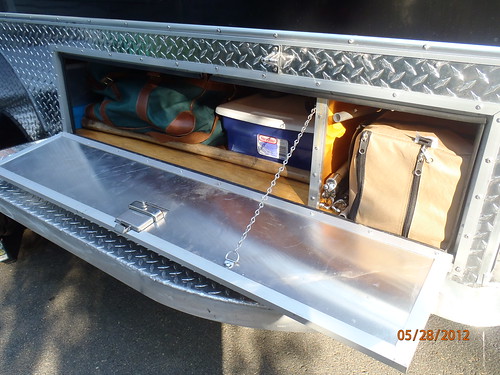
The basement doors turned out well. The basement is awesome and gives us plenty of space for the Gazebo (on the right) and various other gear (on the left). With both sides we have enough storage for all the gear that gets used in our basecamp, leaving the truck free for other accessory gear (hiking, kayaking, etc) or firewood, or anything else we might find we need for a particular destination.
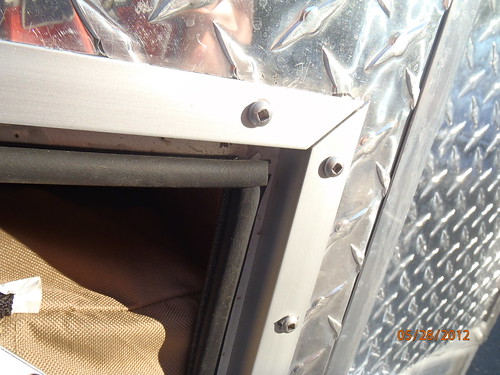
The rubber seal along the inside lip of the Z channel keep everything in the basement dry
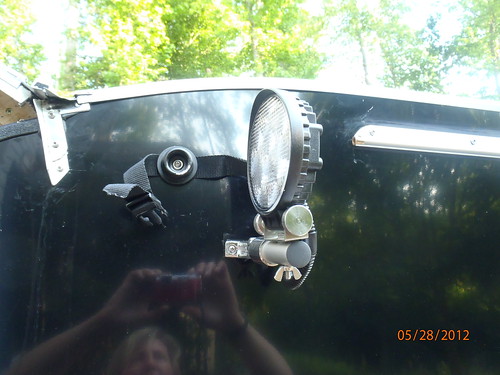
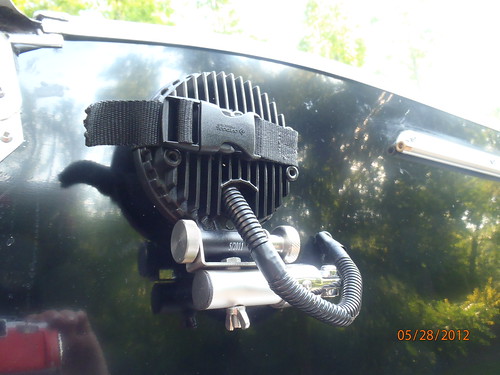
The porch light is the Truckstar LED flood light from Northern Tool. It's switched on from inside the bedroom, and swivels so we can use them as extra backup lights if we ever find ourselves finding a campsite after dark. When in travel mode they fold up tight against the trailer wall to protect the lens from debris.

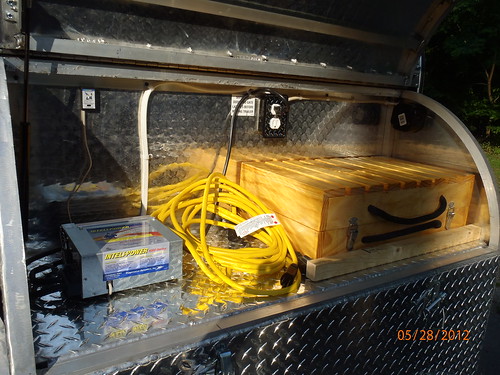
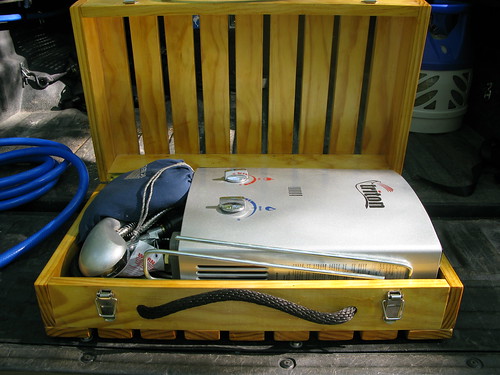
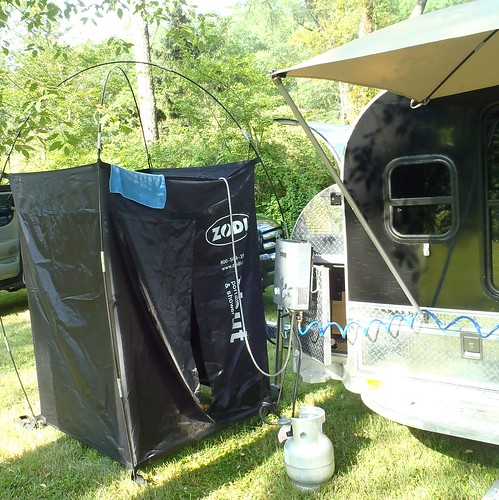
The upper tongue box holds the shower unit (Triton water heater) which is stored in our homebuilt box that doubles as a shower floor, and the Intellipower 9260 battery charger.
Emptied of its contents and on the ground. Shower floor is ready for action
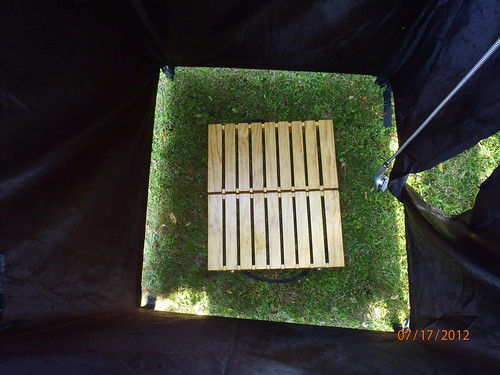
The Zodi Hut (stored in the basement)rounds out the showering duties for a little privacy during bathtime
The lower tongue box houses the two deep cycle house batteries and the Global Passport portable toilet (just in case we are in an area where catholes are inappropriate)

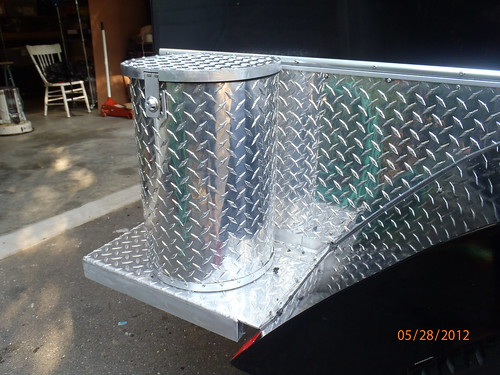
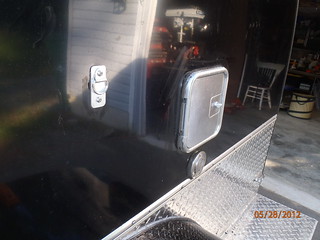
The front propane locker mounts on the tongue in front of the tongue box

The 10lb propane tank fits snugly
The hatch struts gave us fits. We made three tries to get them right and we ended up with 2 150lb struts mounted thusly to get the hatch to stay open
The basement doors turned out well. The basement is awesome and gives us plenty of space for the Gazebo (on the right) and various other gear (on the left). With both sides we have enough storage for all the gear that gets used in our basecamp, leaving the truck free for other accessory gear (hiking, kayaking, etc) or firewood, or anything else we might find we need for a particular destination.
The rubber seal along the inside lip of the Z channel keep everything in the basement dry
The porch light is the Truckstar LED flood light from Northern Tool. It's switched on from inside the bedroom, and swivels so we can use them as extra backup lights if we ever find ourselves finding a campsite after dark. When in travel mode they fold up tight against the trailer wall to protect the lens from debris.
The upper tongue box holds the shower unit (Triton water heater) which is stored in our homebuilt box that doubles as a shower floor, and the Intellipower 9260 battery charger.
Emptied of its contents and on the ground. Shower floor is ready for action
The Zodi Hut (stored in the basement)rounds out the showering duties for a little privacy during bathtime
The lower tongue box houses the two deep cycle house batteries and the Global Passport portable toilet (just in case we are in an area where catholes are inappropriate)
The front propane locker mounts on the tongue in front of the tongue box
Last edited:
jim65wagon
Well-known member
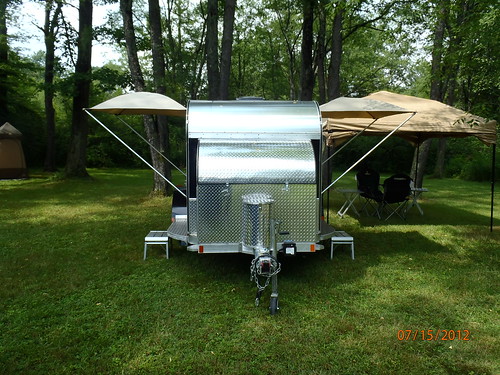
The awnings that we first showed you way back in post #105 turned out well. They do a good job of keeping rain off the running board and door so it's easy to sit in the doorway and put your shoes on in the morning.
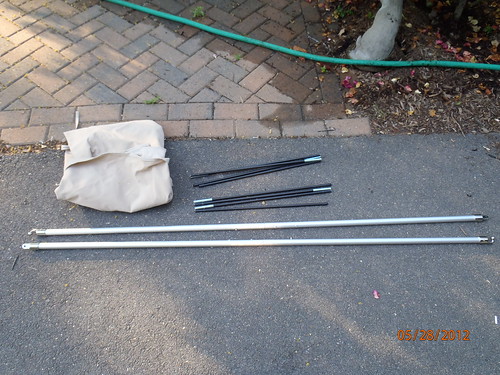
The awnings and tent poles fold up and store in a duffel bag in the basement. The awning poles break down to half length and store with the Gazebo
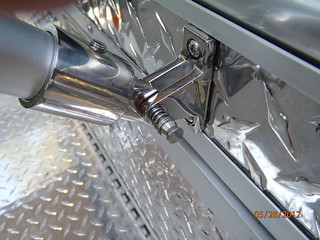
The base of the awning pole mounts to the bimini hardware on the wall of the teardrop, the top of the pole fits into grommets in the awning.
 .......
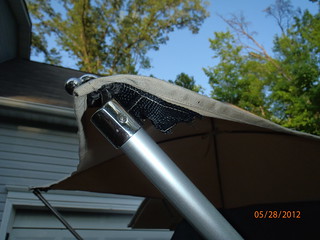
we did make a major mistake, the front awning fitting was originally placed high on the trailer, just under the windows, and when I opened one of the doors, )all I wanted to do was close the window!) there was a loud crash as the bottom window in the door made contact with the fitting and broke into a million little pieces. I was just a little upset. ( There was wailing and gnashing of teeth) . It was just a couple of days before our Indiana trip!
.
We cleaned up the debris and did a search on the interweb on how to repair these doors. What information we found said they couldn’t be repaired, they need to be replaced.
We figured we didn’t have anything to lose, so we took the top slide bar out ( the part that the glass slid into). There were pieces of glass still glued in it’s slot , so Beth put the bar into the oven at 275 degrees until it heated up and the glue loosened up enough to pry out the glass. It took several tries to get it all out.
Then we made a template out of poster board and cut a replacement piece out of Plexiglas. The plexi was untinted and not as thick as it should be (but it worked for our Indiana trip) so the next day she ordered the correct thickness of tinted lexan from Mc-Master Carr . It was cut to the correct shape and carefully bent and guided down the grooves until it popped into place. The top bar was gooped in its groove with silicone and place onto the lexan and left to cure for a couple of days. The repair is not too noticeable. Since replacement doors are so expensive we can live with it.
At first we placed retaining chains onto the tops of the doors to keep them from opening too far and hitting the awning brackets , but it didn’t work as well as we thought it would, so we moved the fittings further down the wall. Then we had to lengthen the awning poles, which meant that they needed to be broke down into two piece sections so they would fit in the storage area. Moving the fittings left screw holes on the side of the trailer, so to disguise that, we placed d-ring fittings over the holes . Of course now we have had several people ask what they are for, so we have to say things like, “ They’re there to umm… you know…attach stuff to.”
All setup the awning looks like this:
Realworld awning lesson number one turned out to be the fact that a good wind would make the awning "walk" pulling itself out of the rail causing a catastrophic awning failure. The simple cure was to put a permanent stop in one end of the rail and a clip stop in the other end. This makes it easy to install the awning, yet prevents it from uninstalling itself.
 .....
.....

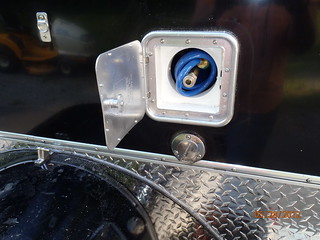
The Sprayaway sprayer/hose storage door mounts to the exterior. The water fill is just below the sprayer door
 ....
....
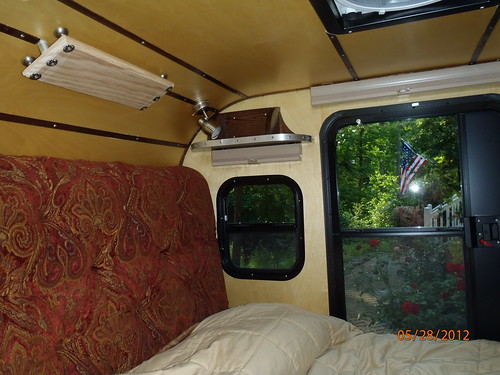
The headboard gives the bedroom a nice finished look. Here you can also see the reading light, storage shelf, window and window blind. The oak board on the ceiling hides the ambient lights and is now painted with a Queen Annes Lace motif.
The ceiling received some oak trim, the ceiling light is a white/red LED marine unit, and the fan is a 4-speed MaxxAir that draws enough air to make naps in July a breeze.
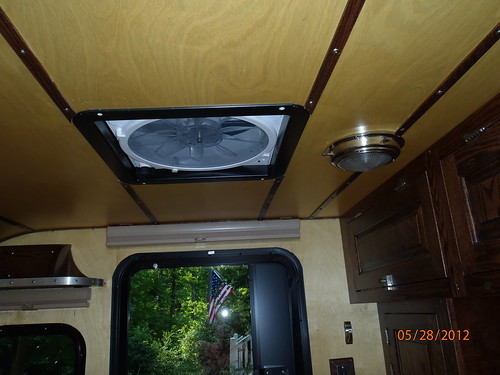
The ceiling light also provides light into the oak cupboards. We've had a weeks worth of clothes, jackets and extra blankets in them and still wasn't even close to filling them.

The awnings and tent poles fold up and store in a duffel bag in the basement. The awning poles break down to half length and store with the Gazebo
The base of the awning pole mounts to the bimini hardware on the wall of the teardrop, the top of the pole fits into grommets in the awning.
.......
we did make a major mistake, the front awning fitting was originally placed high on the trailer, just under the windows, and when I opened one of the doors, )all I wanted to do was close the window!) there was a loud crash as the bottom window in the door made contact with the fitting and broke into a million little pieces. I was just a little upset. ( There was wailing and gnashing of teeth) . It was just a couple of days before our Indiana trip!
.
We cleaned up the debris and did a search on the interweb on how to repair these doors. What information we found said they couldn’t be repaired, they need to be replaced.
We figured we didn’t have anything to lose, so we took the top slide bar out ( the part that the glass slid into). There were pieces of glass still glued in it’s slot , so Beth put the bar into the oven at 275 degrees until it heated up and the glue loosened up enough to pry out the glass. It took several tries to get it all out.
Then we made a template out of poster board and cut a replacement piece out of Plexiglas. The plexi was untinted and not as thick as it should be (but it worked for our Indiana trip) so the next day she ordered the correct thickness of tinted lexan from Mc-Master Carr . It was cut to the correct shape and carefully bent and guided down the grooves until it popped into place. The top bar was gooped in its groove with silicone and place onto the lexan and left to cure for a couple of days. The repair is not too noticeable. Since replacement doors are so expensive we can live with it.
At first we placed retaining chains onto the tops of the doors to keep them from opening too far and hitting the awning brackets , but it didn’t work as well as we thought it would, so we moved the fittings further down the wall. Then we had to lengthen the awning poles, which meant that they needed to be broke down into two piece sections so they would fit in the storage area. Moving the fittings left screw holes on the side of the trailer, so to disguise that, we placed d-ring fittings over the holes . Of course now we have had several people ask what they are for, so we have to say things like, “ They’re there to umm… you know…attach stuff to.”
All setup the awning looks like this:
Realworld awning lesson number one turned out to be the fact that a good wind would make the awning "walk" pulling itself out of the rail causing a catastrophic awning failure. The simple cure was to put a permanent stop in one end of the rail and a clip stop in the other end. This makes it easy to install the awning, yet prevents it from uninstalling itself.
.....
The Sprayaway sprayer/hose storage door mounts to the exterior. The water fill is just below the sprayer door
....
The headboard gives the bedroom a nice finished look. Here you can also see the reading light, storage shelf, window and window blind. The oak board on the ceiling hides the ambient lights and is now painted with a Queen Annes Lace motif.
The ceiling received some oak trim, the ceiling light is a white/red LED marine unit, and the fan is a 4-speed MaxxAir that draws enough air to make naps in July a breeze.
The ceiling light also provides light into the oak cupboards. We've had a weeks worth of clothes, jackets and extra blankets in them and still wasn't even close to filling them.
Last edited:
Jakes01234
Explorer
That thing is amazing!!! Great job
Sent from my DROID RAZR using Tapatalk 2
Sent from my DROID RAZR using Tapatalk 2
Every Miles A Memory
Expedition Leader
Love this thing. Especially like the folding light
Jeff Wanamog
Off Road Camper Guy
Fantastic build. I like your great use of space. Have you had a chance to weigh the trailer yet with the 40 gallons (333 lbs.) of water?
I am interested in the trailer weight and the tongue weight.
Thanks.
Jeff
I am interested in the trailer weight and the tongue weight.
Thanks.
Jeff
Last edited:
4x4x4doors
Explorer
Absolutely FAB-U-LOUS, DAH-LINGS!
I'll have to hide on the other side of the campground from you guys to avoid being publicly shamed!
On the struts, keep in mind that cold and old are not their friends. If they start being sloppy at all, consider a "safety prop" as that hatch could cause serious injury if the struts got tired.
I'll have to hide on the other side of the campground from you guys to avoid being publicly shamed!
On the struts, keep in mind that cold and old are not their friends. If they start being sloppy at all, consider a "safety prop" as that hatch could cause serious injury if the struts got tired.
Expedition.Report
Explorer
Amazing!
jim65wagon
Well-known member
Thanks for the kind words everyone!
Jeff: I haven't weighed it yet, we were shooting for 2000 lbs, but I think I'm a leeetle over that. I'll let you know as soon as I get it weighed.
Papa: Being stickified would be a supreme compliment, but I'll settle for your props!
4x4x4doors:We actually do keep a prop rod stored in the tongue box, we had to use it in Indiana when our second set of rods decided they weren't quite up to the task and the hatch would slowly close. also, we'll camp beside anybody, no matter their setup. It's the fire, stars, food and people that really make a trip.....we just like a little more comfort than the average peeps")
In June we went on a weeklong trip to Utah ( without the trailer- we stayed in a hotel), we stayed in Vernal and visited Dinosaur national monument and the surrounding State and National forests . We had a great time, the Green river and canyons were spectacular, the dinosaur fossils were awesome, and the desert was beautiful.
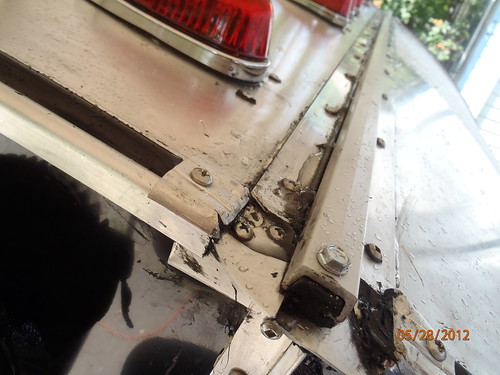
When we came home we had a big problem to address with the trailer. At the end of May we had determined that the small leak in the galley was due to water pooling above the hinge when it would rain. The insert trim came all the way to the hinge and water was unable to flow completely off the top of the trailer. So we thought that the answer was to trim back the insert trim and create rain gutters that would allow the rain to drain. Beth used a hack saw to cut it back to size . She also trimmed the flat molding that we used to finish off the edge of the aluminum on the roof, then fashioned gutters out of scrap aluminum and sealed and fastened everything down. After letting everything cure for one day, we tested my new system with a water hose. Everything seemed to work fine.
She even took pictures of her excellent work. Oh so clever.
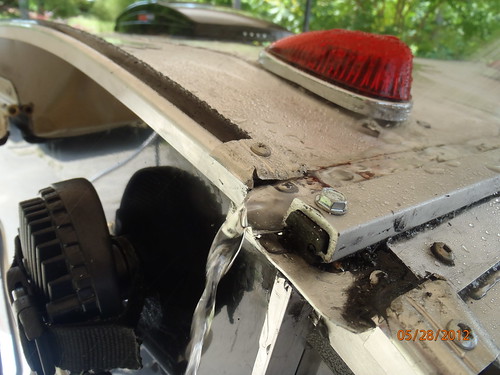
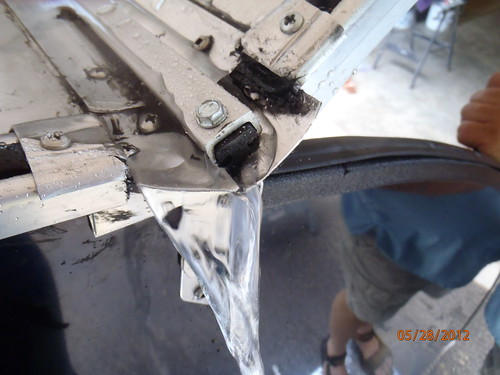
Everything seemed hunky dory at first. Then we had four days of heavy rains coupled with high temperatures . We didn't check the trailer all that week, when the weekend came we opened the hatch and realized that we had big problems. Apparently there was now a bigger leak than what had originally been repaired and now it was leaking on both sides!. The water had flowed onto the top of the upper cabinet then had run down the electrical access into the interior of the upper cabinet, the worked its was south into the lower cabinet. Even though it had only been less then a week, due to the high temperatures ( in the 90's) there was a thick layer of mold in the right cabinet and the plywood had delaminated and peeled in five separate places. Of course, now we realize that the only plywood that failed was the 5 layer hardwood we bought at the big box store. Needless to say Beth was devastated . After she threw a tantrum and I calmed her down, we cleaned the mold off with dilute bleach water, placed a large container of Damp-rid in the cabinet, and covered the trailer with a tarp. After drying out for a week or so, Beth peeled off all the damaged wood, which amounted to the top veneer layer and then one or two layers beneath it. Even then the underlying wood was still damp, and there were a few small black beetles that had taken up residence. She sprayed the areas with insecticide and left everything to dry for another week and a half.
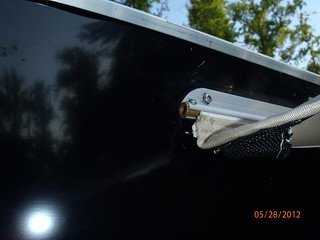
We decided to remove the flat piece of trim and the rain gutter to see what the problem was. Once removed it became apparent that we had broken the seal between the hinge and the roof in our efforts to cut the trim while in place. There was a good sized gap on the passenger side. I have no idea why it did not leak with my hose test.
We then decided to fix the problem by placing a piece of z-channel trim over the hinge . This we could effectively seal while leaving the ends long for a gutter effect. We placed some d-shaped weather-stripping under it to keep water from invading when the hatch is up. In the end it looks like this:
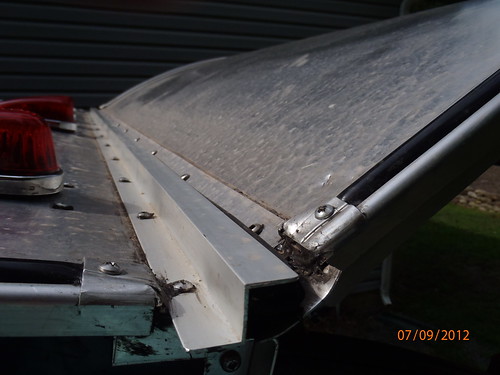
I know it's probably overkill but it works and has weathered a dozen storms with no leaks.
The next weekend Beth tackled the water damage. She filled in the missing areas of plywood with layers of 1/8 inch ply until the surface was level. Then she refaced the surfaces that were damaged, including the inside ceiling of the cabinet, the outer wall, and the brace. While she was at it she created an electrical chase cover that can be snapped in and out to cover the wires in the back of the cabinet. All the pieces were finished with spar varnish. The next thing she did was face the damaged ply on the inside of the stove drawer cabinet with a leftover piece of mill finish aluminum. We couldn't use the Baltic ply because its thickness would interfere with the drawer slides. The only areas not fixed yet are a couple of spots on the top of the cabinets that will be covered by speaker boxes when we finally install a stereo.
Looking good at the beautiful Sugarcreek Campground. It was a little pricey, but it was freshly mowed and the staff was friendly.
Finished* driveway shots


*not really, we've got some minor details to contend with. The list of things that need to be done is getting smaller, we still have to buy and install a stereo ( need money first) , wire in the 12 volt outlets that go under the interior cabinets , fix the screw holes left over from the gas strut debacle, move the axle forward a few inches to center them in the fenders, add shocks, and build a partition wall in the tongue box. There are a few more decorative touches that Beth would like to do in the galley. We still need to weigh the trailer and get insurance on it.
but that's it as it stands for the time being
Jeff: I haven't weighed it yet, we were shooting for 2000 lbs, but I think I'm a leeetle over that. I'll let you know as soon as I get it weighed.
Papa: Being stickified would be a supreme compliment, but I'll settle for your props!
4x4x4doors:We actually do keep a prop rod stored in the tongue box, we had to use it in Indiana when our second set of rods decided they weren't quite up to the task and the hatch would slowly close. also, we'll camp beside anybody, no matter their setup. It's the fire, stars, food and people that really make a trip.....we just like a little more comfort than the average peeps
In June we went on a weeklong trip to Utah ( without the trailer- we stayed in a hotel), we stayed in Vernal and visited Dinosaur national monument and the surrounding State and National forests . We had a great time, the Green river and canyons were spectacular, the dinosaur fossils were awesome, and the desert was beautiful.
When we came home we had a big problem to address with the trailer. At the end of May we had determined that the small leak in the galley was due to water pooling above the hinge when it would rain. The insert trim came all the way to the hinge and water was unable to flow completely off the top of the trailer. So we thought that the answer was to trim back the insert trim and create rain gutters that would allow the rain to drain. Beth used a hack saw to cut it back to size . She also trimmed the flat molding that we used to finish off the edge of the aluminum on the roof, then fashioned gutters out of scrap aluminum and sealed and fastened everything down. After letting everything cure for one day, we tested my new system with a water hose. Everything seemed to work fine.
She even took pictures of her excellent work. Oh so clever.
Everything seemed hunky dory at first. Then we had four days of heavy rains coupled with high temperatures . We didn't check the trailer all that week, when the weekend came we opened the hatch and realized that we had big problems. Apparently there was now a bigger leak than what had originally been repaired and now it was leaking on both sides!. The water had flowed onto the top of the upper cabinet then had run down the electrical access into the interior of the upper cabinet, the worked its was south into the lower cabinet. Even though it had only been less then a week, due to the high temperatures ( in the 90's) there was a thick layer of mold in the right cabinet and the plywood had delaminated and peeled in five separate places. Of course, now we realize that the only plywood that failed was the 5 layer hardwood we bought at the big box store. Needless to say Beth was devastated . After she threw a tantrum and I calmed her down, we cleaned the mold off with dilute bleach water, placed a large container of Damp-rid in the cabinet, and covered the trailer with a tarp. After drying out for a week or so, Beth peeled off all the damaged wood, which amounted to the top veneer layer and then one or two layers beneath it. Even then the underlying wood was still damp, and there were a few small black beetles that had taken up residence. She sprayed the areas with insecticide and left everything to dry for another week and a half.
We decided to remove the flat piece of trim and the rain gutter to see what the problem was. Once removed it became apparent that we had broken the seal between the hinge and the roof in our efforts to cut the trim while in place. There was a good sized gap on the passenger side. I have no idea why it did not leak with my hose test.
We then decided to fix the problem by placing a piece of z-channel trim over the hinge . This we could effectively seal while leaving the ends long for a gutter effect. We placed some d-shaped weather-stripping under it to keep water from invading when the hatch is up. In the end it looks like this:
I know it's probably overkill but it works and has weathered a dozen storms with no leaks.
The next weekend Beth tackled the water damage. She filled in the missing areas of plywood with layers of 1/8 inch ply until the surface was level. Then she refaced the surfaces that were damaged, including the inside ceiling of the cabinet, the outer wall, and the brace. While she was at it she created an electrical chase cover that can be snapped in and out to cover the wires in the back of the cabinet. All the pieces were finished with spar varnish. The next thing she did was face the damaged ply on the inside of the stove drawer cabinet with a leftover piece of mill finish aluminum. We couldn't use the Baltic ply because its thickness would interfere with the drawer slides. The only areas not fixed yet are a couple of spots on the top of the cabinets that will be covered by speaker boxes when we finally install a stereo.
Looking good at the beautiful Sugarcreek Campground. It was a little pricey, but it was freshly mowed and the staff was friendly.
Finished* driveway shots
*not really, we've got some minor details to contend with. The list of things that need to be done is getting smaller, we still have to buy and install a stereo ( need money first) , wire in the 12 volt outlets that go under the interior cabinets , fix the screw holes left over from the gas strut debacle, move the axle forward a few inches to center them in the fenders, add shocks, and build a partition wall in the tongue box. There are a few more decorative touches that Beth would like to do in the galley. We still need to weigh the trailer and get insurance on it.
but that's it as it stands for the time being
Last edited:
looking at the photo with your truck, it appears larger than I thought. Still a work of art man, no matter how big it is. We just got back form taking ours to Colorado, did Imogene, Engineer, Corkscrew, Hurricane and Cinnamon with it. Never took a single picture as the camera was stolen with the wifes purse the first day at the Summit. NICE. Did get some pictures at Navajo Lake in a very large Aspen grove, will try to get pictures up soon of that.
My latest one, came in at 2300 pounds with 28 gallons of water, 258 amp hour battery, 8 gallons of propane, Fox Wing Awning, spare 35 inch tire. It still has gone anywhere the truck has gone. Have not found a trail that a trailer can be taken on that it can not do.
I think we are going back to Iowa for the jeep festival and enter the trailer competition, should be fun. Are you planning on hitting that?
Bob
jim65wagon
Well-known member
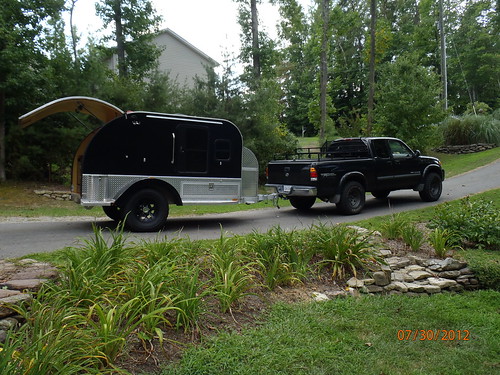
Well, big is relative. At it's widest point it is no wider than the fender flares on the truck. It's only big because it is 12" taller than a normal 5x10 teardrop due to the basement storage. That extra height makes it look huge though.looking at the photo with your truck, it appears larger than I thought. Still a work of art man, no matter how big it is.
I'll be checking your thread for pictures of the truly offroad trailerskersfan said:We just got back form taking ours to Colorado, did Imogene, Engineer, Corkscrew, Hurricane and Cinnamon with it. Never took a single picture as the camera was stolen with the wifes purse the first day at the Summit. NICE. Did get some pictures at Navajo Lake in a very large Aspen grove, will try to get pictures up soon of that.
We were trying for 2000 initially, right now I'm hoping it's only 2500, but if it's under 3000 fully loaded I'll be ok with that. That's the tradeoff for the extra water, propane, and gear in storage.skersfan said:My latest one, came in at 2300 pounds with 28 gallons of water, 258 amp hour battery, 8 gallons of propane, Fox Wing Awning, spare 35 inch tire. It still has gone anywhere the truck has gone. Have not found a trail that a trailer can be taken on that it can not do.
Never been to Iowa, and it would be fun, but that's not in the future for us. We've got enough vacation and time to pull off our ARSES Wifflebat Kayak Float, hopefully hit a teardrop gathering in West Virginia, and maybe be able to do a weekend in the woods before we have to garage the trailer till spring. Next year, who knows where we may get to....skersfan said:I think we are going back to Iowa for the jeep festival and enter the trailer competition, should be fun. Are you planning on hitting that?
Bob
Thanks to you Grimbo it was fun documenting the build....