Intro & my "Swiss Army" trailer build using '05 Tacoma bed

1x1_Speed_Craig

Active member
I think it depends on how you mount your equipment...

Thanks for the feedback! :coffeedrink:


My Milwaukee 14" chop saw arrived a couple days ago, and I put it to work today. I should have bought this long ago. You have to take care with the cuts to make sure you don't get too much blade deflection, but with care, you can get pretty clean cuts.

28650_6180-20.jpg


Pics of the start of the trailer frame to come tomorrow...

Craig
 

1x1_Speed_Craig

Active member
Smarta$$... Point was that you'll just have to make it work. Lengthening the tongue will only due so much. Just build the thing and post some pictures to give me some motivation. :eek:)

-

It wasn't meant that way at all (I was just reducing the amount of text in the quote), but now that I re-read it, it's pretty darn funny. :bike_rider:

Pics to come later today. The most critical cuts (the ones I'm nervous about) will be the "V" cuts out of the side rail that I will bend inward to form the tongue. They have to be in exactly the right spot to maintain the 41" outside-to-outside frame rail width, and also meet up correctly at the AT tongue bracket. I've already done the math (high school flashbacks) to determine where they'll be, but it's a one-time shot on the 15' runs of 2"x3" tubing I have.

Off to make a pot of coffee, and then get to work.

Craig
 

1x1_Speed_Craig

Active member
It doesn't look like major progress, but I feel pretty good about how it's coming so far. Well, a little math goes a long way. I measured long for the notch I had to cut out of the side rails to form the tongue, so I just have to do a little more incremental grinding & measuring to wrap it up. As the drawing I posted previously shows, it'll be gusseted after welding. I used my 4 1/2" grinder to "freehand" the "V" cut, as the chop saw wouldn't have worked well in this case. As you can see, it was a pretty clean cut with limited gap to fill.

So, after many hours of cutting/welding, it's starting to look a little like a trailer frame. this is the underside of the frame, BTW.

Craig
 

Attachments

  • tongue_mock-up.jpg
    tongue_mock-up.jpg
    315.3 KB · Views: 147
  • tongue_mitre.jpg
    tongue_mitre.jpg
    331.6 KB · Views: 120
Last edited:

elmo_4_vt

Explorer
Looks nice... It always gets me how much time can be spent on little stuff like matching angles when you are trying to get it perfect. I always spent more time than is probably necessary, but if I were to mess something up, or if it were to not look as nice as possible because I was rushing, I would be very mad at myself.

Are you going to slide in one of the pre-manufactured receiver tubes into the tongue area? Might be nice to weld that in before the plate is welded to the trailer frame?

-
 

1x1_Speed_Craig

Active member
Looks nice... It always gets me how much time can be spent on little stuff like matching angles when you are trying to get it perfect. I always spent more time than is probably necessary, but if I were to mess something up, or if it were to not look as nice as possible because I was rushing, I would be very mad at myself.

Exactly my thinking. I'm a bit of a perfectionist (some would say "anal-retentive"), and would rather take the time to get it just right. I know bigwalton here on the board, ahd he's harassed me (in a fun way) about being picky with some of my Jeep projects in the past.


Are you going to slide in one of the pre-manufactured receiver tubes into the tongue area? Might be nice to weld that in before the plate is welded to the trailer frame?

Yes, I actually just picked one up at lunch today. Because my welder is a 115V unit (Millermatic 135) that's only rated for 1/8"-3/16" max, I may take the receiver & tongue bracket to a local guy who does a great job with heavier-duty welding. It should be the only part of the trailer I won't be welding myself. I'll definitely have it done before I weld the tongue sides into the bracket.

Craig
 

bigwalton

Observer
Exactly my thinking. I'm a bit of a perfectionist (some would say "anal-retentive"), and would rather take the time to get it just right. I know bigwalton here on the board, ahd he's harassed me (in a fun way) about being picky with some of my Jeep projects in the past.

HAHAHA, it's all out of respect and awe. My problem is that I want to get done with things to either use what I'm trying to do or move on to the next step and I go too fast and screw things up or don't do them to the level of detail that I'd like.

Craig gets it right, all of it, and I'm just jealous. :Wow1:
 

1x1_Speed_Craig

Active member
HAHAHA, it's all out of respect and awe. My problem is that I want to get done with things to either use what I'm trying to do or move on to the next step and I go too fast and screw things up or don't do them to the level of detail that I'd like.

Craig gets it right, all of it, and I'm just jealous. :Wow1:

What, Eric? You have the nicest, all-stock Alaskan Postal restoration I have seen. :sombrero:

I'm just annoyed because now, jscherb on the various Jeep boards has "raised the bar" to an almost unobtainium height with his projects. Talk about inspiration!!!

OK, back to the trailer project...

I'm getting ahead of myself here, but I'm thinking about what finish I'll use on the trailer frame. I want to protect the inside of the box-section tubing.

Options:
  • The "high-zoot" way to go would be to have it dipped & galvanized when I'm done, and then paint the outside of the frame. A place a couple hours from me (actually, very close to you, Eric) will do this for ~$250. My thought is to give the outside of the frame a quick paint job when it's done, and use it for the season. Only after using the trailer for a while, and verifying that I don't want to do any additional welding on the frame, I could have it galvanized.
  • I could try the POR-15 route, but it would be very tough to get good coverage inside the tubes, and would be expensive to do so anyway. I have used POR a lot in the past, and am very familiar with it.
  • I could leave the inside of the rails uncoated, and add some small access holes in which I could periodically spray some light oil.


Suggestions?


Craig
 

elmo_4_vt

Explorer
IMHO, I don't think you should have to worry about the inside too much. I have (or had) a couple trailers that are over 20+ years old and the only rust on the inside of the tubes is surface scale. No kind of deep rot or anything that I could? I will usually take a can of primer and just spray erratically to give it some kind of coating, and you could take it a step further by adding a couple holes to spray in WD-40 or something, but in the end I don't think it's worth the galv. process.

I would concentrate on keeping water/salt out of the front of the tube and leave a place for anything that does get in to drain, and leave it at that.

-
 

1x1_Speed_Craig

Active member
Well, I got the Tacoma fenders stripped off the bed today, and positioned the bed on the trailer frame in-progress. It's helping my motivation to start envisioning how it'll look completed.

I believe I have decided on my suspension set-up. I'm planning on using just the main leaf from a set of CJ-7 front springs to position the axle, but then use a set of air bags to manage the suspension load. I'm not sure what I'll do for shocks yet.

I have a lot to do this week:
  • Place an order with Martyn at AT for several items, including a tongue box and several other misc. items.
  • Buy CJ-7 leaf springs/brackets. I have scrapped so many of these, it makes me a little twitchy to have to go buy a set. *DONE* EDIT: I intended to buy used, but ended up just placing an order for new parts from 4wd.com. I also would have liked to have gone with an airbag set-up (using the leaves just to position the axle), but I may add that a little further down the line when my budget allows.
    [*]Buy an axle. EDIT: I ordered an axle from Randy at abctrailerparts.com (great service). I'm hoping the set-up will allow me to use my Jeep Ravine aluminum wheels without wheel spacers, but I'm doubtful based on measurements. We'll see... *DONE*
    [*]Possibly order a set of 31" tires. We'll see how the budget is looking...


Craig
 
Last edited:

1x1_Speed_Craig

Active member
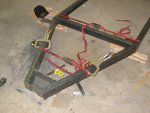
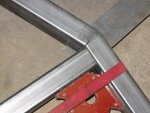
I got the receiver welded into the tongue bracket (pics to come soon). I received my CJ-7 suspension components, and should be taking delivery of my ABC 3500-lb. axle early to mid next week. I'm waiting on addressing the spring hanger positioning & final tongue trimming on the frame (which will determine the overall frame width) until I have the axle in-hand, and can verify the spring perch spacing relative to the frame width.

I also picked up a set of OEM Tacoma adjustable bed rail tie-downs on eBay, and will be getting a set of 31" BFG KM2s mounted up tomorrow.

So, things are coming along slow-but-sure.

Also, this thread leads me to ask what's appropriate (and what may be overkill) for my crossmember needs. I planned on three (3) crossmembers, including the rear bumper. However, the Tacoma bed will be mounted using the six factory mounting holes on the 2" x 3" x 1/8" outer frame rails (the two front mounts will have small "outriggers" from the frame), and is self-supporting in terms of rigidity (injection-molded cross-bracing underneath). I want the frame to be rigid, but not too heavy. Maybe I'm overthinking this, and should just stick with my original plan. I will mention that, in addition to these crossmembers, there will be an additional 1/8-3/16" plate up front to mount a pair of AT can holders/cans. This will add some cross-bracing, as well. Thoughts???

Craig
 
Last edited:

elmo_4_vt

Explorer
I'd think that 3, including the rear bumper should be fine. If you'd like, you can probably downsize 2 of them (not the bumper), because I think they'd be there more for keeping the frame in check (square and equidistant), then anything else. Bolting the bed down to the frame will provide a good deal of rigidity.

Don

-
 

1x1_Speed_Craig

Active member
The parts are arriving...

Here's the Tacoma bed, along with the new CJ springs and newly-mounted BFG KM2s (31" x 10.5"). My axle should be arriving tomorrow, and then I'll be able to start making some decent progress.

Craig
 

Attachments

  • trailer_bed_tires_springs.jpg
    trailer_bed_tires_springs.jpg
    77.2 KB · Views: 270

elmo_4_vt

Explorer
Is that all your using from the bed of the truck? I envisioned you using the whole back end, aka the blue painted bed sides from the first picture on the first page.... Do you plan on finishing the outside up at all, or just leaving it rough?

-
 

Forum statistics

Threads
189,797
Messages
2,920,944
Members
232,931
Latest member
Northandfree
Top