1120 AF Build in Norway

Geo.Lander

Well-known member
I'd think you'd be better supplying a basic engineering drawing of 'your' truck... Mine had been modified since it left the factory, and then I shifted and changed stuff again to suit our build... Different diesel tank, batteries and air tanks relocated, spare wheel carrier shifted, tail of chassis shortened etc etc... If you are mounting your Hab Box 'rail on rail', they'll need the rail width's, rear axle position in relation to the back face of the cab and rear end of the chassis. They'll need the side view plan (showing how much to cut out to allow for the front splash guards) etc. Those factory drawings might complicate the job. I'd do 3 basic scale plans. Side view (showing wheelbase, wheel size, cab and mudguard positions and height, chassis overhang), aerial view (showing rail width, tyre width, cab width, overhang, fuel tank, batteries and air tanks, leaf springs etc) and rear view (again showing rail widths, wheel widths etc). If they have any questions, they can always ask.

I'd also be prepared to shift stuff on the chassis to suit your build... We have used every available piece of free chassis space for lockers, water tanks, fuel tank, box type muffler etc. Early scale drawings/plans are worth their weight in gold. You get to see your finished truck, see what will and won't work, and what you can fit into it! :)

Hi @Sitec ,

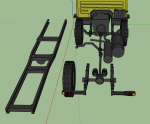
I totally agree with your approach, but the chassis designs have been requested nonetheless as documentation for design and approval needs to stem from from MB in Norway (so I have been told). I am rather new to all this, but have the following chassis prep in the works which will all need to align with the intermediate frame design and construction, at the moment I am in favor of a 4 point torsion free subframe (the only one approved by MB for use with their offroad chassis). I have been speaking to Atkinson Voss and another Austrian based design and engineering firm little and this seems to be the way to go (at a fairly large price bump):-
  • Parabolic springs and shocks with 60-80mm lift front and rear are waiting to be installed with the new super single wheels and tires
  • Steel air tanks removed and waiting for 2 * 30L aluminium air tanks from Germany - To be mounted centrally
  • Battery location still needs to be resolved, I wanted to relocate them within the drivers cab using lithium starter batteries (will also double as drivers cab house bank) but my planning on this is somewhat (*********y) lacking
  • New 400L fuel tank on the cards (not ordered yet until the intermediate frame is designed with all these considerations)
  • Lifting spare winch for chassis mounted spare tire (not ordered yet until the intermediate frame is designed with all these considerations)
My 3D skills suck and nothing is to scale, but ill start fresh and make a scale reproduction of the chassis and accessories I want to mount in January.

I sort of was just wondered if there are these plans open sourced somewhere..?
 

Attachments

  • Screenshot 2020-12-30 at 17.05.31.png
    Screenshot 2020-12-30 at 17.05.31.png
    241.5 KB · Views: 19

Geo.Lander

Well-known member
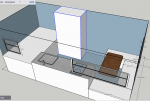
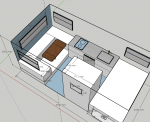
here is a quick preview of the hab layout we are working on, what is missing is the bathroom and entrance door which will be on the passenger side- opposite the kitchen.

The window sizes are based on Outbound specs and we still need to finalize the U-Shaped seating area dimensions (although it will turn into a 130cm bed) but you get the gist-. This design is basically an inversion of the classic with the bed and garage up by the truck cab and the seating aft to facilitate a panoramic view..

Still #todo
  1. Maybe raise the seating on a platform like @VerMonsterRV to add more storage underneath and refactor the seating and backrest dimensions
  2. Investigate the perfect bathroom size for this layout (we will not have a sink, just a shower and toilet)
  3. Add overhead storage / decide where this will be placed (maybe just fore and aft and some kitchen units to keep things feeling airy)
Suggestions and comments really welcome! I really need to take a proper sketchup course as below is just a mashup of badly organised components.

We have pretty much decided on going full electric for cooking and will also add a 12v floor heating system (diesel air blower system too, although that is very much a TBC thing)

Screenshot 2020-12-30 at 22.40.19.png
 
Last edited:

Joe917

Explorer
Cab to cabin access?
Bathroom?
For heat I highly recommend a coolant heater and radiators plumbed in to the engine coolant loop. Webasto ThermoTop C or Esparcher equivalent. You can put heating loops in the floor, way more efficient than electric for heat.
 

VerMonsterRV

Gotta Be Nuts
I would try and work in some floor to ceiling walls, I did that as close to the middle of the habitat as possible to help support the roof panel and stiffen the side walls (our empty box felt a bit flimsy, but the walls stiffened it right up). I would recommend building your seating area raised like we did. It allowed us to fit a ~100 gallon water tank, LifePO4 house batteries, Dometic CFX40 freezer and inverter. Plus the foot area has shallow lockers. We use a Webasto Thermo Top C for our habitat heat, domestic hot water (can also be heated using 12v DC) and engine pre-heat. Eventually I will have it setup where I can also heat the habitat and domestic hot water from the engine coolant while we drive (might build an Arduino with relays and touch screen to control the features). We ended up with a separate stall shower and a very small sink in the bathroom. For us, our layout is pretty much perfect. There are some minor changes I would make now but nothing major. So far we have not missed a crawl thru, it would be interesting to have and our layout would allow on down the road if we decide it is a must have (enter over the seating area, it is a crawl thru due to size anyway). One last thing, make sure you plan for storage. It is amazing how fast it fills up.
 

Geo.Lander

Well-known member
Cab to cabin access?
Bathroom?
For heat I highly recommend a coolant heater and radiators plumbed in to the engine coolant loop. Webasto ThermoTop C or Esparcher equivalent. You can put heating loops in the floor, way more efficient than electric for heat.

Bathroom hasn't been added yet, will be next the bed on the passenger side.

Not planning on a cab-cabin hatch at this point. If we do decide on that there's space just above the bed platform.

Yea, I'm looking into the heating setup you are suggesting. But I don't have the skills or budget to add the underfloor heating circuit as you are suggesting. The 12v underfloor heating will be more auxiliary for comfort. I'm not sure about radiator heaters Vs air blowers.. my original plan for a diesel Truma 6D combi unit. Compact, efficient and reliable. No doubt making use of the engine heat is of course optimal ?

Plans for the hab box have been changing from removable military to custom GRP, for a variety of reasons but mostly to get the layout we want and not having to wait for the German lead times. So basically now the heating and pumping doesn't have to all be encapsulated within habitat. Norwegian rules and regulations will force me into having any diesel heating professionally installed which really will dent my budget.
 
Last edited:

VerMonsterRV

Gotta Be Nuts
One thing about building a truck like ours in the USA is there are actually very few rules. Good if you have the time and skills but really very time consuming but helpful to the budget. Any chance you could work with a licensed installer having them approve some of your work? That can happen here for some more skilled tasks. The good part of this is if you travel away from civilization things will break (our water pump out in the middle of Death Valley 9 days ago for example), it would have been obscenely expensive (a small car can run unto $2k) to get towed out from there, so way way cheaper to fix it myself in place. If long term budget is a concern (it is for us) then the more you know the truck the better. The Truma looks to be a nicely engineered unit, can it also pre-heat your engine? I think I remember you have a glow plug but your block pre-heated would be better. These trucks smoke like crazy when cold, a bit embarrassing in a modern world of emission friendly vehicles. With the regulations can you have them install the actual furnace, but before they do that you already have the DC wiring run to it completed, the habitat coolant circuit and have the diesel fuel pickup in place? Then the actual furnace install is pretty straight forward, the time consuming bit is the habitat coolant circuit and that is not all that difficult once you understand the basics (I can point you towards how to do it). For safety our furnace is installed in the outside under storage steel box. All combustion happens in there. Just a couple of coolant lines run into the habitat. In my opinion this is nicer than compared to some forced air units that are mounted inside the habitat.

Any reason you are putting the bed forward? I like the way our seating area is forward, I did this for a few reasons. First is when people enter the truck they will see the seating area first. Second with 100 gallons of water we change the weight of the truck by over 800lbs between full and empty. The thought was to keep that weight out of the end of the truck. Also a crawl thru might be difficult with a bed that high, our seating is way lower and I think pretty close to the height of the engine hump in the cab.

Back to storage, depending on your inside ceiling height you may want to think about the height of your bed. Our gear locker under the bed is full, we have full size mountain bike, backpacking gear, 2 person inflatable kayak, motorcycle helmets, folding chairs etc. It fills up fast if you are interested in outdoor activities. We do have the washer/dryer under there that takes up a lot of space though.

So lastly about the skills, I was lucky enough to grow up in learning a lot about building things from my father and uncles. But it was nowhere near complete as I had planned on university (I really should have payed attention more). My motto now is to give it a try and I can always hire someone to fix my mistakes. It has worked out to be way less expensive. Also, in your interior layout try and think about your positioning of equipment, things like breaker panels, inverters, batteries... A bit of planning might reduce the complexities of the installs.
 

Geo.Lander

Well-known member
I would try and work in some floor to ceiling walls, I did that as close to the middle of the habitat as possible to help support the roof panel and stiffen the side walls (our empty box felt a bit flimsy, but the walls stiffened it right up). I would recommend building your seating area raised like we did. It allowed us to fit a ~100 gallon water tank, LifePO4 house batteries, Dometic CFX40 freezer and inverter. Plus the foot area has shallow lockers. We use a Webasto Thermo Top C for our habitat heat, domestic hot water (can also be heated using 12v DC) and engine pre-heat. Eventually I will have it setup where I can also heat the habitat and domestic hot water from the engine coolant while we drive (might build an Arduino with relays and touch screen to control the features). We ended up with a separate stall shower and a very small sink in the bathroom. For us, our layout is pretty much perfect. There are some minor changes I would make now but nothing major. So far we have not missed a crawl thru, it would be interesting to have and our layout would allow on down the road if we decide it is a must have (enter over the seating area, it is a crawl thru due to size anyway). One last thing, make sure you plan for storage. It is amazing how fast it fills up.

Hi Jon, Ive added where I think the bathroom will be but still need to mockup at scale to find the right size, so the entrance door should be to the right of this around where the rear wheel will be i imagine.

Yea, I think the raised seating is a great idea, I plan to house the house batteries there, inverter and charger and build the rest into storage. Will the Arduino be setup to control the values? There seems to be a lot of values to open close in those engine heating circuits depending you are pre-heating the engine, hab box, only hot water etc. Setting up a solenoid values controlled by Arduino or similar would be genius. Let us know those plans :)

Appreciate all the advice! Our plans are evolving constantly based on our research and posts here!

Screenshot 2021-01-01 at 11.10.33.png
 

Geo.Lander

Well-known member
Any chance you could work with a licensed installer having them approve some of your work?

This is the route I am taking with the 12V house bank, I will build all the circuits, battery and do the core install. I have found a automotive election who will connect up he inverter and shore power and certify that, he says that will be enough documentation on that end. I have not gotten as far yet with the heating plans since we have changed designs from a removal military Hab box to custom GRP (no plumbing between drivers cab and HAB is not longer an issue).

The Truma looks to be a nicely engineered unit, can it also pre-heat your engine?

No, I do not think it is designed to at least but I need to talk to Truma about this option too.

I think I remember you have a glow plug but your block pre-heated would be better. These trucks smoke like crazy when cold, a bit embarrassing in a modern world of emission friendly vehicles

Yea, we have already noticed that while delivering the truck to our garage just before xmas. It warmed up quite fast and started totally fine with about a 15 second buzz from the glow plugs but there was some smoke.. I always planned on adding a proper diesel furnace to preheat the engine and drivers cab, but now with all the advice here the consensus is to also use this to heat the habitat too. I am a little concerned about the complexities of a system like this to be honest. Ive never liked plumbing..

habitat coolant circuit and that is not all that difficult once you understand the basics (I can point you towards how to do it)

Please do! I would appricate all the crash course material I can get, I have been reading @Neil 's blog about it but I really do not undertand the components at all yet.

Any reason you are putting the bed forward? I like the way our seating area is forward, I did this for a few reasons. First is when people enter the truck they will see the seating area first. Second with 100 gallons of water we change the weight of the truck by over 800lbs between full and empty. The thought was to keep that weight out of the end of the truck.

For exactly the same reasons you stated, to keep the weight off the back of the truck. Also, we really want the panoramic views for the seating, hence the stupidly large and expensive windows. I might still extent the bed to 160cm and height to 90cm/garage as most of our systems apart from battery bank will be there. water will be split between under the kitchen and garage drivers side forward to match the weight of the oposting fuel. I am planning on a heated grey water system mounted under the intermediate frame too, but that is still all up in the air.

So lastly about the skills, I was lucky enough to grow up in learning a lot about building things from my father and uncles. But it was nowhere near complete as I had planned on university (I really should have payed attention more). My motto now is to give it a try and I can always hire someone to fix my mistakes. It has worked out to be way less expensive. Also, in your interior layout try and think about your positioning of equipment, things like breaker panels, inverters, batteries... A bit of planning might reduce the complexities of the installs.

I have seen your woodwork and it is nothing short of artisanship, I have to plan a little different because I cannot obtain those finishes. I am going to have the box builder construct how bed platform and bathroom and use marine plywood for the cabinets supported by 2020 alu extrusions, to finish the ply we are planning on 3M PSA veneer (we are also considering doing this to the walls too. With this sort of construction it should be easy to hide my mistakes and also be able to use the truck for some local travel and long weekends while building still.
 

Joe917

Explorer
You are going to curse that u shaped dinette with the table so lose to the cabinetry. You will either have to swing the table every time you get in or out of that side or you will have to slide around the dinette from the other side.
After living with our truck full time for 5 years I would not have a truck without cab to cabin access.
A bathroom, shower/toilet wet-room needs to be 28"X46" minimum for comfort.
I would keep looking at layouts before you commit to anything
Radiators with a hot water tank and a Webasto or Esparcher plumbed to the engine is a simple set up. I would avoid any electric valves (they will fail) and any computer controls. Added complexity is just asking for trouble. Our truck came with a computer control set up for all the tank levels and the Webasto. First thing to go(only half of it worked). A simple thermostat will work very well with the Webasto Thermotop C (12V Heatmiser)
 
Last edited:

Geo.Lander

Well-known member
You are going to curse that u shaped dinette with the table so lose to the cabinetry. You will either have to swing the table every time you get in or out of that side or you will have to slide around the dinette from the other side.
After living with our truck full time for 5 years I would not have a truck without cab to cabin access.
A bathroom, shower/toilet wet-room needs to be 28"X46" minimum for comfort.
I would keep looking at layouts before you commit to anything
Radiators with a hot water tank and a Webasto or Esparcher plumbed to the engine is a simple set up. I would avoid any electric valves (they will fail) and any computer controls. Added complexity is just asking for trouble. Our truck came with a computer control set up for all the tank levels and the Webasto. First thing to go(only half of it worked). A simple thermostat will work very well with the Webasto Thermotop C (12V Heatmiser)

Hi Joe, the table is just a mock up component, we are planning on a marine style fold up/extendable table on adjustable marine pedestal to make the support for the bed conversion. The table will be fairly compact once in what will probably be default down position. Here is a view from underneath, we might not even have the table extendable and just buy an off the shelf adjustable unit and make our own top.
Screenshot 2021-01-01 at 19.52.19.png

Thanks for the bathroom advice, we were thinking about 1100*750mm and a quick conversion of inches indicates we are within your suggestions ?

I have no experience with solenoid values on trucks, but I know the ones I had on my boat (to control the live well filling) where there for over 10 years in salt water, no issues at all.

We are looking at layouts a lot now and we really are keen on the U-shaped seating/guest bed. Akin to @VerMonsterRV I have spent a lot of time at sea (not as close to a circumnavigation) and am used to moving around these types of layouts.

I really need to get my head around the heating system being suggested over and over again here, I am not even sure what the proper name for such a setup is..
 

Sitec

Adventurer
Hello! The joys of planning your build eh!!

Two things I pick up on... (and I'm far from being an expert, so don't take it as correct! ;) ) Firstly, I tend to agree with Joe917 in that you will find that seating frustrating, especially at the cooker end.... We have mocked ours up in the Hab Box to see how usable it is, and ended up changing quite a bit of it so it was easy to use and access... Look up a 'Nuova Mapa' table. It may save you a lot of work. Our plan attached below (to add to your confusion! ;) ). Exterior measurements of ours are 6m x 2.5m.

Plans Final Layout.jpg

The second thing to review I think, is having your door above the wheel... It means you can't have a step well, which will make your external steps very long, or steep. It also means they'll have to be detachable, or be folded down from inside (which has it's own build issues). If you have a sliding step on the outside, there's a good chance it will be filled with crap thrown up by the wheel... Consider how many times you will get in or out of the Hab Box when parked, especially when carrying stuff in and out. If it's not really easy, you'll avoid doing it. Decent real steps was a requirement by my wife, and the door can be closed with them out or in. I can comfortably walk up and down them without having to hold any grab rails.

Cab Mods 34.jpg

I think it's worth considering reversing your layout on the chassis, as it'd put the under bed locker at the rear of the truck meaning it can be square edged (as there's not a gearbox and linkage in the way), and it puts your seating against the cab. As has been suggested before, elevated seating has a good feel about it, and gives more room for valuable storage. It's also better for gearbox/engine access. Seat bases and panels can lift out easily... Mattress's are fun to lift out in a house, let alone a truck... As always, this is just my thoughts, and only what I've taken on board from the forum members while we are building ours. Spending time and mocking up your Hab Box in a spare room of your house or the garage is time well spent. You'll work out really quickly what you can live with and what you can't... We had our Hab Box early in our build so have been able to visualise it all, and make it all suit the chassis. As VerMonsterRV mentioned, some internal walls or a bulkhead is also key... Your plan lends itself to having a bulkhead between the bed and living. Have access to the bedroom through an opening that's around 1.5m wide and 1m tall... It'll put huge strength into the body, give you splash protection between the stove and bed (wife spotted that straight away), and it'll give you walls to mount switches, hooks etc.

If you are really set on keeping the bed up front, and the seating at the rear, then also consider locating your door behind the rear wheels... With some clever engineering, you could have a sunken set of steps and a door on a back corner.. (I'll draw what I'm seeing if you need...).
 

Joe917

Explorer
100% agree with Sitec on the step well. We have a two step well inside the truck. We can get in and out (with a little effort) without deploying the steps. These little conveniences are huge when you live full time in the truck.
 

VerMonsterRV

Gotta Be Nuts
One thing I have learned is there is no perfect boat (or in this case overland truck) for everyone. Each build is a compromise and works towards what works for you and what fits in your budget. For us we love the U-shape dinette even if it is a little tight on the driver's side, but we are fairly active and are not large/tall people. Same goes for the dry bath, it is tight and if we were larger/taller it might not work but love the separate stall shower. Not having a crawl thru, once again a cost/complexity decision. Our passage would need to be small with a bellows and double door (plus it complicates raising/lowering the cab which unfortunately lately I seem to doing a lot of). I looked into building the sunken entry, it would have taken diesel tank space and increased the time to build and cost. Also take a look at some of the higher end builders in Europe (Bliss and Unicat for example), a lot of their designs do not use sunken steps. For us 2 permanent steps that swing out allow us to get in and out of the truck no problem when on the move. When parked for the night I bring out a small 2 step ladder that fills in the first 2 feet before the swing out steps. Our worry is when people less agile come by to visit as it is not as guest friendly as a sunken entry. My guess is you may have the habitat built and mounted on the truck, so each of these would add to the overall cost. After a full year in the truck we really have not missed either of these, but this is just our opinion.

I agree about complexities, but once again it is an individual thing one what you consider complex. Lets face it the amount of systems on these trucks is complex by nature (solar, b2b chargers, inverters, refrigeration, freezers, furnace etc). I'll digress for a moment, before we had a lot of offshore experience we had already lived aboard/coastal cruised our sailboat for a number of years. We got tired of the manual pumping toilets and the rebuilds I needed to keep doing to stop them from leaking. So I bought an electric head, oh boy the "old salts" really loved that and said it would be the bane of my sailing, "I better bring a bucket". I listened a bit and ended up buying a complete spare and stored it in the bilge. It ended up staying in the bilge and that toilet was by far the best least troubling head we ever owned. Am I sure I will be doing an Arduino controlling the heating system, nope. But since I would build it, program it and install it, it would not feel all that complex to me. But it would allow me to control that system exactly the way I want it to work.

Now the entry door over the rear wheel, I would not do that. It would really limit your options for steps/ladder or the mentioned sunken entry. Depending if you are going foam core/fiberglass skinned walls I would think about that long window. Might make more sense structurally to have a window the size of the seating area and another one in the kitchen area. Then you could have a bit of a supporting wall between. Plus I think visually inside it would look better.

I would also add to Sitec's comment about the bulkhead for splashes. I would say you should have something at each end of the counter to stop water. Given we camp a lot of nights not in formed campgrounds we are usually not perfectly level. So if a bit of water gets on the counter it can go forward or aft. For us the cabinet that is our pantry/refrigerator is on one end and we have a 12mm clear plexiglass partition for the other end (to allow light).
 

Geo.Lander

Well-known member
Hello! The joys of planning your build eh!!

There certainly is a lot to think about, and this is our first draft really just to figure out where we want the main components, windows and doors :D but so far it is still fun for us at this point!

Look up a 'Nuova Mapa' table

This looks very cool, I like the symmetry of your design!

The second thing to review I think, is having your door above the wheel... It means you can't have a step well, which will make your external steps very long, or steep. It also means they'll have to be detachable, or be folded down from inside (which has it's own build issues). If you have a sliding step on the outside, there's a good chance it will be filled with crap thrown up by the wheel... Consider how many times you will get in or out of the Hab Box when parked, especially when carrying stuff in and out. If it's not really easy, you'll avoid doing it. Decent real steps was a requirement by my wife, and the door can be closed with them out or in. I can comfortably walk up and down them without having to hold any grab rails.

This is a great point, we are having the designer of the intermediate frame leave enough space for a slide out platform under the entrance, we will not use this to start off with but this will give us the option to add a full staircase on the platform if we need this going forward. Right now we are pretty agile and active people and will have no access problems with our planned 3 step solution:
1609582562109.png

I think it's worth considering reversing your layout on the chassis, as it'd put the under bed locker at the rear of the truck meaning it can be square edged (as there's not a gearbox and linkage in the way), and it puts your seating against the cab.

There is no gearbox or linkage in the way on our truck as this is encompassed within the 1.5 cab, we can fit the box up against the drivers cab with about 20-40mm of space almost flush (like the current firetruck cab is mounted). We are pretty set on an the bed forward approach to try and keep weight central and have 180˚ view from the seating area. It is a little different from the traditional I know :D

I really appreciate the analysis and feedback from everyone here! Please keep it coming!

The design is constantly evolving, here is the latest draft, I realise I should put more work into the details before posting, but getting the feedback from everyone here is really improving the iterations we are producing! We will also be adding a full height closet between the bed and kitchen. We are also a few steps closer to signing a contract with a box producer and Aktiksen Voss in the UK are currently a favorite of ours, will keep you posted.

Screenshot 2021-01-02 at 11.25.20.png
 

VerMonsterRV

Gotta Be Nuts
With the table, if I remember correctly there are some tracks you can mount underneath to move it side to side. A lot of the conversion vans use the Lagun mount. We wanted a solid table and are happy with the table and the pedestal we have.

What are your plans of the rear of the truck? Are you planning on a lift? I ask because if you are try and plan the overall height of it compared to your rear facing window. Also, our truck seems to create a rather large vacuum behind the truck. The amount of dust that collects there is rather amazing. Even though the motorbike is covered every time we use it I clean/rinse it off. You mentioned light and wanting a lot of it inside. We shared the same thinking and is one of the reasons we included roof hatches in our truck. They really do let a lot of light in and with our mainly white interior walls it is very bright inside our habitat.

One thing we added near the end of our build (and luckily had room for) was a place for shoes/coats near the door. I also like our slide out platform in the entry for taking shoes on and off (we do not wear our shoes inside). We now really appreciate this feature.

Sitec's comment about the wall between the galley and bed. Try and play a bit with this. Heather cooks a bit and we eat most meals in the truck. A nice detail might be a thin wall that has a built in spice rack, place for a wall clock on the kitchen side. Not sure what your feelings about entertainment are but we enjoy watching the occasional movie. We have a 21" monitor on a swing arm mounted just aft of our refrigerator. It is setup so we can watch is from the dinette or in bed if we choose. If you wanted something like this the thin wall could be a good mounting point for it (I am assuming the window in the bed area would be at your feet, ours is and it is nice to look out in the morning). Try and think about getting your wiring from the roof/lighting, fans etc to your distribution panels. There will need to be chase ways that you can access for installation and eventual repairs. For composite panels you can also have wiring chase ways built into them during the manufacture. We did this for our overhead hatches as they have lights in them. I ended up boring my own channels for the MaxxFan and rooftop AC as I had not planned ahead for these.

Try and work in your overhead cabinets. Ours really do store a lot and are very important. The height and depth are important because they will dictate how large your windows can be. They are also great mounting points for lighting. The longer the runs of wire the large gauge they need to be for the same current draw. Our floor to ceiling pantry is the major channel for our wiring, but we also have the 2 front corners with 45 degree panels. These are also mounting points for reading lights.
 

Forum statistics

Threads
188,200
Messages
2,903,704
Members
229,665
Latest member
SANelson
Top