1973 Wagoneer - Full Size Camping Goodness

Dr. Marneaus

Station Wagoneer
Bah!
EFI will remove your excuse for getting home a day... or two late. Where's the fun in that?
I'd rather have a '74 with a four barrel, and mice turds.
Oh, wait... I guess this trade really is a win-win! :victory: roflol

Looking forward to following along on the install, and also get your input on the '74.
Great meeting you. Will be fun projects for both of us. :beer:

Here it is at it's new home. :)


I'm glad we were able to make this all work out. You know how to get ahold of me when you have questions or when you realize how crazy we all are for working on the FSJs....but if you're a scout guy im sure you already get that!
 

Dr. Marneaus

Station Wagoneer
Step one is mostly complete. 4.5" hole cut into the tank. Then I hammered down the raised parts to get the mounting flange to sit flush. Need to do some final massaging and smooth out the cut but most of it is done.


Comanche Scott

Expedition Leader
That's looking good. Nice thick metal on the OEM gas tanks.
Will your local radiator shop boil it out for you when you've got all the cutting and drilling done?
That should clean it up like brand new. :)

Something I was just thinking of. The big fuel hole in the sump tray is at the wrong end with the assembly turned to face the rear.
It if were me, I'd cap that hole, and make one in the end facing forward. This will help hold fuel in the tray when on steep inclines.
If you stay at or above a 1/4 tank it's a moot point though.
 

Dr. Marneaus

Station Wagoneer
That's looking good. Nice thick metal on the OEM gas tanks.
Will your local radiator shop boil it out for you when you've got all the cutting and drilling done?
That should clean it up like brand new. :)

Something I was just thinking of. The big fuel hole in the sump tray is at the wrong end with the assembly turned to face the rear.
It if were me, I'd cap that hole, and make one in the end facing forward. This will help hold fuel in the tray when on steep inclines.
If you stay at or above a 1/4 tank it's a moot point though.

That thought had crossed my mind as well, and i think the tanks instructions said to actually mount it pointed side to side in the tank, which is not an option due to my baffle. Due to the location of the baffle it seems like there is little to no concern with losing fuel while point DOWN hill, so you might be on to something!

Got it all cut and mocked up, needs a TINY bit more massaging in 2 spots to get it as flat as possible, but otherwise it's all ready for me to assemble the pump then drop it in with some gasket maker, the corn gasket, then snug it down.


The tank is damn near perfect inside, not worried about having it cleaned out. I'm honestly surprised how it looked. It was being driven regularly its whole life, and when it got parked a year or so ago it had like 3/4 tank of gas in is. I'll probably swish some solvent or something just to get it 100% clean. It has some super minor discoloration from me leaving a little bit of water in it over night without actually drying it. I dried it with heat gun last night, however, when I was done working on it.


Dr. Marneaus

Station Wagoneer
I know it doesn't look like much but its getting there. All wires are run now, dropped and removed old tank and fuel pump, removed the lines I need to use again, I removed even MORE superfluous wiring for accessories, made all the leads for the power and ground, made all the fuel lines, mounted new tank, mocked everything up for measurements and cuts, dropped it back out, added a union so I can drop the tank without pulling the under hood lines, added the fuel filter, mounted the lines to the side of the tank, I can now permanently install the new tank.


Several items left however. Need to measure the under hood lines, cut and mount. need to mount regulator. Then, everything will be plumbed. Need to tidy up the wiring by replacing the split loom i removed when deleting a bunch of crap, then build the little diode Y and connect the last 2 wires. Next comes the O2 sensor bung getting welded in, then finally I just need to replace my filler neck with the dual tube version that goes with my tank and connect it with hoses. I THINK thats all.

A few nights working after I get home for a couple hours ought to get it done. I'm hopeful that I'll be able to fire it up before or during this coming weekend.
 

Dr. Marneaus

Station Wagoneer
Tank is in. Fuel lines from union/filter to TBI are mocked up and measured for cut. regulator mounted. Got tired and went in for dinner before making those cuts. Will do it today. Hope to have everything 100% plumbed by the end of the night, and hope to drill o2 sensor hole.


(yes, that all clears the linkage without any contact)
 

Dr. Marneaus

Station Wagoneer
So, was getting low voltage while cranking., mostly because the battery had sat for weeks, been cranked over a bunch, etc. Charged it, then charged it on my dakota with jumper cables for about half an hour. Seems to have alleviated the issue. I'll check back tonight after it has sat to see if it's still got enough juice to fire up the computer for the EFI. I cranked it for about 30 seconds total yesterday while testing, so this should be a good indicator of how it would fare in a normal situation.

as soon as I'm done getting it up and running I'll be bypassing my ammeter which should gain me about a volt at the solenoid and should help give the battery a good high voltage charge when I'm driving. After this is all dialed in, my next move is upgrading to a 10SI alternator, with 95 amp output. That should all be a huge upgrade to my charging system.

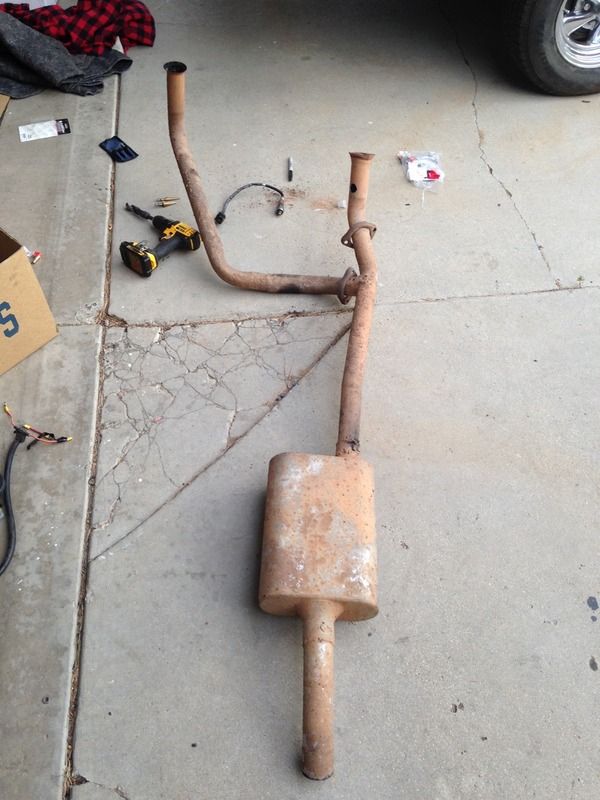
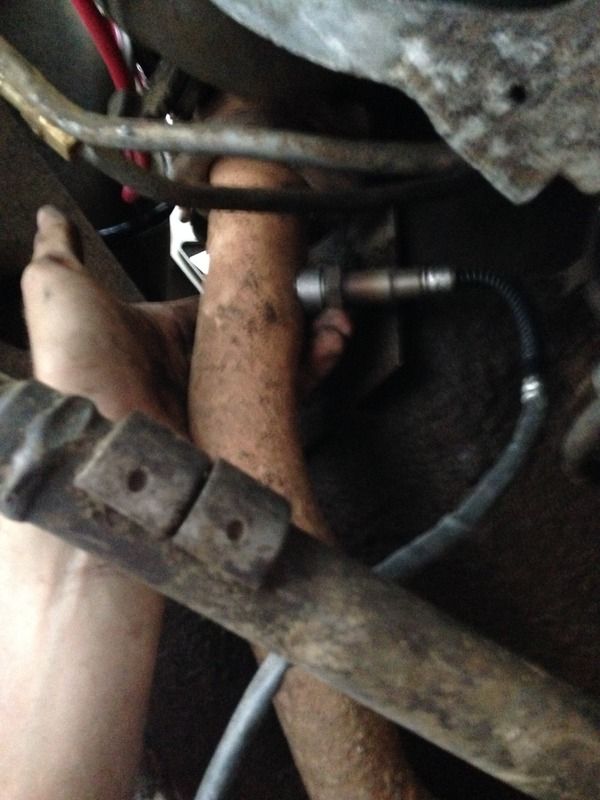
anyway.....had to drop the crossmember and drop the exhaust to drill for the bung, and will have my buddy weld it in tonight.


Everything is plumbed at this point, with the exception of me installing the new filler neck, and connecting the vent nipple on the tank to the existing lines that go to the charcoal canister. I also changed up my wiring a bit more, removed the fuse for the headlight relays and am running on a breaker instead. all new 2AWG battery wires/terminals, and a brand new 4AWG starter cable.

what's left to do is:

1. weld the 02 sensor bung and reinstall exhaust
2. Install filler neck and connect to tank with the $115 fuel hose i bought...
3. connect vent nipple
4. Connect the 12v on/off sensor wire to switched 12v for both crank and run. Need to solder up a diode in line to prevent feedback to the 12v start wire. I'm going to have all of this inside, under the dash as close to the ignition switch as possible.
5. figure out a barb elbow fitting for the brake booster since the regular barb I installed interferes with a vacuum pot on the manifold.
6. put fuel in it
7. fire it up?
 

Dr. Marneaus

Station Wagoneer
I drove it into town today and it was pretty much fine. Idle is a bit weird but I assume its learning and its going to feel a bit different in general.

I realized for some reason the little nipple on the gas tank wasnt venting, and it was letting out a big woosh every time i opened the gas cap. I reinstalled my old vented gas cap and that fixed the issue. So until I feel like dropping the tank again thaT'LL be my solution.

Lastly, I realized I was only showing 13.06 volts at the battery when idling, this has always been the situation, but given this system is now installed and i need a healthy batterty, it wasnt gonna fly. So I did the ammeter bypass. 8 AWG fine strand wire from the alt to the solenoid. yellow wire abandoned at both ends, red wire from alt to the solenoid, and then insulated and capped the other end of the red wire that I removed from the ammeter.

Fired it up and hot damn. 14 volts at idle! That should keep the battery happily charged and avoid issues like I was seeing before. Soon I will install an upgraded amperage alt, but until then I think that was a big help and a smart move.

As mentioned idle is a bit weird right now but it was cruising up and down the highway with no issues under load or just cruising. Backfired out the muffler twice on the highway when i let off the gas but then it never did it again.

So, its now running and driving! I intend to drive it around every night this week to get a feel for it and put a good 50 or 60 miles on it. We have a trip this weekend to a 4x4 campground so I want to get a few miles before heading out!
 

njtacoma

Explorer
Great news
I have followed your adventures with mostly envy (a few spoiled camping trips not so much)

I like old wagoners and yours is great
 

Dr. Marneaus

Station Wagoneer
I'm pretty stoked about the alternator rewiring. The 13.06 volts wasnt enough to give a high energy charge to the battery, so no wonder it would get weak fast. Also, everything is set up now for when I upgrade the alternator.
 

Forum statistics

Threads
187,301
Messages
2,893,183
Members
228,166
Latest member
Nchamp
Top