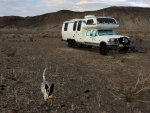
1993 Revcon Trailblazer - Project Overhaul

ExpoMike

Well-known member
we used loctite Power Grab to glue them to the wall and foil tape to secure them to the aluminum studs.

we didn’t really get into the weeds with eplastics about the thermal expansion with ABS. We’re using c channel between sheets so they aren’t butted up against one another and it creates a “seemless” look.
Eplastic was really great to deal with so they may be able to quickly answer over the phone. Sorry I couldn’t be more helpful.View attachment 635637

Thanks for the info. I was checking out the site and realized they are local to me, about 7 miles away. Likely need to swing by and talk with them. Looking forward to more updates. :)
 

ITTOG

Well-known member
Interesting approach to blame the wood for the window leaks. The good thing about the wood is it identified the leak fairly quickly. If you still have leaks the same can't be said for the plastic. Also, just so you know, mold can form on plastic as well. So changing material will not eliminate mold. Only not having a leak will.

Sorry if that sounds a bit harsh. That wasn't my intent. I just wanted to make sure you understand that none of your changes will help you. Only fixing the leak will help you. Good luck.
 

AdvWife

Active member
Interesting approach to blame the wood for the window leaks. The good thing about the wood is it identified the leak fairly quickly. If you still have leaks the same can't be said for the plastic. Also, just so you know, mold can form on plastic as well. So changing material will not eliminate mold. Only not having a leak will.

Sorry if that sounds a bit harsh. That wasn't my intent. I just wanted to make sure you understand that none of your changes will help you. Only fixing the leak will help you. Good luck.

never blamed the wood for the leak. And we understand mold can grow anywhere. Plastic is easy to maintain if and when leaks happen and mold occurs. Wood needs to be removed if damaged too badly, as we found when we purchased the Revcon. We don’t intend to leave leaky windows - that would be a huge waste of effort and money. Merely pointed out why we decided to change materials for walls.
 

ericvs

Active member
This is such a cool rig. I am glad that you guys have taken it over and are giving it a new life! Keep up the good work!
 

Hellwinger

Member
The Spousal Unit and I are the proud second owners of an almost fully operational and often road-worthy 1994 Revcon Trailblazer. In a previous life, until 2002, it was the Phoenix One, of RoadTripAmerica fame. It's been kept going on a budget over the years. Still runs great, and scares the hell out of Jeepsters when rounding a mountain dirt road.

You guys are really tearing into your Trailblazer, uncovering craftsmanship issues that no doubt still lie hidden in ours. We have put many miles on the Phoenix II. Like your trip from OR to AZ, it's all fun and games until something breaks! We've repaired, modified and re-engineered brakes, fuel system, running gear, engine & transmission heat management, etc. There is probably much to learn from each other about the care and maintenance of our beasts.

Also, at the beginning of this thread, you say that about 57 were made? Do you know of a Revcon Trailblazer therapy group or something?

Please enjoy a couple of photos:

- Hellwinger
 

Attachments

  • At_JPL.jpeg
    At_JPL.jpeg
    517 KB · Views: 9
  • At_Panamint_Dunes.jpeg
    At_Panamint_Dunes.jpeg
    506.8 KB · Views: 9
Last edited:

AdvWife

Active member
The Spousal Unit and I are the proud second owners of an almost fully operational and often road-worthy 1994 Revcon Trailblazer. In a previous life, until 2002, it was the Phoenix One, of RoadTripAmerica fame. It's been kept going on a budget over the years. Still runs great, and scares the hell out of Jeepsters when rounding a mountain dirt road.

You guys are really tearing into your Trailblazer, uncovering craftsmanship issues that no doubt still lie hidden in ours. We have put many miles on the Phoenix II. Like your trip from OR to AZ, it's all fun and games until something breaks! We've repaired, modified and re-engineered brakes, fuel system, running gear, engine & transmission heat management, etc. There is probably much to learn from each other about the care and maintenance of our beasts.

Also, at the beginning of this thread, you say that about 57 were made? Do you know of a Revcon Trailblazer therapy group or something?

Please enjoy a couple of photos:

- Hellwinger

If there’s a support group, sign us up! This turned into a beast of a project. And it’s slow going.
That’s killer that yours is in good shape. I’m jealous of the owners so can use theirs!
 

Hellwinger

Member
If there’s a support group, sign us up! This turned into a beast of a project. And it’s slow going.
That’s killer that yours is in good shape. I’m jealous of the owners so can use theirs!

Actually, we have never seen another Trailblazer on the road. When on the road, we get lots of admiration, lots of "never seen one of those before!" and "Is that custom?". Have seen a couple of manky ones for sale on the web over the years. Would be very interested in whatever contacts you have. Where did you hear the 57 number from? When we got ours in 2002, the previous owners said only about a dozen had been made over the years. Not sure what their source was, either. Hmm, I should ask.

So, as far as I can tell of your progress from your videos, I can offer some experience:

I sealed my roof by wire-wheeling off the layers of butyl rubber and RTV and stuff and re-sealing all seams and holes and rivets with Dicor 501LSW self-leveling lap sealant. Prepped with mineral spirits. Works great. It is white, I think it might come in colors, it could be paintable to match your Toyota tan. I must say, tho, the reflective difference between a bright white and a tan roof is thermally significant.

The seal between the front fiberglass coach end cap and the stock Ford roof of the cab needs to be flexible. I keep re-sealing mine with a huge thick and ever-growing bead of white silicone sealant (RTV). Aerodynamically, you can see how rain is funneled into that region above the A pillar. While y'all have the interior bed floor off at the front, you might want to see if a better flexible seam can be engineered. Maybe with some closed-cell foam of proper elasticity modulus (stiffness).

One of the things I have found that greatly adds to wear and tear, and that is difficult to anticipate, is the relative motion between all the engine, frame, chassis, body, and coach parts. The frame was extended by two feet between the front and middle axle and this has resulted in much greater diagonal flexure, especially in off-road conditions. And there is also vibration to consider. Especially if you find out that you can indeed take a cobblestone road at 45MPH if you deflate the tires! There is a lot to be said for the inertia of 7 tons of fun!

Not being afraid of tight fits, scratchy bushes and low tree branches is a reason we have yet to paint ours. Also why we don't have an awning. Would like one tho. Need to figure out how to armor against scrape-y tree branches it in the stowed position. Am curious to see how yours works out.

One of the first things that had to be rebuilt (during a road trip, in a Walmart parking lot), was the gasoline filler necks. As is, they leaked gas fumes into the coach. Note that the fill hoses for the gas tanks cut a corner through the interior coach volume. It is very important all of the relevant seals work 100% . As a backup, I have also built a box around each and filled it with urethane expando-foam. Also, the volume of the isolating box is best vented to the outside, but be sure to use a screen for critters and wasps.

Speaking of which, we have found that a bit of food-grade diatomaceous earth sprinkled around the wheels keeps ants out during storage. And is not toxic to dogs. And speaking of storage, I keep the gas fresh with a bit of Marvel Mystery Oil.

Am very curious about your floor solutions.

The original black tank was inside the coach, under a bench seat. Vibration wore a pin-hole in it with very slow-to-manifest yucky results under the kitchen table. Now a new one is mounted outside and armored against rocks. It has a 25 gal capacity, plenty for boondocking if managed. Also has strategic cleanouts that have not been necessary, but add to peace of mind regarding possible clogs. Sanity on the road is helped along by easy-to-use robust infrastructure. I will hazard a guess that the cartridge toilet you are proposing will get old fast. And the privy shower is very nice. Need to clean the toilet area? Take a shower! Nothing like modern plumbing...

Well, I could go on and on, but like any great project, best taken in small bites. Am happy to answer questions!

- Hellwinger
 

AdvWife

Active member
Actually, we have never seen another Trailblazer on the road. When on the road, we get lots of admiration, lots of "never seen one of those before!" and "Is that custom?". Have seen a couple of manky ones for sale on the web over the years. Would be very interested in whatever contacts you have. Where did you hear the 57 number from? When we got ours in 2002, the previous owners said only about a dozen had been made over the years. Not sure what their source was, either. Hmm, I should ask.

So, as far as I can tell of your progress from your videos, I can offer some experience:

I sealed my roof by wire-wheeling off the layers of butyl rubber and RTV and stuff and re-sealing all seams and holes and rivets with Dicor 501LSW self-leveling lap sealant. Prepped with mineral spirits. Works great. It is white, I think it might come in colors, it could be paintable to match your Toyota tan. I must say, tho, the reflective difference between a bright white and a tan roof is thermally significant.

The seal between the front fiberglass coach end cap and the stock Ford roof of the cab needs to be flexible. I keep re-sealing mine with a huge thick and ever-growing bead of white silicone sealant (RTV). Aerodynamically, you can see how rain is funneled into that region above the A pillar. While y'all have the interior bed floor off at the front, you might want to see if a better flexible seam can be engineered. Maybe with some closed-cell foam of proper elasticity modulus (stiffness).

One of the things I have found that greatly adds to wear and tear, and that is difficult to anticipate, is the relative motion between all the engine, frame, chassis, body, and coach parts. The frame was extended by two feet between the front and middle axle and this has resulted in much greater diagonal flexure, especially in off-road conditions. And there is also vibration to consider. Especially if you find out that you can indeed take a cobblestone road at 45MPH if you deflate the tires! There is a lot to be said for the inertia of 7 tons of fun!

Not being afraid of tight fits, scratchy bushes and low tree branches is a reason we have yet to paint ours. Also why we don't have an awning. Would like one tho. Need to figure out how to armor against scrape-y tree branches it in the stowed position. Am curious to see how yours works out.

One of the first things that had to be rebuilt (during a road trip, in a Walmart parking lot), was the gasoline filler necks. As is, they leaked gas fumes into the coach. Note that the fill hoses for the gas tanks cut a corner through the interior coach volume. It is very important all of the relevant seals work 100% . As a backup, I have also built a box around each and filled it with urethane expando-foam. Also, the volume of the isolating box is best vented to the outside, but be sure to use a screen for critters and wasps.

Speaking of which, we have found that a bit of food-grade diatomaceous earth sprinkled around the wheels keeps ants out during storage. And is not toxic to dogs. And speaking of storage, I keep the gas fresh with a bit of Marvel Mystery Oil.

Am very curious about your floor solutions.

The original black tank was inside the coach, under a bench seat. Vibration wore a pin-hole in it with very slow-to-manifest yucky results under the kitchen table. Now a new one is mounted outside and armored against rocks. It has a 25 gal capacity, plenty for boondocking if managed. Also has strategic cleanouts that have not been necessary, but add to peace of mind regarding possible clogs. Sanity on the road is helped along by easy-to-use robust infrastructure. I will hazard a guess that the cartridge toilet you are proposing will get old fast. And the privy shower is very nice. Need to clean the toilet area? Take a shower! Nothing like modern plumbing...

Well, I could go on and on, but like any great project, best taken in small bites. Am happy to answer questions!

- Hellwinger

The other half did some internet sleuthing when we 1st bought it and saw the 57.That hasn’t been validated though.

We still have to seal...well pretty much everything. Haha. We’ve sealed the vent fans and that’s about it so far. We should probably take stock out in whatever brand we choose before we buy because the square footage!

Were considering the vibration and flex but haven’t come up with a solid solution yet. The Revcon could’ve been built better for the off-road conditions they wanted it to handle.

Thanks for the info on the filler necks. We will definitely look into that before we reconstruct the interior. As for the toilet we are going with composting. Save space on a black tank and carry less hoses and whatnot.

Fortunately and unfortunately we’re still a few months out from getting back into it so that will give us more time for research.

Thanks for the advice! Super helpful to hear from someone who not only owns one but uses it too.
 

Hellwinger

Member
"The Revcon could’ve been built better for the off-road conditions they wanted it to handle."

Haha! You said it!

So one thing I have tried to engineer in as things get repaired, rebuilt, etc. is to make it easy to disassemble and reassemble. Machine screws instead of glue or rivets in strategic places. No hard-to-get-to fasteners. Easily accessed decking or gold drywall screws for straightforward disassembly. Exposed fastener heads (no extraordinary efforts to hide fasteners). Be prepared to re-do things as reality imposes itself. It's called iterative engineering, and it's less stressful to be mentally and physically open to the possibility. Gets ya on the road faster, too. Carry plenty of tools on the road! Every trip will be a shakedown cruise more or less, hopefully less as time and experience go on . . .

BTW when you get to electricals, do not trust the factory wiring or crimp-on lugs. Many bad crimps, and corroded connections could haunt you. While you have the walls off, the investment in re-doing the wiring will pay off. Most of the old wires could be OK to re-use, but they are often routed past sharp edges and screw tips and such.

When it comes to coach power, the Phoenix has (3) parallel 100Ah AGMs, and we have never run out of juice. AGMs are superior for this application. They are sealed, don't leak, and can be deep discharged without being killed. The Phoenix's are charged via a Morningstar controller channeling 200W of solar panels mounted on the front fiberglass cap, or the engine alternator, or from shore power when plugged into AC. It all goes into the controller, each input isolated by diodes, so no overcharging.


But when these crap out (the Morningstar solar controller gives them lots of charging TLC, so that won't be for years, hopefully) I would like to replace with LiFePO4 or something similar if affordable. Lead is heavy!!

The Phoenix has a shunt starter relay to connect the engine and coach batteries together. Under normal conditions, the two power systems, engine and coach, should be isolated so that the engine starting battery is not inadvertently discharged. That's a sticky wicket. However, on really cold mornings the coach batteries could help get the engine started. When the engine is running, closing that relay allows the engine alternator (having a high-capacity aftermarket alternator is a good idea) to charge the coach batteries at a much greater rate than the Morningstar can handle (but it is unmanaged, so to not overdo it, the Phoenix has a dash-mounted high-current meter on the alternator output).

And the generator is started from the coach batteries. Heavy gauge wiring for high currents is a must. I solder my battery lugs onto the heavy wiring - even a fraction of an ohm resistance can be a problem. Circuit breakers will save batteries if battery wire insulation is violated by off-road conditions. Ugly story about how I know...

Ah well, when y'all get back into it, I'm happy to answer questions. Still curious about awning solutions . . .

- Hellwinger
 

AdvWife

Active member
"The Revcon could’ve been built better for the off-road conditions they wanted it to handle."

Haha! You said it!

So one thing I have tried to engineer in as things get repaired, rebuilt, etc. is to make it easy to disassemble and reassemble. Machine screws instead of glue or rivets in strategic places. No hard-to-get-to fasteners. Easily accessed decking or gold drywall screws for straightforward disassembly. Exposed fastener heads (no extraordinary efforts to hide fasteners). Be prepared to re-do things as reality imposes itself. It's called iterative engineering, and it's less stressful to be mentally and physically open to the possibility. Gets ya on the road faster, too. Carry plenty of tools on the road! Every trip will be a shakedown cruise more or less, hopefully less as time and experience go on . . .

BTW when you get to electricals, do not trust the factory wiring or crimp-on lugs. Many bad crimps, and corroded connections could haunt you. While you have the walls off, the investment in re-doing the wiring will pay off. Most of the old wires could be OK to re-use, but they are often routed past sharp edges and screw tips and such.

When it comes to coach power, the Phoenix has (3) parallel 100Ah AGMs, and we have never run out of juice. AGMs are superior for this application. They are sealed, don't leak, and can be deep discharged without being killed. The Phoenix's are charged via a Morningstar controller channeling 200W of solar panels mounted on the front fiberglass cap, or the engine alternator, or from shore power when plugged into AC. It all goes into the controller, each input isolated by diodes, so no overcharging.


But when these crap out (the Morningstar solar controller gives them lots of charging TLC, so that won't be for years, hopefully) I would like to replace with LiFePO4 or something similar if affordable. Lead is heavy!!

The Phoenix has a shunt starter relay to connect the engine and coach batteries together. Under normal conditions, the two power systems, engine and coach, should be isolated so that the engine starting battery is not inadvertently discharged. That's a sticky wicket. However, on really cold mornings the coach batteries could help get the engine started. When the engine is running, closing that relay allows the engine alternator (having a high-capacity aftermarket alternator is a good idea) to charge the coach batteries at a much greater rate than the Morningstar can handle (but it is unmanaged, so to not overdo it, the Phoenix has a dash-mounted high-current meter on the alternator output).

And the generator is started from the coach batteries. Heavy gauge wiring for high currents is a must. I solder my battery lugs onto the heavy wiring - even a fraction of an ohm resistance can be a problem. Circuit breakers will save batteries if battery wire insulation is violated by off-road conditions. Ugly story about how I know...

Ah well, when y'all get back into it, I'm happy to answer questions. Still curious about awning solutions . . .

- Hellwinger

thanks for the solar info! The other half has heavily researched solar and any tips are great. We will be avoiding lead acid batteries too. Even if that means building a smaller battery system initially and adding later.

the RV wiring was trashed. Prior owner had to rebuild due to an electrical fire and the reason it was left to sit and rot is they never finished, so we’re starting new. And in keeping with exposed fasteners were opting to go with wiring hidden in upper cabinets. That way we don’t need to pull out walls if we need to fix something or add/upgrade.

hope to see you guys on the road someday. Whenever we get done, of course.
 

OFFRDRV

New member
Hey guys my name is Jason. I just found your post about Trailblazers. I live in MT and have owned our 1994 Revcon now for about nine years. It has been an amazing rig for our family adventures. Its nice to see that others are enjoying them and keeping them on the road. Just recently my wife and I have had the hard conversations about selling the RV. We love it and it is in great working order but we would like to get something with a bigger towing capacity. No final decisions have been made but I would be interested in your opinions about what you think they are worth these days. Also happy to help if there are any questions I can answer about these rigs.
 

Attachments

  • IMG_5589.jpg
    IMG_5589.jpg
    83.7 KB · Views: 41

AdvWife

Active member
Hey guys my name is Jason. I just found your post about Trailblazers. I live in MT and have owned our 1994 Revcon now for about nine years. It has been an amazing rig for our family adventures. Its nice to see that others are enjoying them and keeping them on the road. Just recently my wife and I have had the hard conversations about selling the RV. We love it and it is in great working order but we would like to get something with a bigger towing capacity. No final decisions have been made but I would be interested in your opinions about what you think they are worth these days. Also happy to help if there are any questions I can answer about these rigs.

Ill PM you
 

Hellwinger

Member
Hi Jason!

Great to hear of other Revcon runners! Clean rig! I might have some questions as time goes on...

Maybe we can start a Revcon Trailblazer thread?

- Hellwinger
 

Hellwinger

Member
I have a question for you two fellow Revcon owners:

The rear window. Ever open it? The Spousal Unit has speculated that cracking it open would be good for air circulation in the back. Our rig has an office in the back - no ceiling fan and only the two little side slide windows that open to let in air. There are two ceiling fans - one in the shower/head and one in the aisle where the stove is. They really suck - and when widows are opened, lots of fresh air comes in.

Anyhow, the rear window has a hinge on top - it looks like. I've never had the guts to open the two red latches on the inside because the window looks like an emergency escape hatch - and those are typically not designed for repeated use. So I worry about breaking that (really old by now) seal.

And speaking of windows, how does one take apart the side slide windows? There are 5 in our rig. Ours are gunked up a bit. I'd like to disassemble for a thorough cleaning.

I've taken apart the slide windows up in the bed. That was satisfying - and keeping them clean is the trick to keeping them from leaking. Because they are canted out a bit (not the angle they were designed for by the way), they collect more rain that washes down into the little gutter the panes sit in. If that or the weep holes are obstructed, the water overflows to the inside. It's a gravitational maze system, like shingles - there is no positive seal.

Curious to hear of your experiences . . .

- Hellwinger
 

Forum statistics

Threads
188,025
Messages
2,901,297
Members
229,411
Latest member
IvaBru
Top