1997 K2500 Sub- Expedition Build

Yroundrdn

Observer
Rear Drawers

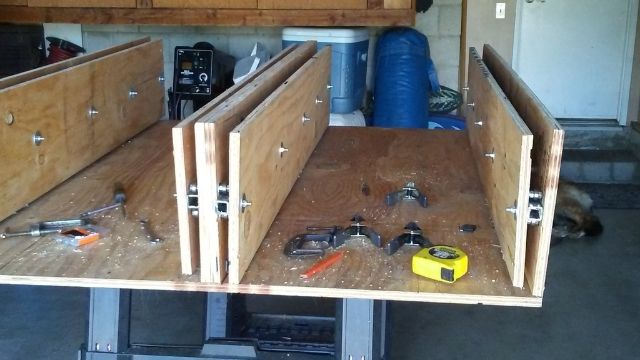
As you will see, I picked up some great ideas off this site for my rear drawer build. I have under $300 in materials so all in all it was worth the time. I went with the skateboard bearings and 1" square tubing for a drawer slider. I also chose the more expensive and high quality wood. Since I don't have much for wood working, I had the cuts made at the store and everything else was freehand with a skill saw. I also had to make a few jigs to hold things in place but in the end, it came out better than I thought.
20170328_113545.jpg


20170328_180745.jpg


I put all 200+ pounds on the draw and it held perfectly.

drawer.jpg

And here is the entire box with the drawers closed. I still need to put a cover on the front drawers, a stop, a latch and hinge the extension for sleeping.
box.jpg
 

chilliwak

Expedition Leader
That looks like you did a pretty good job for a guy that says he does not have much woodworking experience. Is it possible to get a closer look/pic of the system you used for the drawer sliders? Keep up the good work. Cheers, Chilli..:)
 

Yroundrdn

Observer
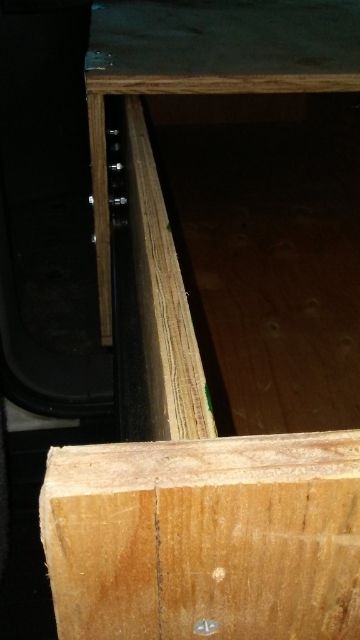
20170328_180700 (1).jpg

This is the only other file I have of the drawer slide. I bought all 4 from a local metal yard, pre-cut to the size I needed for $20. Retail home improvement stores are about 10x the price for metal.

I think I will use the same 1" steel for the roof rack build. Very sturdy stuff, easy to weld but need a new bit to drill.
 

unabashedpraise

Adventurer
Those things are huge! Are you sleeping IN the drawers?! 😂

I would take some sandpaper and rounds over those edges a bit. Saves the wood from splintering and keeps the sharp, rough edges to a minimum.

Good job on those slides!
 

Yroundrdn

Observer
Thx guys, Not that I built them to hold a body but ya, guess that is an option :)

Did some finishing work this weekend. HD had a roll of carpet for $20 that was perfect. The wife helped with the corners since I had not idea how to do that stuff. I then put a redwood sheet over the drawers to clean it up. Found that for $12 at HD. Still need to find latches but will need to go to a wood working shop for that. Nothing found at HD

20170402_165216.jpg

20170402_165229.jpg

20170402_165242.jpg
 

Yroundrdn

Observer
Looks like I'm going to remove the passenger seat behind the driver's seat. The refrig fits perfectly there and I can get several water containers there as well. For now I'm going to have to put the spare tire on the other seat until I get the roof rack or rear bumper built. The next project will be the 2nd battery and solar panel to run the refrig. I will also install an inverter and outlets in the back. If anyone has a good link for that project please share. I've found a few throughout this forum but no need to reinvent a system.
no seats.jpg
 

unabashedpraise

Adventurer
Thx guys, Not that I built them to hold a body but ya, guess that is an option :)

Did some finishing work this weekend. HD had a roll of carpet for $20 that was perfect. The wife helped with the corners since I had not idea how to do that stuff. I then put a redwood sheet over the drawers to clean it up. Found that for $12 at HD. Still need to find latches but will need to go to a wood working shop for that. Nothing found at HD

View attachment 394505

View attachment 394506

View attachment 394507

What are your plans for the old spare tire area?


Sent from my iPhone using Tapatalk
 

chilliwak

Expedition Leader
The whole back is looking good Yround. Now all you have to do is get out in the bush and have some fun..:wings:
 

Martinjmpr

Wiffleball Batter
The next project will be the 2nd battery and solar panel to run the refrig. I will also install an inverter and outlets in the back. If anyone has a good link for that project please share. I've found a few throughout this forum but no need to reinvent a system.
View attachment 394508
.
I can post a link to my dual battery setup but it was for a GMT-800 not a 400 so I don't know how applicable it would be to you. Did the GMT-400 trucks have the space for the 2nd battery shelf? The 800 trucks do, which made mine a lot simpler. The only other chore was pushing the wire through the firewall, then it was a simple matter of pulling interior panels apart to run the wires to the rear driver's side interior trim piece where I put the 12v outlet. It's worked great over the past 6 months or so.
 

Yroundrdn

Observer
Spare will eventually go on the roof, just haven't made the rack yet.

I was trying to modify the space for storage on the drivers side of the engine compartment but it's a couple inches too short for an RV battery. Looks like my options are to put it inside the back or use a non RV battery. There was a guy on this forum who put together a very simple 2 battery system that I will use. I think I will just use his system. Thx for the help.
 

boll_rig

Adventurer
Great looking burb Yround. Always a fan of the white body, black rims combo. the 285s don't seem too big either even without a little lift.

Drawer system and winch look well fabricated! Time for me to finish my drawer it seems. Thanks for the inspiration
 

Forum statistics

Threads
188,366
Messages
2,903,795
Members
230,227
Latest member
banshee01
Top