2000 Frontier (Supercharged) Build and Adventures - Babe the Blue Ox

paulforeman

Active member
A Few Day Trips

So, after having the truck out of commission for a while during the bumper build, I was itching to get out and play. We did a couple day trips to local trails both Saturday and Sunday after finishing up the bumper this week.

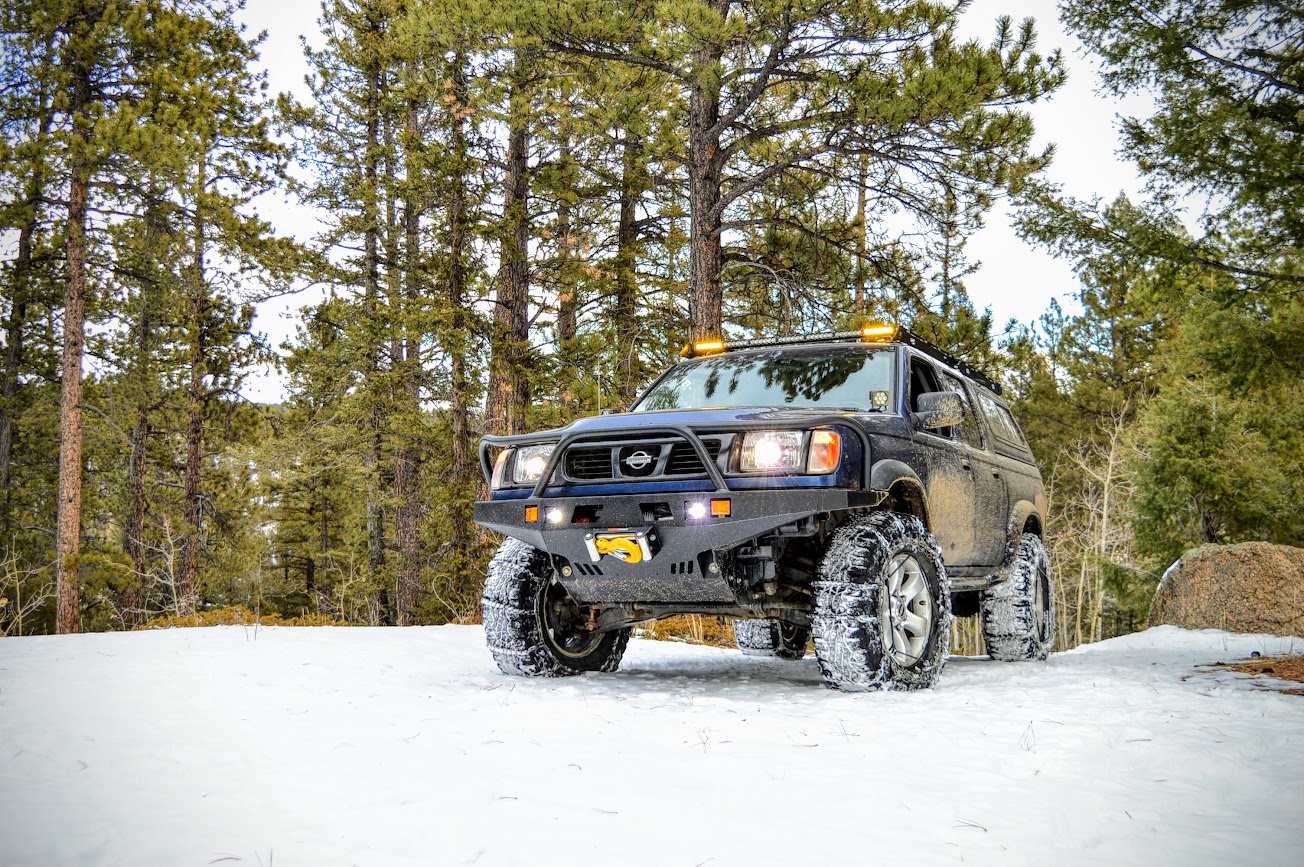
We were looking for some snow wheeling both days, but the second day, everything was dry. The snow has been pretty skinny this year along the Front Range in Colorado. We did chain up on Saturday just for fun, even though we probably didn't need to. Here's some glamour shots and some other pictures from wheeling.
ACtC-3dN7gl0NsoRqn3U6EpdAykZcB0dt00ed5aX5--sl25FZBUax7WX52H5x7jutVXPOOTJp1qS1RjqHI7bLCsEO2FY1YO88TFA6s3ZMOc3rcZBU90oHk76oFQ-U2m3imKmtad9eqk8Hmp2W-eBRaRtai5Zig=w1305-h867-no

ACtC-3cqCmpuh2eNT64_un2gEhL3on4Sdyo4G2SKZq0qX_vumoaKKjLEm8iXt7C-_00_BIpgA-pcEmEGhA3DLvR0aqZWKEKVWqs8agiUfbQ7_VLnj8NHCdEM-VNk5Phfju-3Oo1FCGPwRZvg9EYlwbbPelOj0w=w1305-h867-no

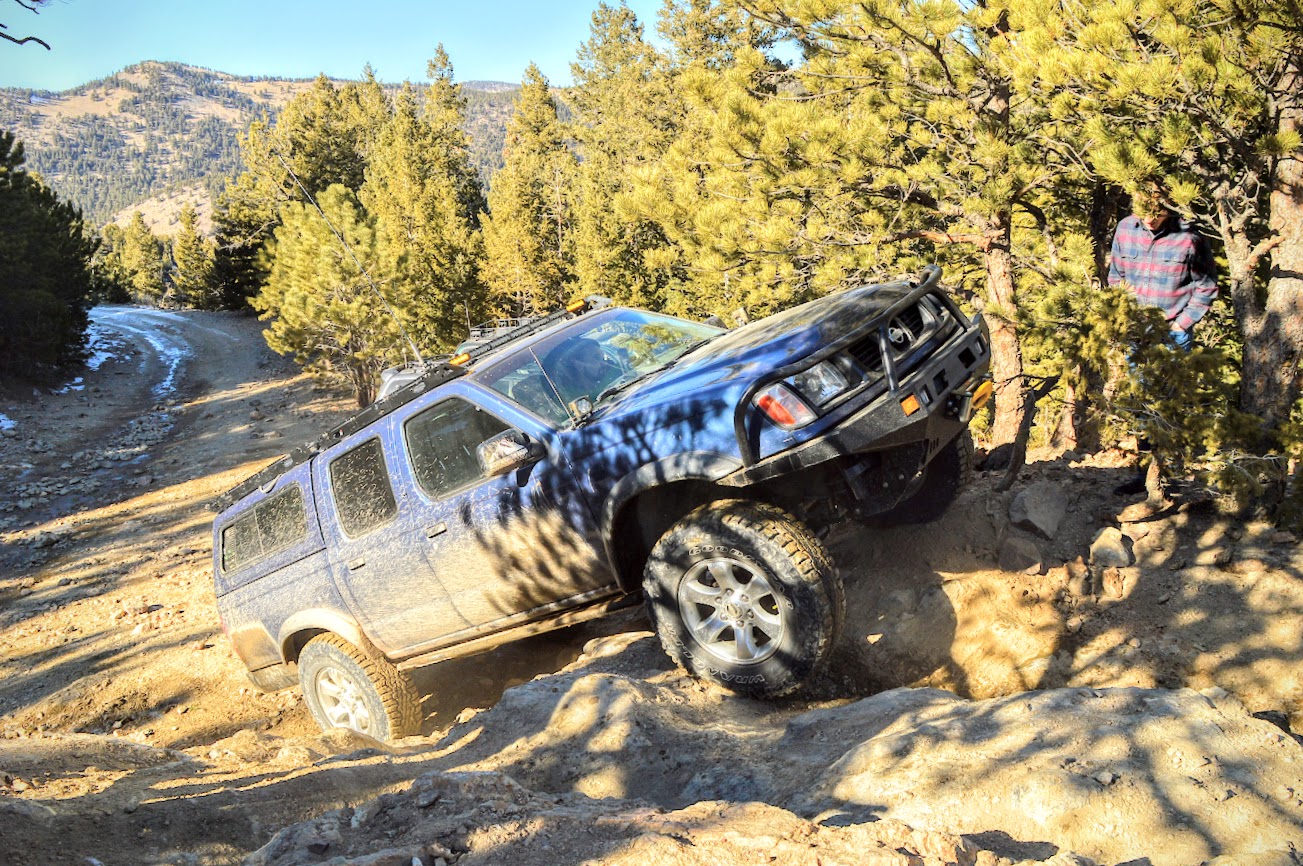
Found a tricky articulation test spot one one of the trails - had about 4 car lengths of back-and-forth flex holes (you know what I'm talking about? I don't know what to call them). It was tricky without a locker but the truck handled it (with some 3-wheeling here and there).
ACtC-3cbqrls3paVyO2SXOE9oac0Q68y9WR5sJtkOb12RpVCvg2XBZkcScuThEFiNo6TBRh3amIlmKYM0CB7v-50RluDKDdHH4hgODp-xUXC-meFYH604X396ynY8aQpQWxgn0tj0UoPgTA3OsRlivnl6A06ZA=w1305-h867-no


We chained up and ran some trails that had fresh snow and no other tire tracks. I took advantage of some good lighting later in the afternoon as the clouds rolled in.
ACtC-3dk_I2VTOlqVtzFli9u2Zrs8sZdJycVYnyKMRCq8vAXmuqZT1nA5IXTr9BXCb9dHi7QbjnZqdQDJrUzIA_1-jXvgjWXj7VMx8WaoR561DS-IJ8fZc5tImaKOotV-9u7SZnKSWou5ST3Gpo41D0LMU6ikQ=w1305-h867-no

ACtC-3ees72e5l9c-TAx9txsi-MiTL2mDjf3Mei5vUCiS376uURhYe9NcqRxzbCjHJRSb1ZRViH2v5_1zEMLJl9nu0Xins8F0kg3cvK_Assd0yBCmzFuKvZq9VdsJw5cc8DsRSn11kHzSOOp7FumVghFjWajig=w1305-h867-no


Someone didn't have as good of a day as we did. Looked like they took the icy corner a bit too fast...
ACtC-3e8h1rLdmZVKQrRwRrwNgbo228uZ9z337whYGg_b2lFhqJhIlNe5fKbos3BA3z-k7AaBW1aTKnEXtacQ_LerSJO9RJketcLN9xAV5Mi-1g-FsKyURvjuSv1F7OWz3uPSK2V0ikJtyW90qsMRCx4COUgaQ=w1157-h867-no


Sunday we did an easy trail that has a couple rock features off to the sides of it. I tried to be a rock crawler and ended up scraping pretty much everything on the rocks. Oh well, it was fun.
ACtC-3f0O6uZvedkDGokg8p_8f0LFUjQNZq1kXyij79Q2wl2hEWum7OrkPcPRzXSQURZ9egXczRr5rieiHlo6TNj-vpu9D00_E6YGRNz-QVccJRWMfMP4quLkxyoks3AVR5406Wf_Udp2RXp4Ex0sr2a1x7RZw=w1305-h867-no

ACtC-3cKWpqaoB7MDnwFsjrW3s7lbDrb1sJlVwJk2rqJ_qEuTOLOOM1LthN-hq7714fCXW5oofsuqBt8bqdLk7zgKJOiywvsEsArJmprwcs1GhcyuU7s9nsL2PvRf8CiALfgUxxkDK1_Pg-4aUp6NWrOm2gR9g=w1305-h867-no

A locker would be a huge upgrade and make it so much easier to do stuff like this, but I still just haven't been able to swallow the $2000 to get an ARB and have it installed. Would rather spend that cash on something I'll use a lot more often.

Anyways, that's it for now. We are hoping to get some more trips in soon. Starting to think about our annual Spring Moab trip already!
 

Andrew_S

Observer
Just read the thread, awesome build man. Love the look and all the functional modifications. Looking forward to seeing more.

edit* next set of chains you buy check out a pair with cam locks.Makes tightening them up an absolute breeze and gets rid of the bungees.
 

paulforeman

Active member
Just read the thread, awesome build man. Love the look and all the functional modifications. Looking forward to seeing more.

edit* next set of chains you buy check out a pair with cam locks.Makes tightening them up an absolute breeze and gets rid of the bungees.
Thanks! And yes, I've seen those, but haven't used them. These sets were both pretty nice and super cheap on Craigslist, but I'll have to try a set of cam lock ones sometime!
 

paulforeman

Active member
New UCA bushings (4x4parts.com)

So I recently had the truck in for an alignment and the shop told me they couldn't get it very accurately aligned because the control arm bushings were all worn out. I checked back through my records and found out that I've actually not replaced them in about 70,000 miles (as long as I've had the arms on there). Greasing them more often may have helped, but overall, it was just time to do them. Replacement Bushings for 4x4parts UCAs

Sure enough, the old ones were pretty sloppy. The metal sleeves fell out of the bushings when I took them off. The bushings came out almost as easy.
ACtC-3fJ2mHiuQBSH7eR0zAmt-hY_uPVeRQVvWAr4PEuMaz_OMno9d6Ee0_1PRFwu0YIbl7CjEKyvmtEBgBaCp0IgiKu1mmifsxrLMQt55amgW5XVfV73ukXN90Fu9Ivwi9kKw-C2HmLEVkbM-TNsbAEEa7gQg=w1157-h867-no

The new bushings seem to have a better design - they have grease grooves cut into them so that you don't have to loosen the cam bolts to pump grease into the joint anymore. The old ones would blow out if you didn't loosen the bolts. These grease up much easier.

I had to actually press the new bushings and metal sleeves into the control arms; further evidence of how worn out my old ones were.
ACtC-3c7N_yGSqZmqRlzPcshTSfaLxnRD2IaPwm9zdVBUgbsip761hqkOzr6n_ENLG4qKyOD02QAD8D6N5eQKyhLR2pbvsXDtIqSV3kAaAWmTuVN8HOjDjbj7NJFTLnqbZr9gq1_41_PMZBanobVbAe67ThVZQ=w1157-h867-no

ACtC-3dYGcHnexF-r6bGLCG3MRyig2YGEpFfHV_ruLhSOzVMT0pG8h0F3gGtG2NY7by3d-E9t6avUrUsLhinEhC20BtCli9px_omWLncwhrkl2m87qONtqoLDx--3R2zCXSUQvaKwPo48tdvjvwwe2BRlTpBFQ=w1157-h867-no

ACtC-3fM9jcm85zT9KEkoExTtmbpOot0meJwbwmpJNYWXMm3EhcCJHYHUYaqkhZkiHFqgis63I4JOcPlAGuVZkso1SBoH9cjNEdB7kcQUdciCACXDYfbMKgWle2GV0S0paKTSBNANdI-TosQGNxwZLF3RQGWNQ=w1157-h867-no

It's not like it rides like a brand new truck now, but it is better, and the alignment shop was able to get it aligned perfectly with no issues.
 

paulforeman

Active member
12V Setup Finally Done...
(but really, is anything ever truely "finished" on project trucks?)


I cleaned up my 12V setup again. Last time I did it all, it was 100% functional but kinda messy and overly complicated (See Post #21)

I had this whole setup in the glove box area. Kinda looked like a bomb, but worked fine, except that my wife's purse strap would always get caught on the the CB radio switches...
ACtC-3djs-iBxbkFBwDYRpM_hrlVGlpUTlYFlvVlhYwF3DoPzb20VkMg-Vjn9fFvaM8YJtK8Slz4cw7EWebAOzPB0VuJv8rJ7rkt1OLjQIMRg5t7RAiM5qrfO4NsDfGAW3sf3MuShVKnKy_LHWtv6NiIjzunkA=w1305-h867-no

I removed it all and put a glove box back in - I forgot how much better it looks without the 12V mess in there...
ACtC-3eXGFOgQ3CAFe8R7-BWLroI_gVrI0937e1McQpi9emzVT6NOLvmZ478D4kC7qHnfaQnE_DGVyRIEP5TI4bCKWmciT3EOhghD-60-srxb96bIjEqMpeEhE4nwXoAYxg-2kTsohYWP3me9Th56Tl-xGrNTg=w1157-h867-no

Back to the engine bay - I removed the Cruise Control Actuator to make room for the 12V accessory infrastructure. It's a big ol' thing and I never use the cruise control anyways. Real-estate in the engine bay on these trucks is tight because they're small, but also because Nissan just ran hoses and wires every which way and put modules and actuators in every open space.
ACtC-3eXCiRFUlNuXt-nkzRgVtpAq4_xRzOGdK_1mJ73RVSCGZywlrWq3EDtAW_VSn9ByxtPwpmTkvPEE4k1pZ5Vur7a5oqHDk4L58EuU3e0lN_KXwJdubNWHuFcqWNZ2xb9VpzubBGb4mB3LQRYWMlKnEqoqQ=w1156-h866-no


In the place where the cruise control actuator was, there were about 6 welded nuts in the body (some from the cruise control module, some were just unused). I used all factory welded nut/threaded locations to mount things so it came out really clean. Here's what's what. New stuff is in GREEN
ACtC-3e2XMkXmfn-cFH1c6tPRKNJawpprQ2Z8ChInZmaot_F7r2j9P00jJNAD-rU1rbmXkIm0JdlJjV9wAMZC9EeLPMC2KaLlcTUV-gu_6Q1zi1CM3CJetRmS9MPn1QAZ1SWc3bTvl7MsI6MO4zUe4rUa2KJpw=w1156-h867-no

The Blue Sea Systems Low Voltage Disconnect is programable to cut power to accessories at anywhere from 11.3-12.1 volts. I set it up to kill all the LED's, air compressors, CB radio, etc at 11.7V so that if I leave them on too long, it doesn't drain and kill my battery. The switch can be used to change the voltage, and also override the system if you need to use the auxiliary stuff below the cutoff voltage.

Here's how stuff's mounted, if you're wondering.

ACtC-3dpFf5L0ceTVqFAgtZ7g1rb6L4r9mDrEgfsyyO6z1oop_8I0TyoxyFJJLF0N1bjH_SgPTaYHCycep_PpthuFvlvj2pHff6j6nRr4EqLLdsy__NAYLPirf0rVb__nhVFCG0XsnQMPj374tjYO_YRoiRM4Q=w1157-h867-no

LVD has 2 halves - I drilled holes through the bottom mounting plate and attached it to this stainless L bracket. M6 bolt on the bottom threaded into body mount hole.

ACtC-3fXYhNkBhVTWiClPOokrmsP26ovEOljJH1O60EFHy9QW-XlqZTtAbYaGMhVJoAXQm4Wo3EY_XFv1hj_B0zQUGMexCfpgCmU8UKbVfeTUJ8Fj7bJfNyGp5qE2cMk4yPEXHZNZpWiXoOlmcLxKRYzSv8SeQ=w1157-h867-no

Fuse block is mounted to some old Thule bike rack clamp pieces - carriage bolt through the bottom of it, into the fuse box feet. The other end has M6 bolts threaded into the body via factory threaded holes. Also pictured - one of the OEM grounding points for all the factory accessories. I grounded a few extra things here.

ACtC-3ddUmXUk4qqHe42bDSS9sgRMqs8hQGVaOVJwvu5LJlAtGLdKsUZQO2GfpmNafAGEffxp8uhNpo-PNFqGkRxE_L-CtbAkycIRhaRZL7cZo3cZ1vAwdJ4VV-_N4jftEYW5D0RVl4f_stA3UMpWH9Q1mvwGQ=w1157-h867-no

Here's another shot of the how the fuse block is mounted, as well as the cool clear-case relays I got on Amazon.

ACtC-3e2UlOISqTbJByDx9VVRI-3u4yPYW0jxx4Jo3QA-Nd1P3MXnPRLjWa1tycmIFFGyT7UgnLUjX469t_Y6QJlmyHdmkQECJhziHZrUj68xlXCgcQukkqzfGkFRyM6JNloWoZ1IrnOHhTm7y1AeE9UBrUKbA=w1157-h867-no

ACtC-3cROyYyvTmjgAtgnAMwMRLYK5E3Ps4xR2uBSCubJ90sXR9GfpXTJwF0CobohwnGXWJaD7BukufjApsLRD_mZl7Hy2IH6YcqEB-JHue5GeUnkRATwI3vUtnAdDpr1IyNsTXjJgOPHg4ss3p4jdN-dNGOYw=w1157-h867-no

I just zip-tied the LVD control switch to a 1"x2" 80/20 L-bracket and bolted it to the body using one of the OEM fuse block mounting screws. I love these L-brackets. They're all over my truck in different capacities.


ACtC-3docAFhYQi_AwKtD2EIZZKmTdzvOlA6PxvmCn_DdHVRwcysG_uNbN-gvl-fK9xsKB4zlShaWtFlG3aHPvsc8KGe1RwjCX_uP89-eZyzNhGqzbvAlofe8yNFwtgeEJFudGUX0_JU0RPJZPTlux7Vpz7MlQ=w1157-h867-no

ACtC-3deNYlsu3KzOZjAjLwfnMtnld6UcO60POzSiLf2K6ni4DKvfXdutyhDV_WFW0PrHLUxppu6ZwnbnttUE0JI_t1rKKmy-bGWNDAKO4K95ZQHu1csg0RsujGizufedMeYQo-n4xoPFe2HoDchwYcCfVk8dQ=w1157-h867-no

ACtC-3frzOjrCxJY0Oh5yV_7I67GsEaf8B6AFk1l-7IdYtgFT23Tpfp3LjhImrJWLGjJC32tC2cHxOLyoGh76X1WYcOazZA2UrzVqntOx7fIRxrJ3z3dhK0P12i7BeJEEgmpjMA0wPBnLK61wpzch2JYbj5_9w=w1157-h867-no

Inside the cab, I labeled everything and tucked it up behind the blower motor. I grounded all the LED's, CB, etc to the frame right behind the glove box. The wires run from the fuse block in the engine bay, through the firewall, to here - this is where they either go out the floorboard grommet to the rear, or up the A-pillar to the roof, and out.

ACtC-3ckyy7QsmW5zuRnZpS_lCaAP2yOGVQFX5c3ns0MYR6l_m0HfLzsRGDw245HncSVRxtqQJsz8xZCQA9KZRkEmOUzgmu_WjE7Ls8IlmQy4byblVLO_D1PQisibiDcaVUptYAACw_KpJFkzIa4T9ItWvujiw=w1157-h867-no

The battery posts are cleaner now. Ground Terminal only has Main OEM body ground and winch ground. Positive post only has 2 main OEM power leads (right side), and then the winch power line, power to LVD/Auxiliary stuff, and power for the HID high-beams (the little one - will be moved later).

I'm trying to put more pictures and less words in these posts - hopefully this was better than some of my other ones.
Cheers.
 
  • Like
Reactions: DLM

paulforeman

Active member
How has your topper been doing with the added weight of the RTT?

Heyo. It's been totally fine - I don't keep the tent on there though - it hangs in the garage when not in use. I have had one on and off for like 3 years and maybe 30+ trips, thousands of highway and off-road miles, and I don't have any cracks in the fiberglass. I called ARE before buying one and asked about it - they said it would be totally fine.

I just have to make sure the clamps that hold the topper to the bed are tight every now and then.
 

WKexpedition

Built, not bought!
Heyo. It's been totally fine - I don't keep the tent on there though - it hangs in the garage when not in use. I have had one on and off for like 3 years and maybe 30+ trips, thousands of highway and off-road miles, and I don't have any cracks in the fiberglass. I called ARE before buying one and asked about it - they said it would be totally fine.

I just have to make sure the clamps that hold the topper to the bed are tight every now and then.
and do you have a higher end topper with reinforcements or the base model? Thanks!
 

paulforeman

Active member
A New CB Radio and Fixed my Roto-pax Mount

Installed a new CB radio. The Cobra unit I had was drawing power even when turned off - I think that that was by design to give emergency weather alerts - not good for truck batteries. The truck isn't my daily so it sits for a couple weeks at a time sometimes and the small drain would slowly kill my battery (fixed that issue too. See post #95 above). I just got a little Uniden unit. My brother has one and it always seems to do just fine. Mounted it below the console. Had to cut the factory slot a bit bigger and mount it a bit crooked to clear the 4x4 shifter and the metal braces inside the console, but it came out pretty good.
ACtC-3cZEXTyMyGMoXkl_k4R3EokT0MtqU4vBXV6FwQYVP6zubmzCv0UOGkUNHuYq6tlEL-OZM-z-JOdc3WmI1zTaSMy6SAvgizK8-gizdEnyReTeqYjk0ICTc2O6PDUWfncZxIjPNBbz2NeUEc56OoyTU__Cg=w1157-h867-no

ACtC-3enFzqXSjpWoUm7-1YDcnIedD5NBOdk48bvFMu89qhiAc61oDWoJcQloC_GBq377JKkU7A1AW2HUXfZwnojnpu7X1xEV2ReVrtKQW1PRVaLfZXqU0JAogjGlffk7WlkuzGYd99FEo6Sh7raSAEU80Df7g=w1157-h867-no


Also fixed my Roto-pax mount in the bed. The mount was previously just attached to the plastic bed liner insert. When the fuel/air in the tank expanded, the tank would pull the bed liner away from the wall. When it was cold, the plastic would all relax and then the tank would fall off and bounce around the back of the truck since the mount would get loose as the plastic contracted. See the problem? Here's where it was mounted.
ACtC-3d5W7Ac3eYS9A83VOo9_lU9UfxZu9i8D4CuB4WMoZVDfJqNVqK1l-2NtFRuakTcnxU9dFAC6PYsm9f0e1sN1EK_AgsMWX-kkIydtsnxa7t-a8TyeBYO2ohnBUb7kEMBeo0lY6KZ2ace2PmiA1IMOqgP2w=w1157-h867-no


Used a .75" thick piece of 4" x 4" aluminum I had laying around, another 80/20 L-bracket, a piece of 3/16" x 1.50" steel bar, some plastic spacers (computer monitor mounting leftovers), and some stainless 1/4-20 nuts and bolts.
ACtC-3eRw8NAQ8eTxR2k6KZLCO1BPAQXxKuptFkn8nWhUQsxT605jjfMaha1v4Q96qvpWWlUWUHkJwJnaKMvqvyEuez9Ty14d3at-JaJSxPsNhx4zESRiMMtmV99Hb3wFlPeMbWpBKkuCojuLZrI2HahBJnVkw=w1157-h867-no


I drilled and tapped holes (the same pattern as the Roto-pax mount) in the aluminum to accept the 1/4-20 bolts. Bolting straight to aluminum is probably ok in this case since I've got 4 bolts and it's not a very heavy load. Plus if they strip out, I could always use nuts on the back.
ACtC-3eiS7xdpxGjOzh7ujAZyaOM_u6YflxVNFh8ZWfHgj5WqF2SXjjKKaHHFN-tV7LAdI0Ng8YJauK23gTNRFWHCvrKcLyBIOMKq98QSQYlKTHNLIv4XbMzTN6P1sbS6CU6S2GGMN8_iuwydxeuufOG07LNtg=w1157-h867-no


Plastic spacers are to prevent the Roto-pax mounting plate from bending down when installing the 1/4-20 bolts. I am "clamping" the mount to the steel bar to allow me to adjust the height if necessary. Plus I just wanted to use the drill press and tap, so I found an excuse to do so.
ACtC-3cS0ofA_cgVhD4SEQookh0HxJvScHFrnjzfCuF83rDZhvGObgX_6xTSSYWOlfBx1Q7E7560gIrNOlRbMzkYuQLO4L-vDzwiU_AORBNxk3Pgsl7v4uafQk12USAmA4AOw3UZ01e3O07NHXOyfO6U46MVgw=w1157-h867-no


Bolted the mount to the aluminum plate and installed the mount in the bed. The mount bolts to the inside of the bed rail using a 1/4-20 carriage bolt. The smooth head of the carriage bolt will keep from damaging or snagging stuff that rubs up against it. The bottom of the 80/20 bracket is just screwed through the bed liner into the metal bed itself. I just used a sheet-metal/lag-type screw and it seems to be pretty solid.
ACtC-3dA9QY0DjPHLkdeKa1biMU8eQvFlTuPFwZ3eK4UI0cQdMQFBzBwgDOk7YWwX_JHbSsTzDnw555TASHfvHiC8qZhl-91ZnwTfo7DIZg6CX7nGOn-Yz40jX0-gFOkuWPY-Ika8yUkPqieaTAJyadLvOiQgw=w1157-h867-no

ACtC-3fzfIwe1PpSjpn6oax19tFwt9eIVhWWWEQSISNiNCcYYRYxxtkfkdNsN8p4XTQfrn8UP_Tpw2MItBiJ3mzcz8AXqeZ1KJjc8LM_LiOxkRQakt3JWUfLzgRP0L7bbgDXuwhMv-8cYcIUgjD3iXSvQ8uFlQ=w1157-h867-no

ACtC-3dcfLwHjcaYj_X1zkg5QbaQgaRfpMuxJzRvhrTnHwLt-8afCuWmYGX2hwTlDEYWRZEl60mMSair0I_7fre9l2JTEestlQbuU3tZlp893IX85M2GDy5GYATpvYvjPs9wuJyyGa4I9Q4VbibcprA-ECB62A=w1157-h867-no


The 2x2 wood piece is just to add support to the gas can so it doesn't flex around. The jug rests against the wooded rod and the extruded bed liner section towards the back of the truck. It's really solid now. Won't be falling off anymore.
ACtC-3fhB_TDXbvQV1hhfr12onoYEj_dudLiM3WE98_pgz8sauoaxjVw3XNFUHC21npDDbhaFdIxeCPSGzmmKG140XMl3FqQ5dXT4N1VI4BkRNg1tJ_0LIcaSmcP8capfkaOEyJKUhWhRQpfSaFWfbL1s3t8fA=w1157-h867-no

That's it for now. Headed to Moab soon. I'll try to get good pictures while we're out there.
Cheers.
 

Forum statistics

Threads
188,249
Messages
2,904,502
Members
229,805
Latest member
Chonker LMTV
Top