paulforeman
Active member
Ditch Lights
Mounted up some flood lights in the standard "ditch light" configuration/location.

With my old lightbar from Amazon, I had these lights pointed out at an angle for "deer spotting" while driving in the mountains or cross-country at night. Reminder - here's what it looked like:
Old Lightbar Setup:
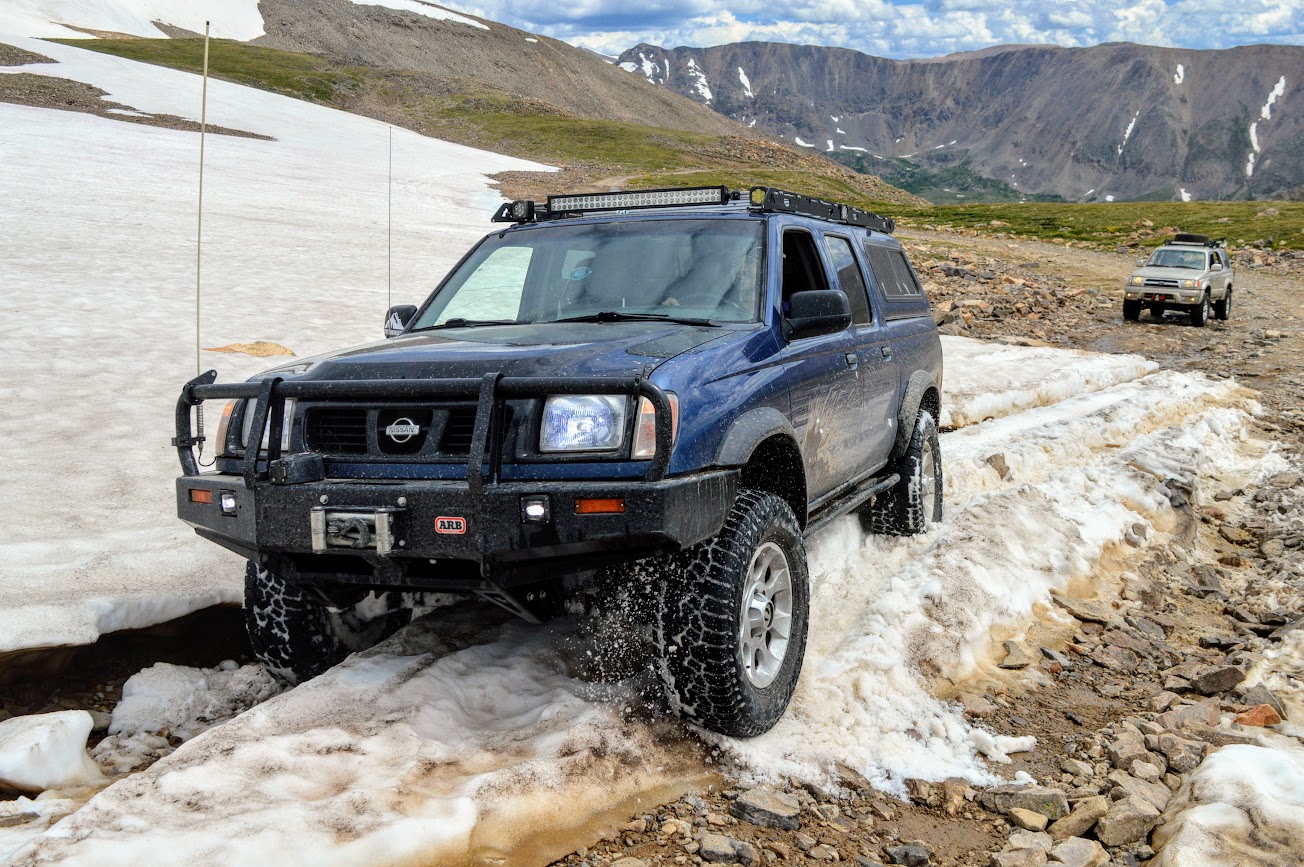
I liked this a lot. Had the floods pointed out at an angle and got really good road-side and trail-side coverage. Just had the light bar and floods on the same circuit with a single switch. But the light bar was an amazon special - had it 3+ years, but I had rebuilt it 2 or 3 times - seal was compromised, so I resealed it, cleaned it, etc. Chrome peeling, so I resprayed the baffles. But it was a lot of work for like a $40 bar. The LED chips started failing and it wasn't worth it for me to solder new ones on the board. Got a new light bar that filled the whole gap between the rack side-plates. I like the look and the amber lights are just kinda cool looking. Better quality, but I didn't have good road-side/trail-side light.
New Lightbar:
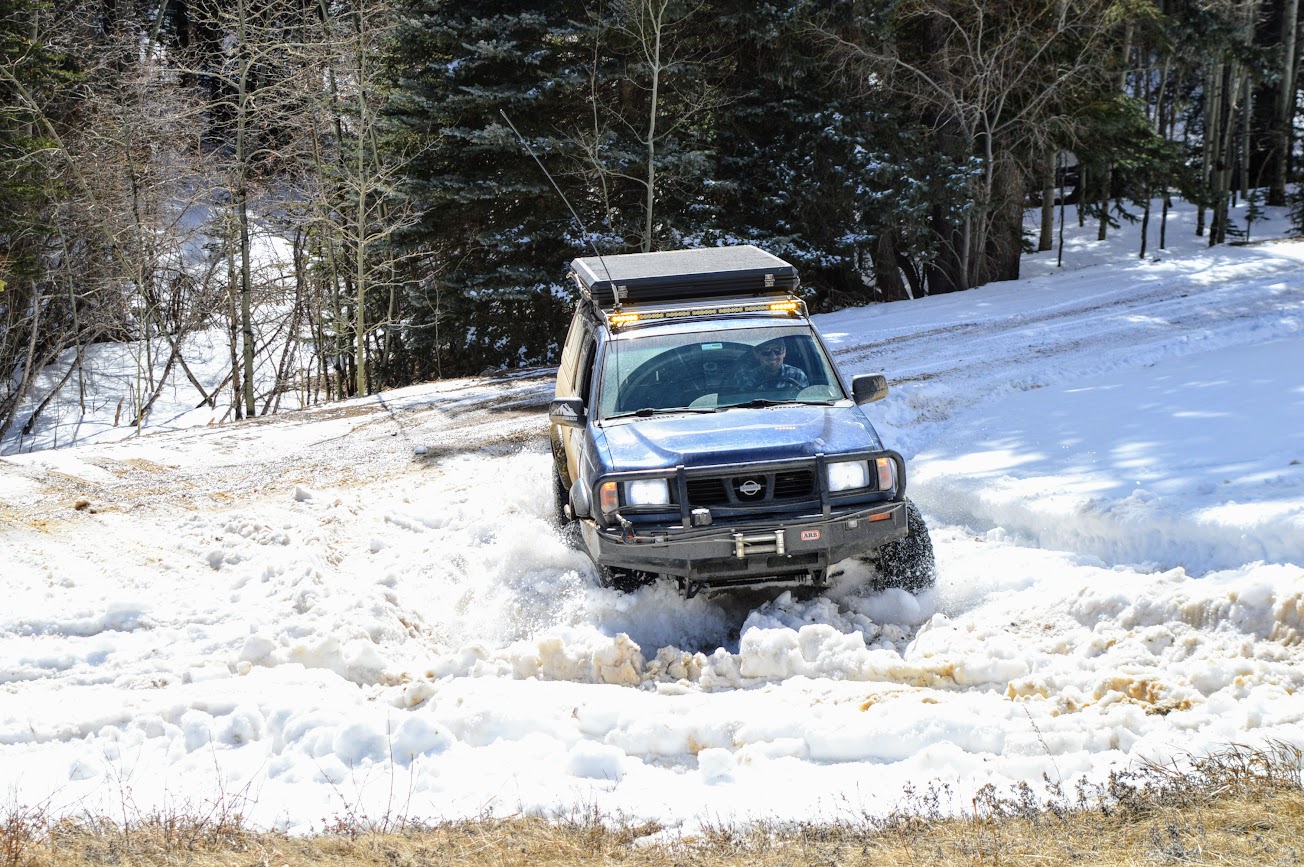

Really bright, good straight-ahead coverage, but not much side-light. Even with the "flood" prism splitter lenses on the front, the light doesn't get wide enough for me.
Anyways, here's the point - I fixed my problem by remounting these side-facing flood lights. Quite a few Jeeps, Toyotas, and other more common off road models have "ditch light brackets" that can bolt onto the hood hinge, A-pillar, or somewhere like that. I've looked, but don't think 1st gens have anything like that available.
I pulled the HVAC air intake bezel off the front of the truck. Used rivnuts to add a mounting location for a bracket.

Using about 4" of 5/16" all-thread and a couple nuts jammed together, I screwed it in. The big flat washer ads a lot of stability to the sheet metal where I mounted the rivnut.
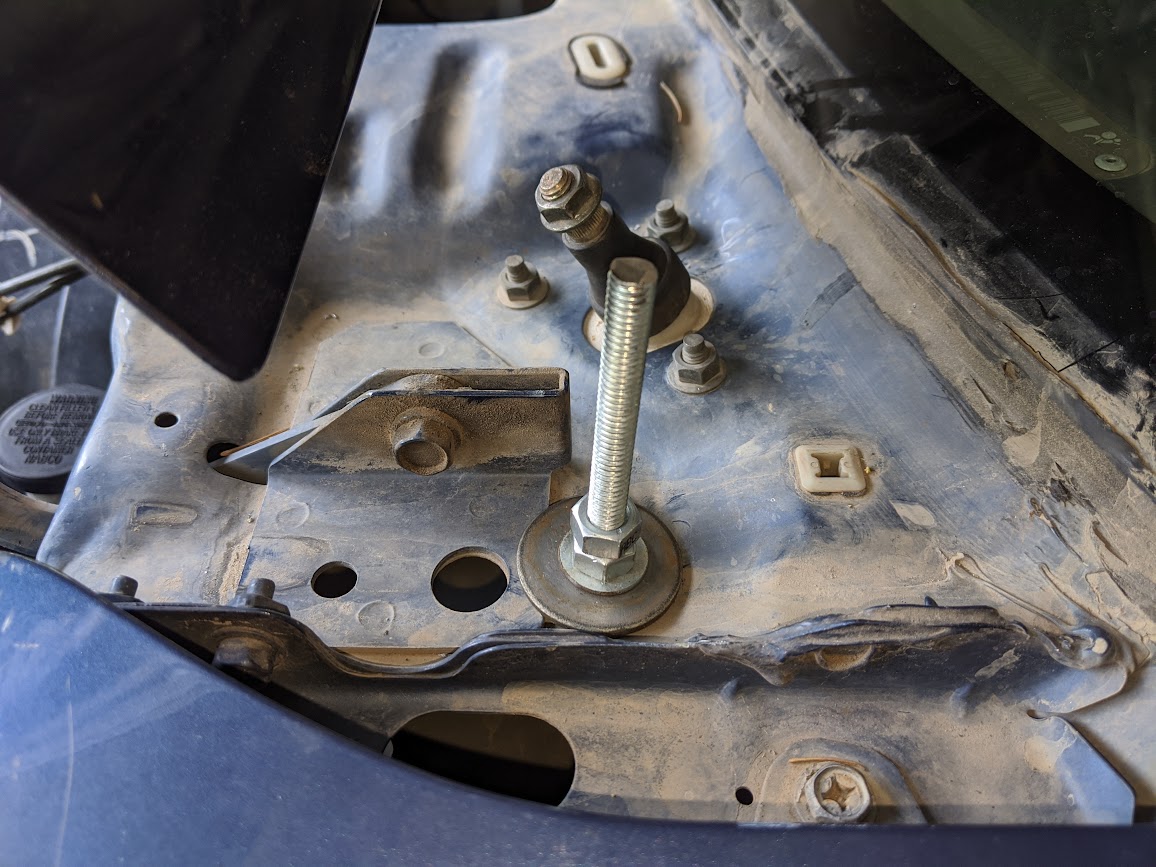
Installed another nut and washer at the right height to support the plastic air intake vent cover piece.
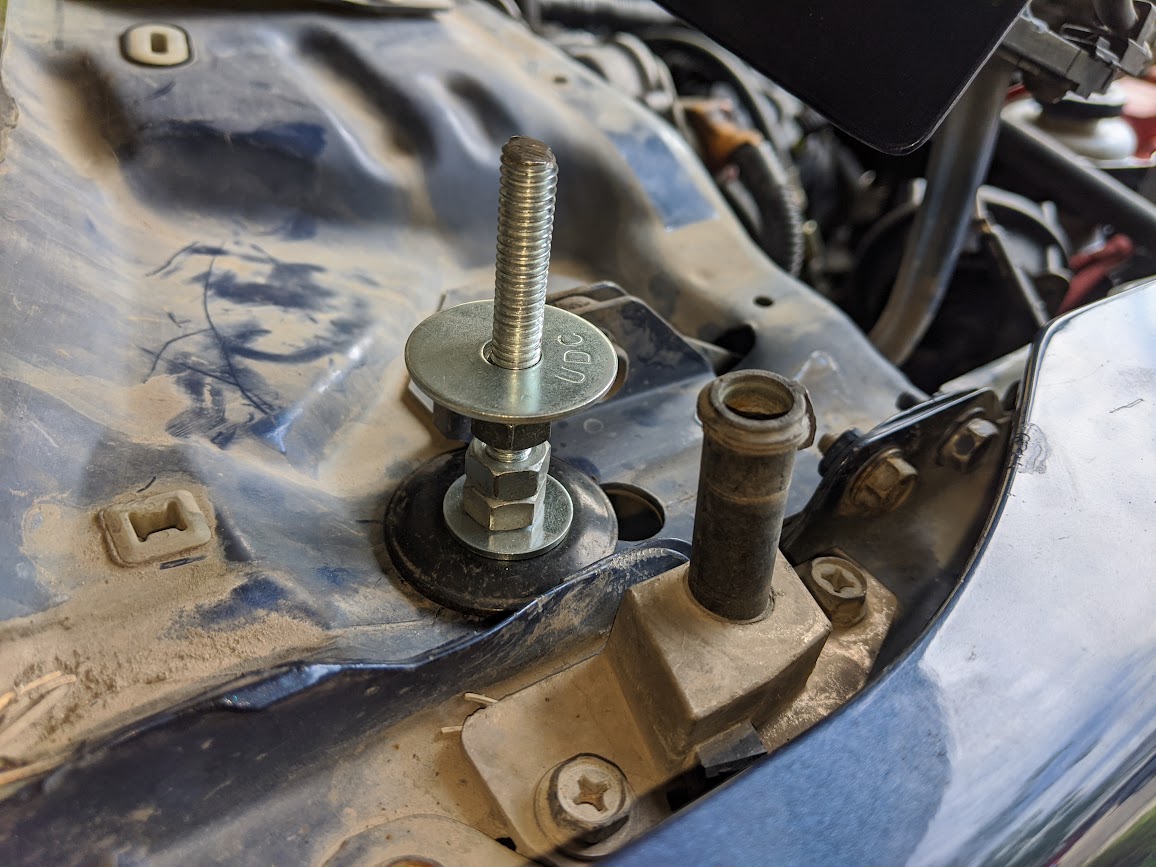
Installed the plastic hood vent intake over the new studs, and added another washer/nut on top of the plastic to add stability and clamp the plastic in place. It may not look like it, but it's actually a pretty sturdy mount. Then, finally, bolted the light on the top of all the all-thread, nuts, and washers stackup.

Bonus - due to real-estate restrictions under that plastic bezel, I had to relocate the FM radio antenna - used a piece of the old tailgate-extender bracket that was originally in the back of the truck.

Wiring harness runs under the vent plastic and the (+) and (-) leads run through the firewall and tie into the same circuit as the light bar. It worked out well. Going to be excited to get it out for some night snow wheeling soon.
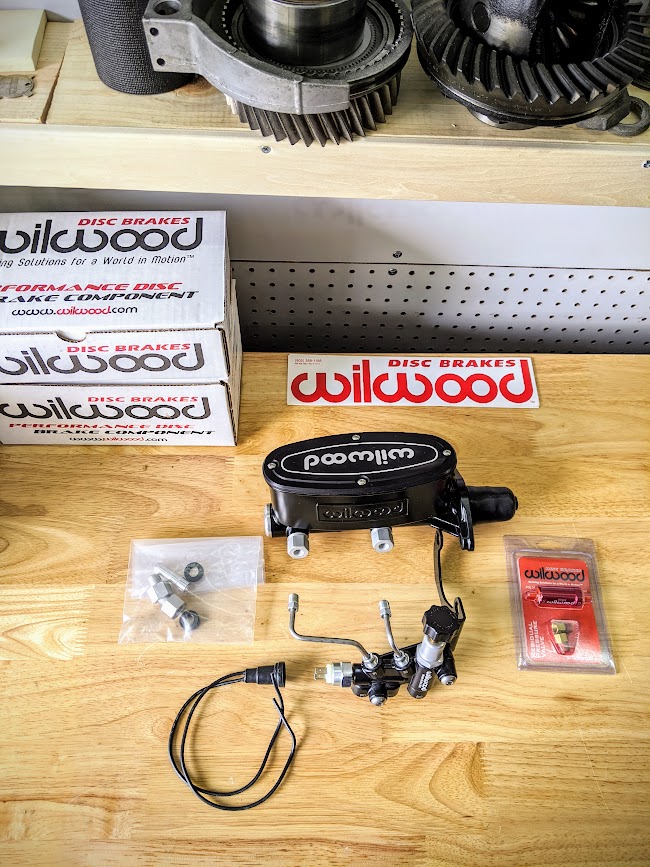
Teaser - got a few other mods coming along too. Hopefully I'll get them finished up in the next few months, but basically, it's exhaust and a much-needed brake upgrade (hopefully it helps!). here's a few pictures of what's coming.

Check back for those updates some time before Thanksgiving hopefully (that's my goal).
Cheers.
Mounted up some flood lights in the standard "ditch light" configuration/location.
With my old lightbar from Amazon, I had these lights pointed out at an angle for "deer spotting" while driving in the mountains or cross-country at night. Reminder - here's what it looked like:
Old Lightbar Setup:
I liked this a lot. Had the floods pointed out at an angle and got really good road-side and trail-side coverage. Just had the light bar and floods on the same circuit with a single switch. But the light bar was an amazon special - had it 3+ years, but I had rebuilt it 2 or 3 times - seal was compromised, so I resealed it, cleaned it, etc. Chrome peeling, so I resprayed the baffles. But it was a lot of work for like a $40 bar. The LED chips started failing and it wasn't worth it for me to solder new ones on the board. Got a new light bar that filled the whole gap between the rack side-plates. I like the look and the amber lights are just kinda cool looking. Better quality, but I didn't have good road-side/trail-side light.
New Lightbar:
Really bright, good straight-ahead coverage, but not much side-light. Even with the "flood" prism splitter lenses on the front, the light doesn't get wide enough for me.
Anyways, here's the point - I fixed my problem by remounting these side-facing flood lights. Quite a few Jeeps, Toyotas, and other more common off road models have "ditch light brackets" that can bolt onto the hood hinge, A-pillar, or somewhere like that. I've looked, but don't think 1st gens have anything like that available.
I pulled the HVAC air intake bezel off the front of the truck. Used rivnuts to add a mounting location for a bracket.
Using about 4" of 5/16" all-thread and a couple nuts jammed together, I screwed it in. The big flat washer ads a lot of stability to the sheet metal where I mounted the rivnut.
Installed another nut and washer at the right height to support the plastic air intake vent cover piece.
Installed the plastic hood vent intake over the new studs, and added another washer/nut on top of the plastic to add stability and clamp the plastic in place. It may not look like it, but it's actually a pretty sturdy mount. Then, finally, bolted the light on the top of all the all-thread, nuts, and washers stackup.
Bonus - due to real-estate restrictions under that plastic bezel, I had to relocate the FM radio antenna - used a piece of the old tailgate-extender bracket that was originally in the back of the truck.
Wiring harness runs under the vent plastic and the (+) and (-) leads run through the firewall and tie into the same circuit as the light bar. It worked out well. Going to be excited to get it out for some night snow wheeling soon.
Teaser - got a few other mods coming along too. Hopefully I'll get them finished up in the next few months, but basically, it's exhaust and a much-needed brake upgrade (hopefully it helps!). here's a few pictures of what's coming.
Check back for those updates some time before Thanksgiving hopefully (that's my goal).
Cheers.
Last edited:
