2002 Sequoia Limited 4WD

Sal R.

Active member
Could have but I don’t want any awnings to overhang the body so much and have sun light make it between awning and body.


Sent from my iPhone using Tapatalk

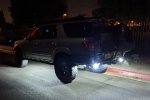
I think I'm going to leave the alley lights alone. They were perfect when scouting locations off the beaten path at night, which was something I hadn't considered.

I toyed with it while at camp and, like you said, the body got in the way and it really hadn't bought me much.

That said, the alley lights really finished out the last thing "I wish I had" and I hadn't even realized that I needed it, lol.
bear01-189.jpg
 
Last edited:

toyotech

Expedition Leader
I think I'm going to leave the alley lights alone. They were perfect when scouting locations off the beaten path at night, which was something I hadn't considered.

I toyed with it while at camp and, like you said, the body got in the way and it really hadn't bought me much.

That said, the alley lights really finished out the last thing "I wish I had" and I hadn't even realized that I needed it, lol.
View attachment 618934
Yup. Too many times I have gone down dark trails looking for a site to camp.

Once you get your rock lights done. You’ll have way better camp lights. The roof lights imo are to bright for camp lights.


Sent from my iPhone using Tapatalk
 

Sal R.

Active member
MODIFICATION: Custom Grille

GOAL:

Replace the old and busted with some new hotness.

PURPOSE:
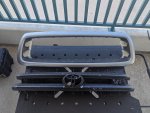
I was tired of masking and repainting the front grille black. And the dated look. Because I like throwing the baby out with bathwater, I hacked up my front grille to update the look.

DURATION: 8 Hours

MATERIALS:
Fiberglass and resin
Bondo filler
Sandpaper
Honeycomb mesh
Painter's tape
Paint and primer
Zipties and mounts

COST: $60

HOW-TO:
There are lots of tutorials all over on working with fiberglass, so I'll stick the basic steps. I had all the materials already, sans honeycomb mesh, so I kinda dived right into it.

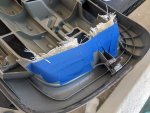
Fill the void spaces of the horizontal slats using painter's tape and fiberglass. I used painter's tape to create the initial contour that would represent the finished trim wall. I laid down fiberglass to create the initial structure.
2020-10-19 10_46_08.jpg

Once the initial glass layup cured, I removed the tape and laid down 5 layers of glass to stiffen up the wall.
2020-10-19 10_45_43.jpg

Once the newly formed trim wall was in place, I cut out the horizontal slats. I waited until this step to cut out the slats to make sure the grill trim stayed rigid during layup. I didn't want any sort of warping when I was laying down glass.

Look at that pitted up nastiness :sick:.
2020-10-19 12_25_37.jpg

Sand the trim flush and use bondo filler to create a smooth finish using grading sandpaper. This was the most time consuming process. Sand, fill, and repeat until you get a smooth surface you are satisfied with.

This is the most crucial step to get right. Imperfections still present at this step cannot be hidden with primer and paint. Going backwards after paint is not fun so make sure you get this part right.
2020-10-20 11_33_55.jpg

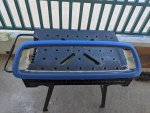
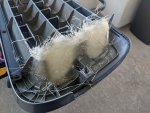
Prime, paint, and ziptie the honeycomb to the grille.

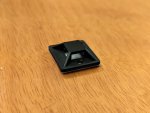
I used these ziptie mounts all around the grille trim to support the honeycomb. It's bonded in place using two part epoxy for strength.
PXL_20201024_033315424.jpg

And finished.
PXL_20201024_173157078-196-197.jpg

PXL_20201024_155119399-193-194.jpg

Barely clears the horn, accumulator, and power steering cooler. ?

I'll never do this job again.

Glass.

Everywhere. :(
 
Last edited:

Sal R.

Active member
MODIFICATION: Rock Lights

GOAL:

Moar illumination.

PURPOSE:
Admittedly, I bought the lights on a whim after I put in my switches and electrical framework. "What do I hook up to my switches?!"

After putting in my alley lights, I figured I might as well dust these off and make use of them in my setup to help with lighting my way.

This mod was every bit as annoying as I thought they would be, FYI.

DURATION: 4 Hours

MATERIALS:
nilight 8pc LED rock lights
Split loom
"L" brackets

COST: $16

HOW-TO:
The lights came pre-wired. Basically, mount it and set power and you're done. Even comes with double-sided tape already added to the lights. Obviously, the longest part about this whole deal was routing everything. I also spent time adding split loom to all exposed wires to help against salt and snow for the winter months.

For simplicity, I tied the lights into my aux rear lights.

I mounted the lights using "L" brackets left over from storage build and hung them just inside of my sliders, slightly recessed to prevent them from getting mangled on a rock. The brackets are basic cabinet construction materials found at Home Depot or similar. This really saved me time fab'ing up customs brackets.

I figured that the selected location was the most outboard I could mount them without having to weld plates to the sliders or have them look unsightly mounted with the wire routing.

I went with low side compliance on this job.
PXL_20201027_201112716-198-200.jpg

Even took a bit of time to knock off the rust under there. I debated securing the wiring onto the sliders so I don't have to do extra work when I do my body mounts, but I felt better knowing they were out of the way as much as possible.
PXL_20201027_233712958-199-201.jpg

3 chips along the slider and 1 just behind the rear wheel on each side. With my ditch lights just in front of the front wheel, I didn't feel it was necessary to add one up front. Though, because of "plug n play" makeup of the system, I do have the option to tie one in if I ever change my mind.
PXL_20201028_023224891.MP-202-203.jpg

PXL_20201028_024819716-204-205.jpg

It extends a good 5ft from the DS at a height of 18in off the ground.
PXL_20201101_020134635-206.jpg
 
Last edited:

smokeysevin

Re-redoing things the third time
What gauge is the wiring? I tried a couple different cheaper led spot/rock lights and always ran into issue with the tiny wires. They weren't prewired though so splicing a reasonable gauge wire to angle hair gauge wire was a mess. I gave up and threw the KC Cyclones under my truck.

Sean
 

calicamper

Expedition Leader
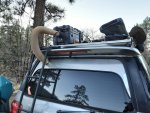
Question have you come across any interesting rear locking drawer systems? My dad has my old Sequoia now. If I can sort out a sliding fork mount for a bike with a locking drawer for golf clubs he would be super thrilled. He will likely be adding a intech Sol Horizon or similar trailer and doing 4-8 months on the road. I keep telling him the Sequoia would be great especially given he’s solo and would be pretty light.
 

Sal R.

Active member
What gauge is the wiring? I tried a couple different cheaper led spot/rock lights and always ran into issue with the tiny wires. They weren't prewired though so splicing a reasonable gauge wire to angle hair gauge wire was a mess. I gave up and threw the KC Cyclones under my truck.

Sean

I'd wager 18-20AWG. Having it pre-wired was a huge seller. That and it was cheap.
 

Sal R.

Active member
Question have you come across any interesting rear locking drawer systems? My dad has my old Sequoia now. If I can sort out a sliding fork mount for a bike with a locking drawer for golf clubs he would be super thrilled. He will likely be adding a intech Sol Horizon or similar trailer and doing 4-8 months on the road. I keep telling him the Sequoia would be great especially given he’s solo and would be pretty light.

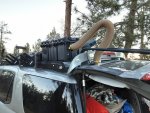
You mean something that can be purchased off-the-shelf specifically for the Sequoia? I don't know of any of any drawer system like that. Nor do I know of something that could be retrofitted. All rear drawer solutions I've seen have been custom jobs.
 
Last edited:

Sal R.

Active member
MODIFICATION: Heater Window Insert

GOAL:

Add a connection for the externally mounted diesel heater and keep the elements out.

PURPOSE:
I needed a way to plumb the heater into the cab. I tried different methods, but a rear hatch window insert made the most sense. This method enabled me to mount the heater on the roof (versus on the ground) and still allow the opening of all doors plus hatch.

DURATION: 1 hour

MATERIALS:
18ga aluminum sheet metal
Rubber grommet
Weatherstriping
1" Velcro

COST: $20

HOW-TO:
Nothing to it, really.
  1. Trace the window shape onto the aluminum sheet metal and cut.
  2. Drill hole for vent.
  3. Drill hole for rubber grommet.
  4. Add weather stripping.
  5. Add Velcro.
The grommet serves to allow the wiring from the heater for the controller to pass into the cab. The heater comes with a remote, but I'm wary of it actually working when it is needed. Plus, I like having the display easily accessible to monitor the heater while in operation.

The insert is held in place using 1" Velcro along its entire length to keep it simple. It was able to stay in place during a fast trail ride meaning I can keep in installed for the duration of the trip.
20201219_070809-228.jpg

The installation still allows for opening of the hatch.
20201219_070731-229.jpg

When the 5kw heater is in operation, it can quite toasty in the non-insulated cab (87deg F). Opening the windows helps, but that doesn't work out when its raining/snowing.

My solution to that problem was adding filler panels surrounding the solar panel. With this, it would allow me to keep my sunroof open when it rains/snows.

FB_IMG_1610475816153-238.jpg

It passed a water intrusion test, so I'm confident it'll keep the elements out.

PXL_20210109_230200337-236-237.jpg

With exterior temps in the low teens with a wind chill, cab temps were in the low-mid 70deg F with the sunroof partially open and the heater on 1.8Hz. Worked like a charm.

I don't need to setup or breakdown the heater when moving around as planned, which is a huge convenience after a long day of snow play.
 
Last edited:

jmodz

Active member
Great build! That heater solution cracked me up, it's pretty ingenious. I didn't realize you were so close to me until I recognized the RB Vons parking lot from a couple posts back. Maybe I will see you driving around one of these days.
 

Forum statistics

Threads
188,179
Messages
2,903,449
Members
229,665
Latest member
SANelson
Top