2003 SSV Tahoe Build

NavyGator

New member
Hi Everyone,

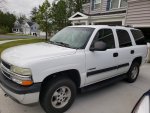
I am going to try and document the build of my overlanding Tahoe here on Expedition portal. I have been hooked on overlanding (with out experiencing it) for several years and I purchased a 2003 Chevrolet Tahoe SSV in February of 2020 that had 142k miles for $6k. From 2003 to 2018 the Tahoe was a marked unit with the Monroe, NC Police department and the second owner purchased it from the city auction. It took me over a year to eventually locate this truck as I was specifically looking for a model that had the barn doors on the rear instead of a lift gate.

Here is a picture of it a little while after the purchase.
2003 Tahoe New to Me Photo.jpg

I am going to catch up with several posts to show how the build has progressed and probably post some pictures of some of the places we have explored so far.
 

NavyGator

New member
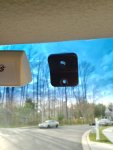
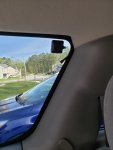
Since the Tahoe was a police unit, one of the first things I did was remove a bracket from the front windshield and and antenna mount off one of the side windows. I visited YouTube University and found several different videos referencing using a heat gun and a putty knife to remove the brackets. It was a pretty straight forward process to apply heat directly to the bracket and I used a plastic putty knife to pop them off. All of the glue residue came off with the heat so there was minimal cleanup.

While I was looking through the truck and working on these brackets I realized that although they had cut some of the wires out when they rebadged the truck, there were still a whole bunch they left behind. I didn't get any pictures but I have pulled probably more than 150ft of cable and wire out of the vehicleU03 - Bracket Removal.jpgU05 - Antenna Mount Removal.jpg over the last 2 years and there is still more I haven't got to yet.
 

NavyGator

New member
I spent a lot of time reading through forums and listening to content creators on YouTube give their thoughts on what the first upgrades should be for an overlanding vehicle. So in addition to a first aid kit I always carry in my vehicles, I wanted to install a fire extinguisher. I use to carry a small fire extinguisher that you see in a lot of vehicles but after stopping for a couple of vehicle fires and getting some first hand experience with their limitations, I decided I wanted to carry a larger one.

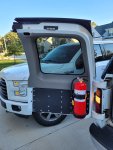
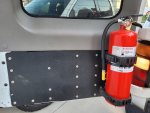
I ended up removing the panel on the left rear door and installed a 1/8 inch thick piece of aluminum. I cut and bent a sheet of aluminum then drilled and mounted it with stainless steel fasteners and rivnuts. I didn't see that the panel slid out of place when I was making the first few holes so it sits a bit crooked and doesn't quite fit the way it was supposed to. I sanded, acid etched, and painted it with Raptor Liner for the final install.

I also bent a small shelf for the extinguisher to sit on and used some larger Quick Fist clamps to hold it to the new panel.

You can see on the left side of the panel there are some gaps from where the panel slid but nit isn't worth the effort and time to fix.

20221014_171824.jpg20221014_171831.jpg
 

NavyGator

New member
We have been trying to consolidate photos from the last few years and I have been having trouble locating pictures for some of the work.

My initial plan for lifting the vehicle was going to be similar to the Rosco P Drivetrain series from Four Wheeler magazine. With that initial plan, I decided I wanted the truck to have better braking capabilities which lead me to swapping the vacuum brake booster to a hydroboost unit. It wasn't exactly an easy project when it comes to working under the dash but it was straightforward. I will admit I was pretty nervous about messing with the braking and steering systems but I purchased a remanufactured brake booster, the additional hose lines, and the new brake pedal. After doing the conversion and test driving the vehicle for a bit, the brakes were no longer soft and had a notable increase in braking power.

With the lift and solid axle swap I was wanting to do, I looked for months and months trying to find a shop to do the work. What I found was that most shops in the Hampton Roads area of Virginia (and within a few hundred miles) only do bolt on or cookie cutter type work. The shops that did that kind of work were typically booked at least 10-12 months out. So I changed my plan and started looking at my other options. This body style has a pretty standard torsion key leveling kit with different rear options. I chose to go with as mild a level as I could to fit some BFG KO2s at 285/75R17. I went with Bilstein 5100 shows all around, torsion keys in the front, and Moog springs to lift the rear.

When I did the suspension work, I also went ahead and got some Duralast severe duty brake rotors and pads to put on.

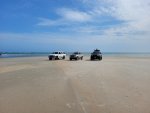
Here is a picture of the Tahoe, my daughters stock 96 4runner, and my buddy's 4runner on a trip to Cape Lookout.

20220319_153544.jpg
 

NavyGator

New member
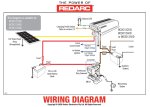
In preparation for going to Overland Expo East in 2021, I decided I needed a dual battery setup. One of the cool things about this body style truck is that they were designed with two battery locations. I ended up purchasing a battery tray, a Redarc BCDC1225D, 40 amp waterproof breakers, 8 AWG wire, terminals, and connectors.

Here is the wiring diagram from Redarc that I used. I did not add a solenoid for jumpstart or the charge LED.
Untitled.jpg

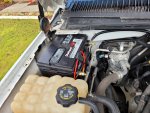
This is the battery sitting in a battery tray. It isn't a deep cycle battery and meets my power requirements for now so it works. Eventually I will get one but not until I need it. I have an SAE lead with inline fuse coming off of it now to run whatever I plug in to it.
Dual Battery Installation.jpg

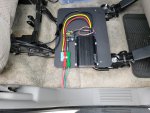
Here is the Redarc unit installed under the rear passenger side seat. I cut a sheet of 1/4 inch ABS and screwed it to the seat frame.
Redarc DC to DC Battery Charger Installation.jpg

At some point in the future I suspect I will get some sort of solar panels. Possibly a flexible style designed to be attached tot he hood of the truck or a portable style that I can use while having the truck parked under a tree in the shade but the panel be ran into the sun.
 

NavyGator

New member
The next upgrade resulted in a road trip from Norfolk, VA to to Louisburg, NC to visit East Coast Gear Supply to have the front and rear re-geared to 4.10 for the larger tires and install a Detroit Truetrac rear differential. The drive back took a good bit longer following the break in procedures but once I got to 500 miles I replaced the gear oil with the recommended Lucas 85W-140.

Since regearing and adding the limited slip, I have had noticeably more traction off road and it has increased my comfort level with tackling 4x4 trails with less traction and more off camber sections.
 

Forum statistics

Threads
188,399
Messages
2,906,848
Members
230,176
Latest member
Arcadia1415

Members online

Top