You are using an out of date browser. It may not display this or other websites correctly.
You should upgrade or use an alternative browser.
You should upgrade or use an alternative browser.
2005 118" Sprinter Conversion for Alexander
- Thread starter PaulJensen
- Start date
PaulJensen
Custom Builder
Paul,
... how are you attaching the overhead wire shelves?
Screws and fender washers into the roof ribs where I can, and straight down screws with fender washers into the horizontal body channel where needed...Those racks don't hold a lot of weight, and the overhang is short enough not be concerned about bending the shelving...It's a good system...
mog
Kodiak Buckaroo
Paul's work is 3 primary things to me: very practical, great use of space/material, and works of art.
I strive to learn from the first two and enjoy the last as I can never rise to his artistic level.
Paul, thanks for great threads. They are the few that I go back and re-read months later for inspiration.
I strive to learn from the first two and enjoy the last as I can never rise to his artistic level.
Paul, thanks for great threads. They are the few that I go back and re-read months later for inspiration.
graynomad
Photographer, traveller
Thanks for that, I just go to this thread and wondered ****** everyone was talking aboutClarification: This was a reply to Southpier who has since deleted his post...
FWIW we do have a large motorhome with space for a permanent bed (in a Luton peak over the cab), but we still sleep on 3" camping mattresses essentially on the floor. In my next build (much smaller) it will be 2" camping mattresses. Simple and cheap and 1000% better than what I use when bushwalking which is still quite comfortable.
I am particularly excited...
While I recognize I responded a little harshly to our troll's posting, I'm not terribly perturbed. More, I think it's that there was an insult levied against my builder and I wasn't about to let that go without a little ********** down.
I'll grant he's entitled to his opinions, but to essentially demean Paul's work is entirely unacceptable.
PaulJensen
Custom Builder
# 24

(above) New week, new list...

(above) The first behind the seat table top will be an art project for later, so another piece of 1/2" Baltic ply is the foundation...T'nuts will be the bolt throughs for the brackets...

(above) 2x4 Fir sliced and planed...

(above) Culled and staggered...

(above) Surfboard skin secret revealed...Masking tape, stretched, is all you need...

(above) More tape pulls it tighter...The tape must be pulled to near breaking strength...It's an acquired feel...

(above) The taped panel is flipped and put on scrap cardboard for aerosol contact cementing...If it was a surfboard skin, I'd glass it with epoxy...

(above) The foundation is ready for contact cement...

(above) Then the veneer gets shot...

(above) Drop the ply on the skin and it's good...Guess where the leg goes...???...

(above) New week, new list...

(above) The first behind the seat table top will be an art project for later, so another piece of 1/2" Baltic ply is the foundation...T'nuts will be the bolt throughs for the brackets...

(above) 2x4 Fir sliced and planed...

(above) Culled and staggered...

(above) Surfboard skin secret revealed...Masking tape, stretched, is all you need...

(above) More tape pulls it tighter...The tape must be pulled to near breaking strength...It's an acquired feel...

(above) The taped panel is flipped and put on scrap cardboard for aerosol contact cementing...If it was a surfboard skin, I'd glass it with epoxy...

(above) The foundation is ready for contact cement...

(above) Then the veneer gets shot...

(above) Drop the ply on the skin and it's good...Guess where the leg goes...???...
PaulJensen
Custom Builder
# 24

(above) The top excess was first cut with a skill saw using the ply as the edge, then with established straight lines, the final cuts are on the tablesaw...

(above) No measuring = better accuracy...

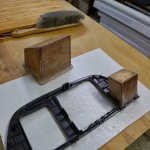
(above) This is the front cabin...The plastic next to the shifter is useless...

(above) This panel is pulled...The plastic cuts were with a knife heated by fire...The new 1/8" ply drop in box was knife cut, masking taped together and bonded with epoxy brushed on the inside...Later the outside tape is pulled and another coat of epoxy is brushed on...Strong enough...

(above) Where the clipboard was is now a pencil holder kind of thing...Later the visible epoxy was painted with color matched paint...

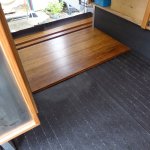
(above) The floor is next...The composition plywood gets a layer of builders felt...

(above) Caramelized solid stranded bamboo...Click lock...

(above) The top excess was first cut with a skill saw using the ply as the edge, then with established straight lines, the final cuts are on the tablesaw...

(above) No measuring = better accuracy...
(above) This is the front cabin...The plastic next to the shifter is useless...

(above) This panel is pulled...The plastic cuts were with a knife heated by fire...The new 1/8" ply drop in box was knife cut, masking taped together and bonded with epoxy brushed on the inside...Later the outside tape is pulled and another coat of epoxy is brushed on...Strong enough...

(above) Where the clipboard was is now a pencil holder kind of thing...Later the visible epoxy was painted with color matched paint...

(above) The floor is next...The composition plywood gets a layer of builders felt...

(above) Caramelized solid stranded bamboo...Click lock...
krl81
Adventurer
Hi Paul!
Have to start by saying: Lovely build!
As a cabinet/furniture maker I just love the "locks" for the drawers! Just a thought though, the table you in post #24, I must say there is a great risk of ll it warping when you only glue one layer to one side. Maybe not as big of a risk when you use contact cement as with regular glue but still. Just as a warning.
Otherwise I love most of your solutions and like the rest of them. I might even steal you water tank idea. best regards K-robin
Have to start by saying: Lovely build!
As a cabinet/furniture maker I just love the "locks" for the drawers! Just a thought though, the table you in post #24, I must say there is a great risk of ll it warping when you only glue one layer to one side. Maybe not as big of a risk when you use contact cement as with regular glue but still. Just as a warning.
Otherwise I love most of your solutions and like the rest of them. I might even steal you water tank idea.
matthewp
Combat Truck Monkey
it's okay, really. get back to us after using it for six months and let's hear what worked and what didn't. be careful using a stove the rear door table; if the paracord breaks you might lose supper or worse.
I was really hoping we convinced this guy to leave!
.
Let me officially add my name to roll of people who think this build, and all your work, is awesome!
PaulJensen
Custom Builder
I was really hoping we convinced this guy to leave.
Nah, Southpier has a place around this campfire...Could someone pass me another beer...
VanIsle_Greg
I think I need a bigger truck!
Nah, Southpier has a place around this campfire...Could someone pass me another beer...
If I were a little closer, I would pass you that beer sir.
Good weather for working on this project these days. Has been warm here, if not a wee bit foggy.
PaulJensen
Custom Builder
Done...and it looks good...
washington taco
Explorer
Looking forward to the final results! Thanks for shaing your builds!
Similar threads
- Replies
- 1
- Views
- 446
- Replies
- 3
- Views
- 1K
- Replies
- 0
- Views
- 150
- Replies
- 0
- Views
- 634
- Replies
- 5
- Views
- 746
