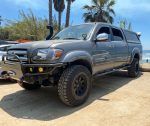
2005 Tundra novice build - "The Rez"

Thread showing. I have the same bumper as you, winch, sliders and a rear bumper as well. Not saying your setup is wrong just weird that we are having different results (or ride preferences). I love driving mine too. 16 years and counting...
 

Kpack

Adventurer
I got a chance to take the truck out on some trails to test out the softer springs. My brother in-law was driving for a good portion of it, and I used a GoPro to get a view of the front suspension was doing. The #650's were more compliant for sure, but maybe too much. We heard the front tires rub quite a bit on harder hits. I thought that they were hitting the rear of the wheel well and that I would need to do more trimming (which I still do), but after watching the video it's actually the tires hitting the inner edge of the upper fender. The SpiderTrax adapters put the tires out to the sides more and now they hit when the suspension is almost fully compressed.

These springs definitely get close to bottoming out easier than the #700's. Looking at my stock bump stops, I don't think they make contact with the LCA's at all. I'm thinking if I'm going to stick with the #650's that I'll need to upgrade my bump stops to something that contacts the LCA's sooner and keeps the suspension from totally bottoming out.

Watch the video and see what you think.
 

Kpack

Adventurer
While I'm impatiently waiting for the Jeep trails to open up around here, I finally tackled a job that I've been avoiding for a while.

Project: Backup Camera Installation

Purpose: Increase safety (lots of young kids at home), avoid accidents, aid in lining up trailer hitch

Materials
-Cheap $20 Chinese camera from Amazon: https://www.amazon.com/gp/product/B074P45P7G/ref=ppx_yo_dt_b_asin_title_o02_s00?ie=UTF8&psc=1
-Braided wire loom: https://www.amazon.com/gp/product/B074GMNW7T/ref=ppx_yo_dt_b_asin_title_o06_s00?ie=UTF8&psc=1
-Heat shrink: https://www.amazon.com/gp/product/B073R69KNB/ref=ppx_yo_dt_b_asin_title_o06_s00?ie=UTF8&psc=1
-Zip ties
-Soldering iron, flux, solder

Method
I installed the camera on the lower arm of the Brute Force Fab swing out. I marked the spot, drilled two holes, coated the mounting screws with black silicone and screwed the baseplate in.
y4mPe8VGCSg3IkUJPja_RmAspIDKXnq2eEWOxvodD6m1unhLs4UvKytGP5cfRTCO8NAJ0E2ZiOxxVlUwn8xq9_4rCMGMfbX_CxmMKg4ntVbna3UCfrmtP1XXSKsYhtpQQ1l3XlpqLPswZdK3aruIFdPKYfBhAgH6-EIfx5tgN0SggySEsglrcGVg-CystI_eBwuZov3LEgUggGwcsEDKl5UKA


y4mJcGf-hl9N0_LXuzlgjEe5lEILzZlxhAPnBrQXHWPELCCQVkzmEmQq42jJIFoMxlLhbEVvjiY6w-Yyi-QtHiFQVJLKyoTjxT3ZBTjogiHSe0qI0ANfun6yFrU1kTfORpVxnH2dnILPY9bn53rEbfRekgwuADPEb2oHn4iBVAThXJlNQaMAggCbJohk1CMXShlCMcsLAVjs0Ci59wJ8RfOyg


I routed the wire under the drop-down table
y4mkSaE1zDMV4YTOv3xOyk1yMTbE39PB7CQjqdudQkWWEhOU7fJznXH-QyaxlQ9WcPhuYkcZrVTx2gv7wY_0tvZd6SoGQ0xMSfSoQxIitFBRzae_WjfdnzQPJUgphsXn1V37Ei9q5-gY4WXWXtAZa0tNwntyMGiyEbTty5QY8WrClqyabmUHABYcaq-FzI6bhFxiUO81lSIDDMOjS7KFVLXbA


I used whatever holes I could to mount the wire up and out of the way
y4m60MjBeLYWmx24uaJBQ2ZF2pV4CTuoExE11jQ0BiCbUzkk1HKCuBb_O_sh_T15zeYD9c7-duSMHy0G6WLxki9SNm-wHrsPp6nHzlEDVf66z9ZIQa9VZimiFwkqdA8mcpeY0nVOHQn2kMZS3uqy-smNAbZ84W-R_xF5urxeQQvOIXo_vclh9DgsGN7Hq4ykyZCrWfIMlE53eGNAO7u5PBLiQ


I used large heat shrink to seal the RCA plugs from moisture and to keep them tight. Red RCA is for power, and yellow is for video. I also started my split loom here.
y4mlMErWxRW7JssD4rjOXFbGAD7hHLgmUl5ODNm0fmZc3j1g-EtuJ68jca_TOTkhD_-bAmdtpY-dgP8CVi_oI34hLpq8mkyGOVBxRsIzKbUmti1xAUZDMohj4ahpkgNTT56YnosN-2h0y314Y4tkbThpBEpLbbjTdVZx4xJYImxlIDvBpOnIkVe5af6t_ep2C8fFDExsFNs9O3wNDfYY_-TOg


I routed the wires so they wouldn't get pinched when the arm was rotated. I also provided a bit more slack here
y4mUkFfVRRMe_DTWPmyH80EB-88vF3NVf_0HeoggKA1_nBIM6isEtz5l_DSV9Ut6V6zGqONLvt1aDasqs8zz4YRzaUKSa3pXe6dmnu-D8YOYfPB73wSYzk-MQGrWDZiRBACuNNMfqyQ7y2fGIfFs5iS2AyElSb_DPXGQXE4tJcP5MqXvK0OztBmVSYcNm9b-16AmxghwVhpJ8dj0j1AWNhFLw


The power wire was then routed up behind the passenger taillight assembly. I tapped into the positive and negative wires for the reverse light. The camera is not always on if done this way. Alternatively I could route the positive wire down to the trailer plug and tap into the constant 12V source there. I may do that in the future. The heat shrink was finished after the picture
y4mR_OznJ-0tnpxGzSFPUDDXQvNSq2LsWfT8GylXyrUd3VyvlXUbiJFjf6MGgBYxSzhjRcAj9gl36epqC2VqUWqEbZ39IrFjrMd820K72ziPw5_FW5faWVfSC8_Z1A6h9LJ7aCnF6mpiw1l1hjOyYdgUPT5pxpb5SkMviYYtYL-w5IhYmJv749Jg_tMg_dXQNVvZ5-lBU9yKKugpNgz8O_4Rg


The camera wire was routed up along the frame rail using factory holes to mount to
y4mW0zuiZj2SBiMQfny83QA5yPZIvEML8KJPT2rxm05JBNhNnj6axOFqkajjBW_B2fo9dnbWnXEkipygWh0mqiMlHKEiOKc8zKmQWJKqrL17evONmKzBqA9-7prdZZwglVIHVfsU-_mt77b5Bbv0MDuJygQTe6ikJLkYCPN_XPbt1clJinEI5pTYTtzDXM9F3PfbXbAJAJ3C9QVYpp4hrRorA


I used split loom near the front exhaust to provide extra protection from heat. Look at how clean the frame is still. I'm a huge believer in Fluid Film.
y4mYTLgMiN3y7WkqES6l3PBX8I_P3Ghro_oiTvstgPyLL0tsYgXTa_sUNizM_f2u72IEjyr-fOPuSNs7RADOB6u0O5vgV8BqYJzjFdcJnrYpoIEWC9Ixy_7Q6pqy8e-0dUMff-WXCLPrXYtlbMdbgjgOTYQ2FL7IV02WC1asBXm1056_JMRBnF3hJyidQJX5PtxGs__BeS976ZwnmCZs4A_Ag


The wire then went up to the engine bay, through the passenger side firewall grommet, then to the back of my Pioneer HU. There is a separate input for a rear camera, so I can keep my front camera for tough trails. The HU has a "reverse" sensing wire that needs to tap into the reverse light wire to turn on the monitor when the truck is placed in reverse. The positive wire at the tail light is red with a blue stripe, but that is NOT the same wire when it reaches the front of the truck. The proper wire is RED with a BLACK STRIPE and SILVER BANDS (this applies to 2005 and 2006 Tundras as far as I know). It can be found by removing the driver's side sill plate and kick panel. Open the large split loom, release some of the electrical tape wrapping the wires, and find the above wire. Tap into it whichever way you want. I solder all my connections.
y4mVwc1y6jpD9WhhxZHONsqf-PyVB3cEMoc-xo7pV9KU1lreg8adUWBRKKIQunOExO6twCbGrPCYdCqTWSHOz1N21XbTImQ1JtMYhfUVvhfttKHQ9hthhR5cS4OOT4OMbrIPaL_ZwuOsFzQEczWU_orQ4vfHVdPI0t7werGQCYnYJvsA3Eq8P4dofodcKskH_phnEg_FZsAvQPshpYhwAp6ug


And now I have a working backup camera. I'm used to not having one, but it's nice to confirm I don't have any kids behind me. The yellow line marks the end of the spare tire and jerry cans hanging off the back.
y4mRt46K7LTOhVUnBll2mQULh3izKMSvph1RFL4XXDwzSnStpN_A4SrjUYspXlj77F4wOvKnPuQwdGsgQ0ONuD-tUinAVhokpSrSZY76Jz2mOYmOyyU0toSMQAJvh3wxug6C-IOWhm00YIVwqS0-xmOrjbTg9ePVjgpCZfMZPJ6uzvymaV03VTR-U-F5-kto4Wrv_Hxiq4ZySHM6X24h7XgZg


-Kevin
 

Kpack

Adventurer
Today I took off my front wheel spacers. I loved the look of them with a bit wider stance in the front, and they did a great job keeping the tires off the frame. But I just couldn't get past the shaking in the steering wheel at highway speeds. It was driving me nuts. With them off the truck is much smoother. There is still a slight shaking in the wheel on the highway, but the spacers were greatly amplifying it. I do have slight rubbing at full lock against the rear of the frame. Not bad at all, and not enough to keep me from hitting full lock on the trails.

If I were to do it over again I would've gotten wheels with 3.5" backspacing rather than 4.5". That would've pushed the wheels out an inch further on all sides, keeping the tires off the frame, and giving it a bit wider stance.
 

smokeysevin

Re-redoing things the third time
I have been surprised at how easy it has been to keep the tires off the frame even with 295s and 4.25" BS, I guess I just don't go full lock as much as I thought I did. I will eventually pick up a set of the -25 offset SCS wheels, not in the budget yet though.

Good call on the heat shrink for the backup camera. I did the same thing for the rca for video. On the power,I cut the connector off and soldered it directly. On the one hand, its nice because it is smaller to feed through the frame and cab, on the other hand I had to redo it once because the wires are like 28awg or something tiny and I pulled one out. My camera also has an additional connector so you can still pop the camera out if you need to which is good because I mounted mine directly to my trailer hitch.

The expanded sleeve is awesome but man I got hand cramps while doing all the additional stuff on my truck.

Your frame is super clean, my Texas truck isn't that nice and I am dreading the repairwork I will have to do at some point.

Sean
 

Kpack

Adventurer
I have been surprised at how easy it has been to keep the tires off the frame even with 295s and 4.25" BS, I guess I just don't go full lock as much as I thought I did. I will eventually pick up a set of the -25 offset SCS wheels, not in the budget yet though.

Good call on the heat shrink for the backup camera. I did the same thing for the rca for video. On the power,I cut the connector off and soldered it directly. On the one hand, its nice because it is smaller to feed through the frame and cab, on the other hand I had to redo it once because the wires are like 28awg or something tiny and I pulled one out. My camera also has an additional connector so you can still pop the camera out if you need to which is good because I mounted mine directly to my trailer hitch.

The expanded sleeve is awesome but man I got hand cramps while doing all the additional stuff on my truck.

Your frame is super clean, my Texas truck isn't that nice and I am dreading the repairwork I will have to do at some point.

Sean
Yeah, rubbing on the frame doesn't happen too much (at least once you have a decent alignment) I will rub at full lock under a few circumstances....tight parking space, tight turn on trails, etc. But not enough to make a huge difference. The thing that bugs me most about running 4.5" backspacing is that the front wheels end up being tucked into the wheel wells more than the rear wheels. Because the front of the truck is independent suspension, when it's lifted, the wheels get sucked in.

And I hear you on the braided sleeve. Feeding the wires through that was an exercise in agony. I basically had to work the wire through an inch at a time. So fun.

My frame was a mess when I got the truck. I put a wire cup on my angle grinder and went to town. I then used a rust converter and painted over it with Rustoleum. I used to have to clean up the whole frame every year after winter, but once I started using Fluid Film there hasn't been hardly any rust. I simply blast off the Fluid Film every year before winter, clean up any spots that need it and apply a new coat.

The only areas that get rust now are the shackle hangers (I think they flex and the paint pops off), anywhere I scraped the frame while off road, and my rock sliders. The sliders get hammered by gravel and dirt all year, so it rips the paint right off and a bunch of little rust spots develop. I have to hit them with a wire brush and paint every year.

-Kevin
 

DzlToy

Explorer
FYI, a long thin dowel or "glow rod" works wonders for fishing wire through braided sleeves. A stiff wire such as that from a wire coat hanger or 10 - 14 AWG copper, can also work for pushing wire through sleeves, grommets and around inside vehicles, in general.
 

migx333

Member
Hey @Kpack

I commented on here a few months ago and your build and page helped me pulled the trigger on selling my 3rd gen tacoma and going to a first gen tundra.

I do want to say I do not regret it one bit!


Heres mine!


Cheers! Hoping to do a coolant fan mod for more peace of mind since its starting to get hot

1592954342763.png
 

Kpack

Adventurer
Hey @Kpack

I commented on here a few months ago and your build and page helped me pulled the trigger on selling my 3rd gen tacoma and going to a first gen tundra.

I do want to say I do not regret it one bit!


Heres mine!


Cheers! Hoping to do a coolant fan mod for more peace of mind since its starting to get hot

View attachment 594158
Love it! Really looks nice. Is that an Addicted Offroad front bumper? I've always liked the hybrid plate/tube.

Also, what headlight/turn signal combo did you use? I need to replace mine and like what you've got.

-Kevin
 

migx333

Member
Love it! Really looks nice. Is that an Addicted Offroad front bumper? I've always liked the hybrid plate/tube.

Also, what headlight/turn signal combo did you use? I need to replace mine and like what you've got.

-Kevin

Its actually a custom bumper from a local guy in san diego. His instagram is @nickdeyatnight
Really good welding

As for my turn signals and headlight combo, those came with the truck so I'm not exactly sure what the previous owner had. I think they were just from eBay
 

Hayden87

Adventurer
Migx333, how was the install of that 100 series snorkel? I'm in the market and curious if on the Tundra (vs. 100 Series), it doesn't attach to the A-Pillar, or if it's just a matter of placement.
 

Kpack

Adventurer
From what I've seen on Sequoia's (same sheet metal as Tundra) it doesn't attach to the A-pillar. You can get it up close to it, but no attachment.

I toyed with the idea of getting one, and it would certainly benefit the dust situation on some trails. But the reality for me is that it would likely get caught and torn off/damage the fender with all the tight trails and low hanging branches. It's just not practical for the type of terrain I find myself on. If I could really tuck it in tight and keep the head super low-profile then maybe it would work.
 

Kpack

Adventurer
Hit a couple trails today with a friend. The 650 lbs front springs did awesome. So much better on washboard than the 700's. And they were great on the trails too. No bottoming out, even though I dropped onto the front several times. One of the trails was very, very rough and required the full range of motion from all wheels. Sliders were used several times, both to push myself around trees, and to protect when the truck dropped.

Mid travel has worked out great for me. I ditched the front wheel spacers and now I can stuff the front tires all the way without hitting the outer fender. I do need more flex in the rear though. At some point I will need to swap springs to something with more droop, or do AG's Hammer Hangers with a longer shackle. But with my set up now I never lifted a tire today.
y4mZewUVNmkGrh9tq9O7qT51fcUPGb437Iqtp25NzltgZMceyJa1TTIIlCGtfwYag1GKzZsQoAdYjaokNbHPzXbzvP1Vb7h8LuN-Rg7a_HIblPI3M5OzyKhNxmTonhWl6rqmi_9sjEzGzY79aZCJGv6nL87tVogZmDW-aEfeTPdJBFFdE20TlhXpUIiAW_r0Qzw5M1q6cl6AC3B70xqPgcwGg
 
Interesting to see you switch back to 650lb springs. I just added a brute force fab bumper. I've not added a winch yet but I do have skid row skids. Despite the weight my ICON coilovers with 650lb springs are doing ok. I was worried it would ride really rough with the bumper.
 

Forum statistics

Threads
188,249
Messages
2,904,493
Members
229,805
Latest member
Chonker LMTV
Top