2005 Tundra novice build - "The Rez"

Kpack

Adventurer
KTempleton - The stock bumper and hardware isn't terribly heavy. Maybe ~30-40 pounds for all of it? Probably less. If you're going to hang weight off the front, I think it may be best to upgrade to 700lbs springs. I still have 1/4-1/2 inch I can crank them down if needed, which is way more than I need.


In other news, I decided I needed a bit more horsepower. So I added this:
y4m3p_8gB-oguguyuBlGolm-d07YT2MDOdPWCOrD9Hn1eM3U0uXnswdC9vblaYB6UArE84S1RtGn84jQK3WbKjQDSRXjV0nTQoJSFhB0kSo8T2EOXbgWAIMyQTkYeQJR6G6NLaJBRX2Ak51UlyEcJyRmnKreTnIGc4tjBf1nlbBQVAPQKc7AJMx3tubbzc4QHYoG6m6ogFQYuLKmy0qHEm9Gw


'Merica. Think it added something like 25HP, at least. I was hoping for darker gray, as that would've added another 10, but this gray will have to do.

-Kevin
 

Kpack

Adventurer
Finally getting a chance to get the sliders welded up to the brackets and frame. I had to wait for a friend who is a welder to get back in town.

19628.jpeg

I'm going to start painting them probably tomorrow. From what I've read on various forums I'll need to sand them first, then spray self-etching primer, then whatever paint I've going to use over the top. Anything I'm missing?

-Kevin
 

toyotech

Expedition Leader
I just washed mine with soapy water. Rinse and let dry in the sun. Than self etch than paint


Sent from my iPhone using Tapatalk
 

bkg

Explorer
I just washed mine with soapy water. Rinse and let dry in the sun. Than self etch than paint


Sent from my iPhone using Tapatalk

I usually do this with a shot of brake cleaner or degreaser.

Running a scuff pad over the steal may improve adhesion, I guess. I’ve never tried it.
 

Kpack

Adventurer
Thanks for the suggestions. I don't think I have time to do soapy water because it will take forever to dry (we're sub-freezing temps here right now), so I'm leaning towards brake fluid or similar. Thanks for the link on that product Loubaru, that looks very interesting. I'll scuff them up a bit too...can't hurt I'm sure. Plus there is just a slight dusting of surface rust from sitting in the garage for a month and a half, so I'd like to get that all cleaned off.

My friend finished the welding and I'll be painting tonight. Then back over to him to weld to the frame. Pictures coming later.

-Kevin
 

Davidw

Observer
Can't wait to see the sliders mounted up. I'm liking that bumper more and more. I bought an 100 Series Land Cruiser bumper from ARB to make fit on my double cab but am starting to lean toward the Brute Force one.
 

Kpack

Adventurer
David - getting close to final mounting. Just need to coordinate time with my friend. I've seen pics of the LC 100 series ARB bumper put on a Tundra before, and I really liked the look. I didn't want to mess with making custom brackets and such to make it fit. I'm loving my Brute Force Fab bumper....it fit perfect....everything lined up exactly how it was supposed to with no adjustments needed. It is very well built.

An update on the sliders now. Brute Force ships them with the main body welded up, and then ships the frame brackets, gussets, and mounting tubes separately. After talking to Billy at Brute Force I learned a few tips on how these things are supposed to be put together....hopefully they will be helpful to anyone else going down this road.
1.) For an access cab Tundra you should plan for a 3/4" gap between the body pinch weld and the tops of the mounting tubes coming off the frame.
2.) For a DC Tundra you should plan for a 1/2" gap between the body pinch weld and the tops of the mounting tubes.
3.) On a Double Cab, you will need to 'cheat" the mounting tube down past the lower edge of the frame bracket in order to achieve the necessary 1/2" gap (see pics below)
4.) Begin by tacking the front and rear mounts in place, then do the middle ones last. Not every frame is perfectly straight....
5.) It helps to tack the mounting plates onto the frame, then tack up the mounting tubes. Once all of them have been tacked in place, cut off the tacks to the frame, then full weld the rest of the assembly and gussets on the bench top.

Here are the pieces that need to be welded by the user. I think my friend did a fine job with the welding here.
y4mJ_movUSZ5SOUfnqQWVLKA6hrcH8LAyfxI_QuzK9UcXRx37LUkwPpsoD1QNfVDz9pP2WLQf29G3bTt_YoNmVB8fXpCG1oRHXcjkXuHJqdE_zc68rzLShabE2Dz-wXZUfzqulpY31D4kAJmAl_MqyJmjYhdzsQgXx1knxXHSIZTrxxxWZIR6FM9WoCSoSUAk3OU4xwtSYh-Fw3EQGNlRpx2w


Here are both sides all welded up and ready to paint.
y4m-NM0vI6bWt3ZxfuS9OQ8AN1gIDfUQeKgrqVz18Ivl983IJn6faF5iRX0y_tlbcEvIdkFCZ7kPJ4lJzZoNUuRG2JH9IpV9OiPsdZE4vxcMkdhczEcoR4WaLxBT-ALV8noJQf_v6Nso4MIwhplrABY4UN54f3dipI5yf94sKRX5Cwquh68in5cT-aRgQNqL37Bs3AmiXUs6YMIKiuul6V11g


The frame mounting brackets:
y4mtb9DOsVhdELL1LgvavhtEqQQFbImEcC5DEft-qH82_yIZnvx08P9K6slMcNPfTA46nZdL-wuwYVyxyOwN11xQAhM0M1YaH6TFC3TmNN2tlV06kt00GCiSvwRYExYrSua3zOUx3QofQliaKasmY-2kPe6W710Cqkubonl76lyjiDFZD6K4PNOHPmyyjMSw0fT2S8bEMLvbOtdgaw4Yeqvqw


Billy mentioned that it's easier to mount the gussets along the edge of the mounting tube, because it can be difficult to weld all the way around it. My friend was able to get around them without too much trouble so he mounted them in the middle.
y4mVzWq3xXStZBQdNlSCgNs2sNxaDCKNEjKdXV3Ffrm7M36UT7Z0O8XRWA3DROC702aD8NiP_nrZWaYv8rWybOpuh8x12481wMeoO1l8N7_2fXE0muEcUk2B5o94tt_0dKxp-DHHN9eFvmHV_a1sOBDr99cMcVZfQbzb7ovAKj_eqy00YaSOP3e3RPXLrG8i4YbEEuesSCZFMGOUYg95OnSGw


Here is what I mean by "cheating" the lower edge of the mounting tubes past the lower edge of the bracket. You'll have to do this on DC cabs in order to get enough space between the cab and the tubes. Don't think you need to on AC cabs.
y4mqJOkAfVkz-cXJOt9zCkvr9h5yzHXxB3V8jQ381WjyS3owymxlsqrFt2Wn8HH7dLu2rH-bccDsALZlKvmjTPybn_bxseQXOv0ghH95vNfRA9VGdd_64sDsQbFmyRjjxwNmZZsrHBLtLUCRPT640-BfPhN1KxNEsqhPBS3OnXHwQmmy4UYpQy26AFcN3LH07OdlnOCiTGOHx5Br-FXFob7Kg


I used a Scotchbrite pad to clean and scuff up the metal, then cleaned it with soapy water.
y4mMBl7r-vseDxe9ZRV7_HJ5VbNHNI-dgqtwCYKU-fjAA_Fygic2Xo2vzRmsgHZr1yky0DllNa4rtx3AQd3UFfo_zzA-sxPP9x2RAjUXJFr9Gi4TtnRKrxZ5VKxu4MeR19-drFj2hRoBUwI2tVS4dvCkyD3OWHWh-Bgz4Em_tS30Yoy_BpFOZHKYoPIRCBEC7iVemB3UoF3AHDPA0VJGIC7fg


I then primed them using Duplicolor self-etching primer, 3 coats of it. Why Duplicolor? That's all the local NAPA had, so that's what I bought.
y4meb82vsmF9x4IStFyRFyejydpWTEd3oDECnb73HFn2A-_xAhOYnrixPXxzUoB680j8L45xGehGjMkVK55iRh46kZ3EojW1bR1dYNbMF2rnW6eoy4GE4yPer8VfLfnVKpARkKmhe1xf33NB-B-2F8Ppruh304Q67fWmIzPODuIZ_gdk4rSgfv-r6i1_p93xM0DBOQbP_uY97ulOTf0GoI3aw


Then came two coats of Krylon automotive semi-gloss black. Pretty close to the finish on the front bumper and easy to touch up. I wanted a mostly smooth surface so I can attach strips of grip tape to the upper edge, to prevent slipping if someone decides to use these as steps.
y4m_QqUqYde0UmkI5ci-14RSDKtIV3LR4MBjy2xzm9m2uoCkBEJYqloyFUIImdzWti6H6jreteqHKFsYjacOqtyM6jnCj9AcAk3K6tQBsZwWvBaIj2EG3hbrsqEL17giN3K1Zed2NTTnzFhx4N-cktGIqKZ5PQkcbLs3JePKzOVGkSceD4NYhGTYA7xLuCU8NIAYe45uyuThQC0TzNBY3Qhzg


-Kevin
 

Kpack

Adventurer
Thanks! I had my friend weld them on the other day, and I've slowly been getting used to them. I got so used to having nothing there that now I have to remember that the sliders stick out some, so that I don't bash my knees all the time.

Not a great picture, but gives you a general idea of how they look.
y4mOg-E5GWelpn8noTOnOj8EpdBprXUU9T8A0TIeeiletbjEWiWIKtT1BAXaLT-8Fm8rA6OsafWOUPObTg_VGeHpkMjJaHUBU3wIgqhbduTtE1BTgaEgqt-05XBmrPV3GVQ11qxAunwzzXX4UAcbYYf-3SFKbHZrpXutJpH_telBsv5PCdxZmYkwHo1zI54ZOUuAF1zl52U5hqVMY096m0cOA


After I got these welded on I went back and tried to raise the ride height a bit on the driver's side. I was sitting at 22.5" from center hub to fender on the passenger and 22.25" on the driver. It's small, but noticeable....more so with a full tank of gas. The lean bothers me. So I lifted until the wheel was off the ground and cranked it down another full turn (it was actually really difficult to turn....is it supposed to be that hard?). In the end I should have raised it more, but it did make a small difference....about 1/8" or so. I'll probably leave it as is until I get the shocks rebuilt in the future.

FYI with the extended droop Icon's and Camburg arms I get 26" from center hub to fender at full droop, which means I have 3.5" of down travel available from my ride height.
y4m7trWTfcEMh9E7Bk2fcHzNU585EmEsREvttAFXtaFEMVOY2f4KDgnUOJGkTncaiMa1Du5zyUlGScv7sNJ5QcYKYTtC6wqqK81lnStLY9AM7IiZYtHhg6fSY73ijXnxwpPAcso_i9UlBMdFZwxN7mzBtbIwdpTbGeDwBIcs33gA3YAEpcI6Gd7tM93ZRuyHYQtuPRXeDUX7NXnM4zvNEt0bA


-Kevin
 

Kpack

Adventurer
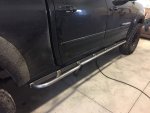
Finally have some dry roads and halfway decent weather, so time for a follow up on the sliders. For anyone with a Gen1 Tundra considering the BruteForce Fab sliders, hopefully these pictures will give you an idea of how they look and fit.

From the side...They stick down past the lower edge of the body by a couple of inches. But they are basically flush with the bottom of the frame rails.
y4mfQPBjIx4OzeODgr7RbyifiKEQUFWV6jjy76KCrMjfO6URN7mx1C57_K33cQyzodzRrkhm-Jnu1SQ28pQcBtVFK6BBPSfLNMzDzhNmUph9UqKcAQSNMvo7VdtHoAv4G-4ui3jxNX6-9Bhcq4GjwEI_IfAw2N48tLARa-_4CyS-Dk-dLa_rLj59hxWBx-BIMw2D4lJVLfY-nCVnVBoaXlRUA


From the front....the main body sticks out from the lower kick panel about 3 inches. The rear kick out is enough to clear the back tire and fender. That should help out quite a bit on tight trails with my long wheelbase.
y4mDf0pxRkBSYK-Az2iQNpJn33g2LDekrFWu-L6RV2vEi_iQWicjWyL163ZQPW1F8MMsl0tI7GSMsmPi7KLtouyR-w66al1MUgW1fixGQl73Fa98ETJl7ide_mE6RH3cIppjjaMi3PbvvqC-KJXgYSHDRH1k8TWjEd2CxAUrkTystuF_1wFi9cZQOXeAQGaDpuJmur_dD3-RkReb0Sg0O_k-Q


I used some grip tape on the top edges by each door and on the rear kickouts in order to make climbing into the bed easy: https://www.amazon.com/gp/product/B01MQYV4SG/ref=oh_aui_detailpage_o01_s00?ie=UTF8&psc=1
y4mvb_m74tInv0aUeySY_FhSz5nT5yfOjwObC3YmBkQEA8oXgorkw_AKOzRABeiw1XrftjffHmxF7cOKcITo2Osq28mrkibusoHdBbwQJq1-1gM0uy8zBb8J0Mh-diVUuTV8rH0mlYrN9MTZp2BvSLGOk3QO3CgvHNfEOuOIbdlr6_CMnrSPCf7DF59SAi_aLIpz58HkUJR9XXR5bVbBgal8Q


And this is why the sliders need to be mounted 1/2" from the lower edge of the body pinch weld....the rear door needs room to clear the kickout when opening. Both sides have just enough space. Door is open in the picture and the corner is right over the top of the slider.
y4mBY2asmfZES5QbKqe3XHd4S--lH95Q1s5PCIsZfl89FYikqrX_8VPHAeEYmNUMCoEsAjH8i57c7wGiGtyBVIEtJni58W_X-IBroQdQVy0SLMXfyPgTOKQ_TJ5nqcIMiW90w_HPYrkkfaM9DbSZ44Kl447jQIX0x7G3_yP0x9MT3lw3Y35iJ3YotlSJ5vHBZU0JlSzrEJKmiTU6YQeRw9P_Q


So far I love the sliders. Haven't gotten to try them yet on the trail yet though. Unfortunately it looks like I'll be having to repaint them when warmer weather hits. Spraying in sub-freezing temps was probably not good for paint adhesion, but that's all I had to work with. Most likely I will need to take a wire wheel to them in the summer and repaint them correctly. Lots of gravel and salt on the roads probably doesn't help, but I can say with confidence that this is probably due to my subpar paint job.
y4moPv8N4h-jUSyooYDca5eggtHFJQY_MPV2au19t_D7nVtCBxzz-U5vjZLKaYurRQePrG76RpZphTUKdjU2XI4pfQzsZjkuK1q571HCiypOVgkq1SphXYg4p4mAmL3WwqQu-1dn_NuX3e1j7JrIWFQH_f5iYi4Bfevs-qGmzzEolp5CgrTcRTUyCnj05xQIRmh7jUwBBjwhPX5RypHU8hjVg


-Kevin
 
Last edited:

trailscape

Explorer
Rustoleum high heat engine enamel or BBQ paint and a heat gun works wonders. Use the high heat primer for even better results. With the BBQ paint you can pretty much heat the metal up and just spray it and watch it dry instantly.
 

Kpack

Adventurer
Finally got around to doing the super-easy diff breather extension on my rear axle. I removed the factory breather, confirmed that it wasn't clogged by blowing air through it, and replaced it with this union on the diff: https://www.amazon.com/gp/product/B00P2S0TKQ/ref=oh_aui_detailpage_o05_s00?ie=UTF8&psc=1. I used 3/8" hose routed up into the bedside, resting on top of the driver's tail light housing. The factory breather went back on and the junctions were secured with small hose clamps. I secured the hose with zip ties and left what I hope is plenty of slack for axle down travel.

y4mMi-3lWpB-9S7H9XOdPgsroUqpTqVOQR2BMHfjTewPsnLwAyiZfur9W-IQylAzDY8mPI7tBdWy9Gxa_3cnbjes4omQbInAF6cAgf4zOJJ1s0R0abiZQLAPRp384vTP9URiiTzC5LDbbBheAsjQQosOk4qCmQHIJg4wRkg979ysm_14yJOKiZ2bEMPDv9p-KwgRSbeOuXTSq7HB5A7fQe9xQ


y4mfc4y-ZDj6CanqXD1H9z2NSG2jcnz-JgAoqC7xXk-nsXEOe1JZ7EBkOByZCR_PHv1DpBCO1cmOldYtNf3f_DywLsX1vgbAFfnj1JxtJRjVlNYtu2XnWHLmGX06DfkxoJjK0d5ROJalV809JKCB3jYsPA-qXv_FhUmoXv4Xm1yXjLbWUcOJRFruFh_DSSqPdzQ7mq6RDNa5P2DSqI0-9WQxw


y4mSqLjJwRggDh58hK_b5JjfkDIFRmmP9UGGlFC33kKe0CpDuI_UcqNXqJ2j2jXBs7J43wdYXqZjVmXIqWNq77Gxebn02CbhK9b91T3hGy1XV9DweFqZEXpcZBDCjD8EUnKTtDg1z2DUOd5zenfMCMQKlQ33PpUQ6z1lqJ83YeHr5MYEH7KvLVEpxWLYMzVzMavZZ9XpULr-YBxCZR5dyeOfg
 

CrewServed

"That" guy
Way cool to see another Gen 1 show up. These trucks are surprisingly capable and a ton of fun to work on and drive. All the years I've been bouncing around in my rig and I haven't yet done the diff breather relocation. How long did that take you?
 

Forum statistics

Threads
188,178
Messages
2,903,418
Members
229,665
Latest member
SANelson
Top