2020 Ram 5500 DIY Composite Panel Camper Build Thread

Jonnyo

Observer
They’re all basically the exact same price

$1000+/- per 100ah seems to be the norm for all brands across the board

such a fun build to follow up! keep posting update on the AC. i m interested in getting a AC for the my van. i build my own 300ah lithium battery and so far, it s been amazing and allow me to cook induction daily pulling 120ah at a time and also have my fridge, water heater, air heater all on 12v. solar and DC to DC keep up daily and it really make the rig awesome for boondocking!
 

Korey H

Well-known member
Soooooo

One thing i was SUPER curious about was the AC and why no one runs this one in a camper, and folks seem to gravitate towards the overly complicated "Mini Splits" with lots of moving parts.

Did some testing today and temp wired it to the Multiplus

On high, it draws 60amps +/-

Started with the box a little warm, and it was ice cold within 15 minutes.

Ran it for exactly 30 minutes and it used exactly 30ah

Solar had it replenished back to 100% in less than 45 mins.

View attachment 619851 View attachment 619853

I didn’t see the ac model in your post (likely just me) can you tell us more about it? I am about to pull the trigger on a Pioneer 9k btu minisplit. Thank you


Sent from my iPhone using Tapatalk
 

RAM5500 CAMPERTHING

OG Portal Member #183
I didn’t see the ac model in your post (likely just me) can you tell us more about it? I am about to pull the trigger on a Pioneer 9k btu minisplit. Thank you

Sorry, I’m purposely not answering questions for people not willing to put in the effort to read.

That’s literally the entire point of a build thread. It’s one giant reference guide.

I even posted a direct link to it, detailing every single spec..

[INSERT JOE BIDEN CMON MAN MEME HERE]
 

RAM5500 CAMPERTHING

OG Portal Member #183
such a fun build to follow up! keep posting update on the AC. i m interested in getting a AC for the my van. i build my own 300ah lithium battery and so far, it s been amazing and allow me to cook induction daily pulling 120ah at a time and also have my fridge, water heater, air heater all on 12v. solar and DC to DC keep up daily and it really make the rig awesome for boondocking!

Thanks man. Will do!

It’s starting to get colder now, so not sure when I’ll have much real world data.

Yeah, that’s the plan. Massive DCDC charger to make good use of the dual alternators while driving.

Onward and upward
 

Korey H

Well-known member
Sorry, I’m purposely not answering questions for people not willing to put in the effort to read.

That’s literally the entire point of a build thread. It’s one giant reference guide.

I even posted a direct link to it, detailing every single spec..

[INSERT JOE BIDEN CMON MAN MEME HERE]

Yep my fault for not going back far enough. Reviewing over beers rather than coffee. Thanks for the build thread!


Sent from my iPhone using Tapatalk
 

motorman

Active member
the power consumption of the AC unit is 'low' and assume once your ice cream cooler is down to temp the consumption would go down

AC on high for 2.5 hrs is a great result! congratulations and thanks for the detail


and the power density of the 300 ah single battery is a serious consideration for size and weight
if you add another battery not meeting your power demands will be a myth but it appears that the single will keep up due to the efficiency of the TC box

1603542364358.png


ive been looking at the 200ah batteries on AMZN for $1k each and planning for 2 or 3
 

RAM5500 CAMPERTHING

OG Portal Member #183
if you add another battery not meeting your power demands will be a myth but it appears that the single will keep up due to the efficiency of the TC box

Thats what i am thinking. 2 batteries will be all i need. Might even get away with one. Will need to do more testing for sure.
 

RAM5500 CAMPERTHING

OG Portal Member #183
specifically regarding your AC unit & installation where did you run your condensate drain?

Honestly, i am not even sure what that is. Sooooooo.... I didnt run one! Hahahaha

I read the instructions online probably 10x before purchase and probably 5 more times before cutting the hole.

I dont see anything mentioned anywhere of a drain.

This is my first AC ever, and i am not savy on their workings at all.

Is this something i should be trying to look into more?
 
Last edited:

java

Expedition Leader
Honestly, i am not even sure what that is. Sooooooo.... I didnt run one! Hahahaha

I read the instructions online probably 10x before purchase and probably 5 more times before cutting the hole.

I do no see anything mentioned anywhere of a drain.

This is my first AC ever, and i am not savy on their workings at all.

Is this something i should be trying to look into more?
Likely just runs out onto the roof. Most rv AC is that way

Sent from my SM-G973U using Tapatalk
 

motorman

Active member
Honestly, i am not even sure what that is. Sooooooo.... I didnt run one! Hahahaha

I read the instructions online probably 10x before purchase and probably 5 more times before cutting the hole.

I dont see anything mentioned anywhere of a drain.

This is my first AC ever, and i am not savy on their workings at all.

Is this something i should be trying to look into more?


thanks for the real world application and G2

to avoid the mini-split now i am looking at using the same unit you have used and was privately hoping there was a specific drain provided

the condensate draining off our diesel pusher w/ 3 units on the roof was a bane and cause unsightly stains during the 7-8 years we owned it

with the ambulance we have drip rails to direct it front or rear but was wanting a line if possible

maybe out west you do not have such a problem with humidity but in the SE 50% - 70% humidity is the norm
 

RAM5500 CAMPERTHING

OG Portal Member #183
thanks for the real world application and G2

to avoid the mini-split now i am looking at using the same unit you have used and was privately hoping there was a specific drain provided

the condensate draining off our diesel pusher w/ 3 units on the roof was a bane and cause unsightly stains during the 7-8 years we owned it

with the ambulance we have drip rails to direct it front or rear but was wanting a line if possible

maybe out west you do not have such a problem with humidity but in the SE 50% - 70% humidity is the norm

I honestly dont have an answer to that, but i will keep an eye on it, and maybe run a line if its needed.

Thanks for the info/heads up!
 

RAM5500 CAMPERTHING

OG Portal Member #183
Ok, this is melting my brain a little...

I am proud to be able to do 97.43% of this myself, and figure out what needs to be figured out.

But this has me perplexed, even after a couple days of brainstorming.

I got the furnace installed and running. Easy Peasy

I went with the new plug and play Espar D2L with the Easy Start Pro controller that has built in altitude compensation from Heatso. Install was super easy, was up and running heat in less than an hour.

The job was made even easier by the bracket/mount @Victorian sells to make the install clean and sealed from the elements.

Here are the links:

Heater: https://www.heatso.com/espar-airtronic-d2l-diesel-heater-kit/
Total Composites Bracket to install: https://expeditionupfitter.com/collections/heat-hot-water/products/mounting-flange-for-air-heater

Here is where/why i am confused...

Watched TONS of Vanlife Nerd videos on YouTube and read the instructions multiple times from the Espar website...

Every single Vanlifer nerd video, and the actual instructions, call for a couple things that don't make a lick of sense to me, and i want to make sure i am not missing something.

The kit includes lots of fuel line, hose, and clamps, and below is a pic of it all installed per the instructions, and per basically every single video i've found

heater1_FORUM.jpg

If you look close you'll see black pieces of hose going in and out of the fuel pump, and then clamped to the supplied blue hose line.

Just at the fuel pump, thats a total of 4 hose clamp connections / possible spots for leaks / failure. Then 2 more where the hose attaches to the heater. Making a total of 5 connections that i simply don't see a point for.

I got this all installed, and it worked fine, but the more i looked at it, the more i cant figure out why in the heck, they just don't use single pieces of hose and eliminate a bunch of connections?

I redid it using high quality 3.5mm fuel line, and eliminated 5 connections:

heater2_FORUM.jpg

Can anyone shed some light on why they might do this and if i am overlooking something? I am kind of confused...

Half of me thinks there is a reason they do it, half of me thinks mechanically there is zero need for it.

Anyone?

Also, both in the instructions, and every video I've watched, they instruct you to assemble the small fuse block they include in the harness with a 5 and 20 amp fuse and connect that to your existing fuse panel.

I'm ok and consider myself "competent enough" with electrical work but my brain also doesn't see the need to add a fuse block going into another fuse block, as look as the fuses match.

Anyone think i am missing anything thing with this thought process?

Half of me thinks its a case of "YouTube Monkey See Monkey Do"

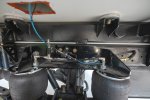
NOTES: Yeah, the kelderman air lines are just Teed off right now, i am re-routing them. Those big aluminum spacers are going to be removed and replaced with 1/4" thick HDPE rounds soon.

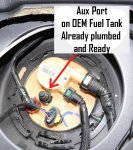
One of the things that make this so easy on this truck (as well as sprinters and promaster) is the OEM aux port. Simply remove that cap, install the quick disconnect hose barb connector and youre good to go. It comes pre-plumbed to 3/4 depth of the tank, so you'll never suck it dry:

heater3.jpg
 
Last edited:

Forum statistics

Threads
188,068
Messages
2,901,829
Members
229,418
Latest member
Sveda
Top