2021 Overland Explorer Vehicles (OEV) CAMP-HBE pop-up flatbed pickup camper (renamed the "Hudson Bay" for 2023 model year)

Ninelitetrip

Well-known member
As always great writeup. Would help if the dealers made some videos also. If you do get a chance to go back I’m curious what the height limit is while standing in the shower. Tray came in heavier than I thought. Tray plus HBE plus all the racks, would like to know the gross weight on this. I like the size of the fridge. Interesting that there is no solar plug in for a portable solar panel.
 

ITTOG

Well-known member
If you go back I would love to see some pictures of how the roof seals to the camper and how they mounted the gas struts. I like that they are not on the outside of the camper and appear to be between the canvas and the seal when closed.
 

Chadx

♫ Off road, again. Just can't wait to get...
Height limit in the shower is 'hit-your-head-but-better-than-nothing' height. Ha. They showed it with shower curtain up in one of their instagram videos but I'll grab measurements. Seems to me it's a few inches under 6' as I think the interior height is still around 6' 10" and the battery box/shower pan is 12" or more. Will add that to the list to measure. [Update: images of shower curtain installed are now on the OEV website]

I don't know if OEV has different versions of the tray or options that influence the dry weight. Original estimates were within 50 - 100lbs of stock pickup beds, including tailgate, which I think run around 400 - 500lb depending on year, length, and stock bed material. I believe the rear has a slide out tray (compartment was locked) and the headache rack may also have the camper steps included in this particular rig. Not sure what is and isn't included in the 708lb dry weight of this particular tray.
 
Last edited:

Chadx

♫ Off road, again. Just can't wait to get...
If you go back I would love to see some pictures of how the roof seals to the camper and how they mounted the gas struts. I like that they are not on the outside of the camper and appear to be between the canvas and the seal when closed.

Since the CAMP-HBE is very similar to the CAMP-X my wife and I bought a year ago, I'll try to explain the entire pop-top operation (and with much more detail than you are asking as there may be others that aren't familiar with pop-ups). The CAMP-HBE roof is the same as the CAMP-X except about 1.5 foot longer, which is why they can fit three windows per softside rather than two of the CAMP-X. The strut attachment points are outside the canvas but inside the roof line and so are not visible/exposed with the roof down. I like this very much. Keeps the bugs, dust/mud/road grime and snow/ice off of them and sleeker exterior. When you open or close the roof, you want a door, window or vent open, as with all popup campers, to allow air flow displacement. Otherwise you are working against suction while raising and pressure when lowering (which can actually be a useful tool if you have the roof loaded up and want it to come down a bit slower; don't crack the window or vent and much and the air pressure will cushion the lowering.

There are four roof buckles. They are adjustable to get just the right amount of tension to keep the thick seal compressed but not smashed. The buckles come with pins, though they are very secure and don't move even without the pins in place. One can replace the pin with a small padlock if desired. On the OEV site, I saw they added a roof assist option for the CAMP-HBE but I'm not familiar with that setup. Most are manual. With the strut assist, it's really quite easy to raise. Once all four buckles are opened, typically the rear is raised first. With open door and/or vent and standing inside the camper, simply push up on the rear of the ceiling. The ceiling is one solid panel so no need to worry about hand placement as we did with our previous aluminum framed camper which had styrofoam inserts so one had to push up in very specific places. As the roof rises, one can also push the large folding roof support. That unfolds until upright then snaps past center to lock into place. Once locked into place, move to the front. I've found that crawling up into the cabover on all fours and pushing up the roof with my back uses the least amount of effort, but when I've been in grimy pants, etc. often push up the roof just standing as far forward as I can. Much more effort since you don't have the leverage of pushing at the very front of the roof, but again, once the folding roof support bracket comes up, you can push that forward as you push up on the roof. Slow and steady is the name of the game. The struts assist, but you are moving a lot of air and the softsides have some resistance as they unfold and straighten so as you get to the nearly fully open position, you can pause and let the fabric loosen up a bit if it's been closed for a while and then proceed to open the rest of the way.

Lowering the roof you start with the front. In the cabover, pull the folding roof support front its locking point past center. You don't need to fully lower the front first, but get it at least 1/2 way down, otherwise, as you lower the rear, the front can spring back to the up position. But it's also fine to lower the front all the way. Then lower the rear. Of note is these campers do not have any type of groove that the roof lowers into to position it. The folding roof supports do a decent job of keeping the roof centered left to right, but you'll find that when you get it lowered, the roof may be sitting an 3/4" of an inch or so too far forward. Simple method to wiggle it into position is to grab and wiggle the rear folding roof support up and down an inch or so. This easily wiggles the roof backwards into position without the time and effort of trying to shove it from the outside. Once the roof is down and in a satisfactory position, close all four buckles. As mentioned, the buckles are adjustable so adjust so the closed tension is a happy medium of compressing the thick seal without smashing it.

On our CAMP-X, I often didn't want to climb up into the cabover to pull the folding bracket when it was time to lower the roof. I ended up attaching a strap to the front folding bracket that was long enough to allow allow me to stand down in the camper and pull the strap to fold the front roof support bracket without climbing up into the cabover. Once the front has collapsed about 1/2 way, I can continue to hold tension on the strap and grab the rear folding roof support bracket and fold it to lower the rear of the roof. Holding tension on the strap to the front keeps the front from popping back up as the rear lowers and also has the effect of the front and rear of the roof come down at the same time centering it fairly well front to back and requiring less of the wiggle adjustment. While that sounds like I'm complicating it, it took me much longer to type that than execute a roof closure...and I'm a fast typer! Ha.

I'll get some better images of the struts when I stop up next. In the meantime, there are some images of my CAMP-X in that thread (post #6). https://expeditionportal.com/forum/...p-slide-in-pickup-camper.214329/#post-2766747
 

Ninelitetrip

Well-known member
Height limit in the shower is 'hit-your-head-but-better-than-nothing' height. Ha. They showed it in one of their instagram videos (putting up the curtain, etc.) but I'll grab measurements. Seems to me it's a few inches under 6' as I think the interior height is still around 6' 10" and the battery box/shower pan is 12" or more. Will add that to the list to measure.

I don't know if OEV has different versions of the tray or options that influence the dry weight. Original estimates were within 50 - 100lbs of stock pickup beds, including tailgate, which I think run around 400 - 500lb depending on year, length, and stock bed material. I believe the rear has a slide out tray (compartment was locked) and the headache rack may also have the camper steps included in this particular rig. Not sure what is and isn't included in the 708lb dry weight of this particular tray.

Yup that battery box makes taking a shower interesting if over say 5’10”. Checked the website. 660 lbs. standard weight for the tray. Stairs are an option, so maybe some of that extra 48 lbs. HBE is 1550 lbs. dry standard no options. No listed weights for the molle racks, rear ladder, or tire carrier. All in very managble weights I think.
 

ITTOG

Well-known member
Since the CAMP-HBE is very similar to the CAMP-X my wife and I bought a year ago, I'll try to explain the entire pop-top operation (and with much more detail than you are asking as there may be others that aren't familiar with pop-ups). The CAMP-HBE roof is the same as the CAMP-X except about 1.5 foot longer, which is why they can fit three windows per softside rather than two of the CAMP-X. The strut attachment points are outside the canvas but inside the roof line and so are not visible/exposed with the roof down. I like this very much. Keeps the bugs, dust/mud/road grime and snow/ice off of them and sleeker exterior. When you open or close the roof, you want a door, window or vent open, as with all popup campers, to allow air flow displacement. Otherwise you are working against suction while raising and pressure when lowering (which can actually be a useful tool if you have the roof loaded up and want it to come down a bit slower; don't crack the window or vent and much and the air pressure will cushion the lowering.

There are four roof buckles. They are adjustable to get just the right amount of tension to keep the thick seal compressed but not smashed. The buckles come with pins, though they are very secure and don't move even without the pins in place. One can replace the pin with a small padlock if desired. On the OEV site, I saw they added a roof assist option for the CAMP-HBE but I'm not familiar with that setup. Most are manual. With the strut assist, it's really quite easy to raise. Once all four buckles are opened, typically the rear is raised first. With open door and/or vent and standing inside the camper, simply push up on the rear of the ceiling. The ceiling is one solid panel so no need to worry about hand placement as we did with our previous aluminum framed camper which had styrofoam inserts so one had to push up in very specific places. As the roof rises, one can also push the large folding roof support. That unfolds until upright then snaps past center to lock into place. Once locked into place, move to the front. I've found that crawling up into the cabover on all fours and pushing up the roof with my back uses the least amount of effort, but when I've been in grimy pants, etc. often push up the roof just standing as far forward as I can. Much more effort since you don't have the leverage of pushing at the very front of the roof, but again, once the folding roof support bracket comes up, you can push that forward as you push up on the roof. Slow and steady is the name of the game. The struts assist, but you are moving a lot of air and the softsides have some resistance as they unfold and straighten so as you get to the nearly fully open position, you can pause and let the fabric loosen up a bit if it's been closed for a while and then proceed to open the rest of the way.

Lowering the roof you start with the front. In the cabover, pull the folding roof support front its locking point past center. You don't need to fully lower the front first, but get it at least 1/2 way down, otherwise, as you lower the rear, the front can spring back to the up position. But it's also fine to lower the front all the way. Then lower the rear. Of note is these campers do not have any type of groove that the roof lowers into to position it. The folding roof supports do a decent job of keeping the roof centered left to right, but you'll find that when you get it lowered, the roof may be sitting an 3/4" of an inch or so too far forward. Simple method to wiggle it into position is to grab and wiggle the rear folding roof support up and down an inch or so. This easily wiggles the roof backwards into position without the time and effort of trying to shove it from the outside. Once the roof is down and in a satisfactory position, close all four buckles. As mentioned, the buckles are adjustable so adjust so the closed tension is a happy medium of compressing the thick seal without smashing it.

On our CAMP-X, I often didn't want to climb up into the cabover to pull the folding bracket when it was time to lower the roof. I ended up attaching a strap to the front folding bracket that was long enough to allow allow me to stand down in the camper and pull the strap to fold the front roof support bracket without climbing up into the cabover. Once the front has collapsed about 1/2 way, I can continue to hold tension on the strap and grab the rear folding roof support bracket and fold it to lower the rear of the roof. Holding tension on the strap to the front keeps the front from popping back up as the rear lowers and also has the effect of the front and rear of the roof come down at the same time centering it fairly well front to back and requiring less of the wiggle adjustment. While that sounds like I'm complicating it, it took me much longer to type that than execute a roof closure...and I'm a fast typer! Ha.

I'll get some better images of the struts when I stop up next. In the meantime, there are some images of my CAMP-X in that thread (post #6). https://expeditionportal.com/forum/...p-slide-in-pickup-camper.214329/#post-2766747
Thanks for all the details. Greatly appreciated.

I look forward to receiving the pictures.
 

Chadx

♫ Off road, again. Just can't wait to get...
I'll get a headroom measurement on the shower.

Yep, at 1,550 dry, the CAMP-HBE is really geared towards a Heavy Duty pickup (2500 and 3500 series). Fullsize pickups (1500 series) are just not going to be a great fit even with airbags or re-sprung. And braking and handling are just as important as supporting that weight.

Figure 38 gallons of freshwater is 315lbs, 20lbs of propane itself (the weight of the tank itself is included in dry weight, but not the propane), at least 50 - 100 lbs for batteries, plus at least an extra 100 lbs for tray over bed (and up to 200lbs more). So one is realistically looking at 2,035lbs - 2,185 lb for the increase in tray weight, camper, water, propane, battery and we haven't even started to load it yet. Now add in any camper accessories (like cassette toilet, king pull out, light bars, roof rack, spare tire carrier, ladder, molle rack, etc.), Reico jacks (100lbs) if you ever run with those, any tools/recovery gear, all your groceries, pots/pans, clothing, chairs, other camping equipment, weight of driver and yes the driver and any passengers and you quickly add another 1,000 lbs (at least). Definitely in HD territory as no fullsize truck, even with extensive spring work, would be appropriate for 3,000+ lb payload. Yes, Ford makes one specific fullsize that is rated to 3,000 payload (some unicorn type truck that I think is a longbed, single cab, two wheel drive and an unlikely layout for someone looking at a flatbed camper). Now add tongue weight (bicycle/motorcycle rack, boat/trailer tongue weight, etc.) or anything you put on the roof (ski box, kayaks, etc.) on top of that 3,000lbs.

For comparison, the lighter CAMP-X is about 1,200 dry with smaller 10gallon water tank and I consider a fullsize pickup borderline but workable with suspension updates.
In my opinion (and mathematically), the CAMP-HBE requires an HD pickup.
 
Last edited:

Trail Talk

Well-known member
Thanks for this detailed review. Beautiful work from Lite Industries! We originally went to them for an HBE and just got sidetracked by the Summit :rolleyes:
 
I'll get a headroom measurement on the shower.

Yep, at 1,550 dry, the CAMP-HBE is really geared towards a Heavy Duty pickup. Fullsize pickups are just not going to be a great fit even with airbags or re-sprung. And braking and handling are just as important as supporting that weight.

Figure 38 gallons of freshwater is 315lbs, 20lbs of propane itself (the weight of the tank itself is included in dry weight, but not the propane), at least 50 - 100 lbs for batteries, plus at least an extra 100 lbs for tray over bed (and up to 200lbs more). So one is realistically looking at 2,035lbs - 2,185 lb for the increase in tray weight, camper, water, propane, battery and we haven't even started to load it yet. Now add in any camper accessories (like cassette toilet, king pull out, light bars, roof rack, spare tire carrier, ladder, molle rack, etc.), Reico jacks (100lbs) if you ever run with those, any tools/recovery gear, all your groceries, pots/pans, clothing, chairs, other camping equipment, weight of driver and yes the driver and any passengers and you quickly add another 1,000 lbs (at least). Definitely in HD territory as no fullsize truck, even with extensive spring work, would be appropriate for 3,000+ lb payload. Yes, Ford makes one specific fullsize that is rated to 3,000 payload (some unicorn type truck that I think is a longbed, single cab, two wheel drive and an unlikely layout for someone looking at a flatbed camper). Now add tongue weight (bicycle/motorcycle rack, boat/trailer tongue weight, etc.) or anything you put on the roof (ski box, kayaks, etc.) on top of that 3,000lbs.

For comparison, the lighter CAMP-X is about 1,200 dry with smaller 10gallon water tank and I consider a fullsize pickup borderline but workable with suspension updates.
In my opinion (and mathematically), the CAMP-HBE requires an HD pickup.

After doing this whole "car camping" - I mean "overlanding" - thing for *decades*, I consider a ¾-ton truck to be the absolute minimum for safely hauling a camper, people, and gear. I prefer a 1-ton. To the people who think their ½ ton, or *forbid their Tacoma, is safely hauling their load, I strongly recommend weighing your full setup, wet, and considering what you're going to say when you get in an accident and are found to be over GVWR.
 

Chadx

♫ Off road, again. Just can't wait to get...
Made another run up to get some measurements and pics that were requested.

Door:
Screen door is 22.5" by 45.5"
Door opening itself is 22.75" by 45.5" inner lip to inner lip.


Height from ceiling down to the shower pan 63" (5' 3").

20210519_170038.jpg


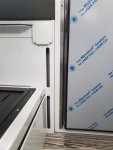
In my first postings, I forgot to mention the viewing slots for the 38 gallon freshwater tank. I think they include a switched LED to backlight the water tank making the level easy to see.

20210519_170222.jpg


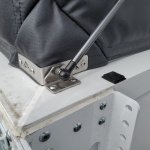
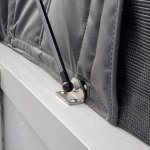
Images of gas strut attachment points and up into roof showing the roof seal and that recess.

20210519_171310.jpg


20210519_171322.jpg


20210519_171329.jpg


20210519_171346.jpg
 
Last edited:

Ninelitetrip

Well-known member
Height from ceiling down to the shower pan 63" (5' 3").


Thanks for checking. That’s awfully short. Make it tough to be useful.
 

Chadx

♫ Off road, again. Just can't wait to get...
A point of interest to some, that my wife brought it up when she joined me on this second trip to see the CAMP-HBE, is that the overall internal height when popped up is shorter than our CAMP-X. I went back and looked at the specs and the HBE is 77" (6' 5") inside where the CAMP-X is 82" (6' 10"). That may be a consideration for some. Makes sense because the CAMP-HBE sits up on a flatbed that is higher than the bed of a standard pickup bed in order to give clearance to the top of the wheel well. This give 5 less inches of interior headroom which, along with the battery box height, is a factor in the shower headroom.
 

Ninelitetrip

Well-known member
A point of interest to some, that my wife brought it up when she joined me on this second trip to see the CAMP-HBE, is that the overall internal height when popped up is shorter than our CAMP-X. I went back and looked at the specs and the HBE is 77" (6' 5") inside where the CAMP-X is 82" (6' 10"). That may be a consideration for some. Makes sense because the CAMP-HBE sits up on a flatbed that is higher than the bed of a standard pickup bed in order to give clearance to the top of the wheel well. This give 5 less inches of interior headroom which, along with the battery box height, is a factor in the shower headroom.

Going with lithium batteries can you think of a better place for them that would move them from under the shower?
 

Chadx

♫ Off road, again. Just can't wait to get...
I assume your are noodling design ideas to lower the showerpan. :)

The compartment, that is accessible from the outside and is under the passenger side dinette seat, is huge and would be a possibility. Would have to think through the wiring though which need to would run from the drivers side, under dinnette seat over to that compartment. I think that compartment door is almost as this, if not as thick, as the main wall and is considered inside the heated envelope. Pro would be the inverter would be right by the battery. Con would be the battery would be further away from the REDARC, which serves as both the solar controller and DC charger, and batteries are typically best located close to that. Larger diameter cabling can help counter that. Cabling would still pass under the showerpan.

Other two battery relocate possibilities might be the bottom cabinet space under the galley (would be tight and put the batteries in the same compartment as propane hoses/connections) or, if no toilet is optioned/needed, there would be space for batteries in the toilet cabinet. Both of those locations come with even more cabling challenges.
 

Forum statistics

Threads
188,341
Messages
2,905,775
Members
229,959
Latest member
bdpkauai
Top